AirDrop makes it easy to transfer between your iPhone, iPad, and Mac devices, but this tech has some connectivity issues. We began to encounter the AirDrop not working error on macOS Big Sur and iOS 14; this was when we started to dig and came up with dozens of solutions that work. This guide is for you if you face the AirDrop not working error on your iPhone, iPad, or macOS.
Apple fans love AirDrop, and there is no denying it unless it fails, and in the middle of nowhere, you are unable to share files. We experience this commonly when wanting to share files between iPhone/iPad to Mac and vice versa. In some situations, you can share files between other Apple devices, but AirDrop fails only for specific iPhone, iPad, or Mac devices.
Also read: Best MacBook Pro and Air Accessories.
Fix AirDrop Not Working on iPhone, iPad, & Mac
AirDrop is a handy file transferring feature on Apple devices that use no internet but work magically fast. We are so used to it that we cannot imagine quick file transferring on iPhone or Mac without the AirDrop feature.
But what if AirDrop is not working while you want to transfer files quickly during work? That could be trouble. But hey, we can fix AirDrop not working error on iPhone and Mac. Here are some quick fixes –
How to Fix AirDrop not Working on iPhone to iPad or Mac
Most of the users face problems when they are unable to transfer files from iPhone to Mac using AirDrop. This can be stressful when trying a quick file transfer in the middle of work or something important.
If you are facing AirDrop not showing on iPhone and iPad, not receiving files on AirDrop, or any other problems related to AirDrop on iPhone or iPad, here are some fixes that will help you fix AirDrop not Working on the iPhone to Mac issue.
1. Check if AirDrop is Turned Off.
On iPhone and iPad, when you enable the WiFi option, AirDrop is turned on by default. In some cases, there is a good chance that you have accidentally turned off the AirDrop feature.
If you are running iOS 11 and below on your iPhone, you will have to turn on the AirDrop feature manually. However, AirDrop is turned on by default on devices running iOS 11 and above.
If the AirDrop is turned off, you won’t be able to see the AirDrop when sharing files from your iPhone to Mac or iPad.
To turn on AirDrop on your iPhone,
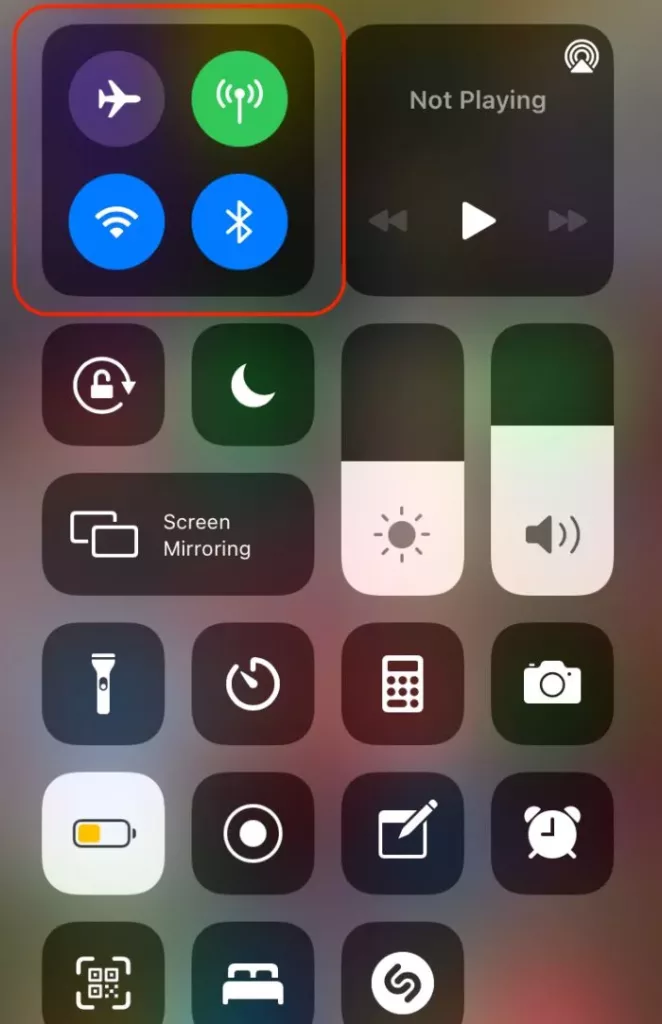
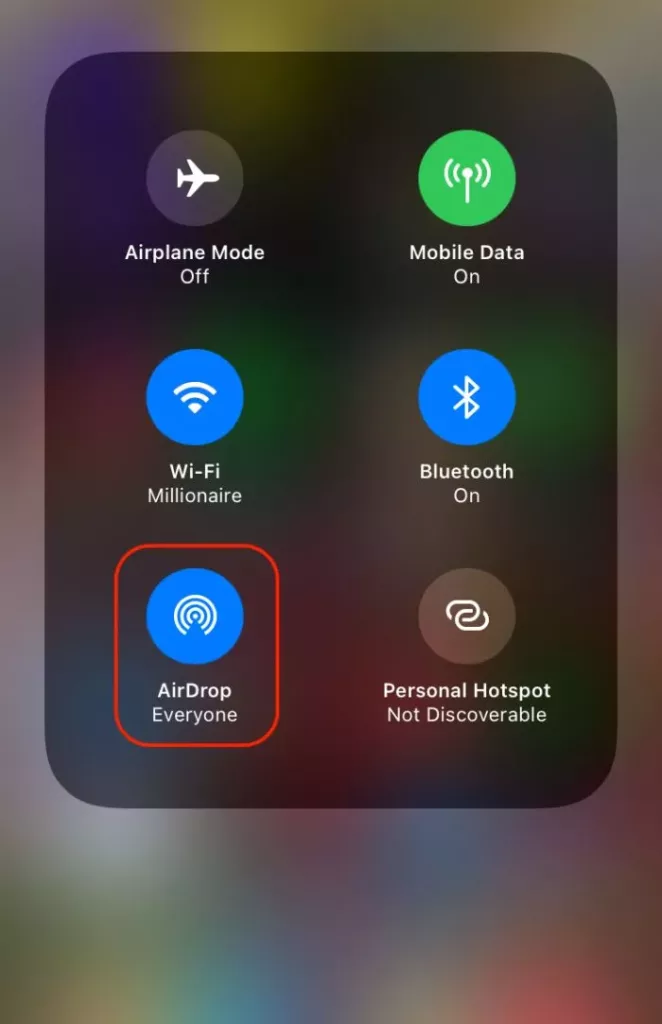
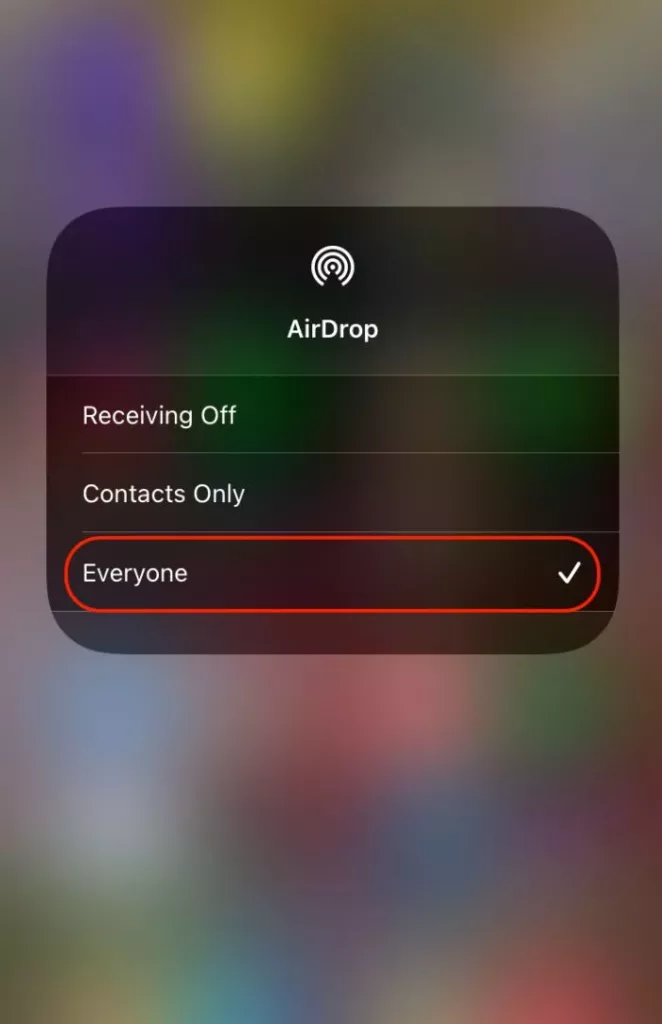
- Open the control center and then tap on network brick. Here, you can find options like Airplane mode, Bluetooth, Personal Hotspot, AirDrop and more.
- Ensure WiFi is turned on and connected to the same network as that of the other device such as a Mac.
- Now, click on the “AirDrop” icon and ensure it is turned blue.
Alternatively, you can also use the settings menu to turn on AirDrop on your iPhone or iPad device –
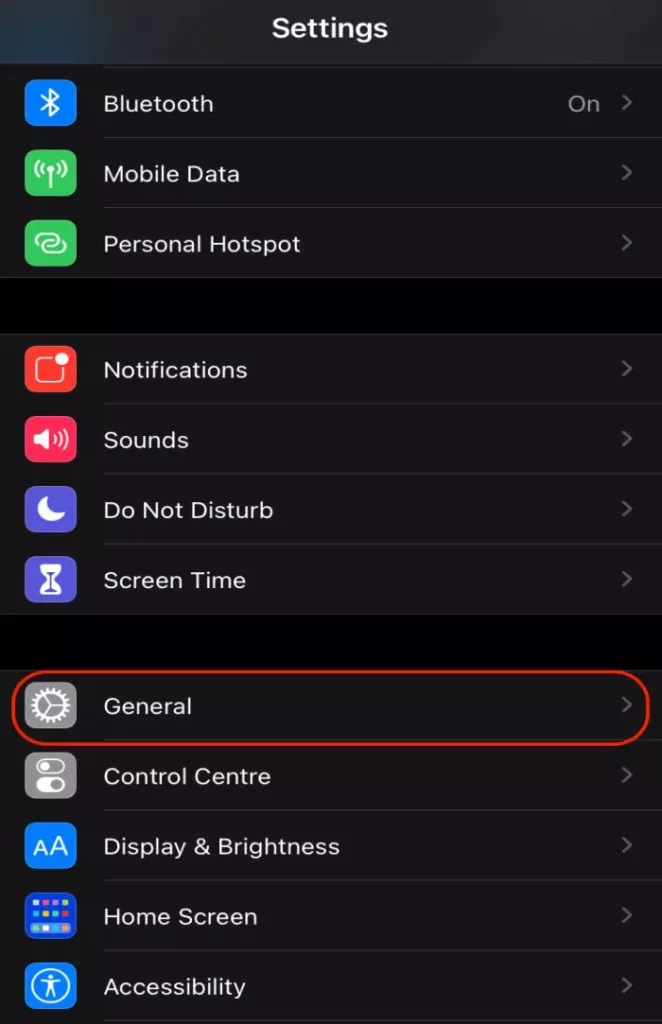
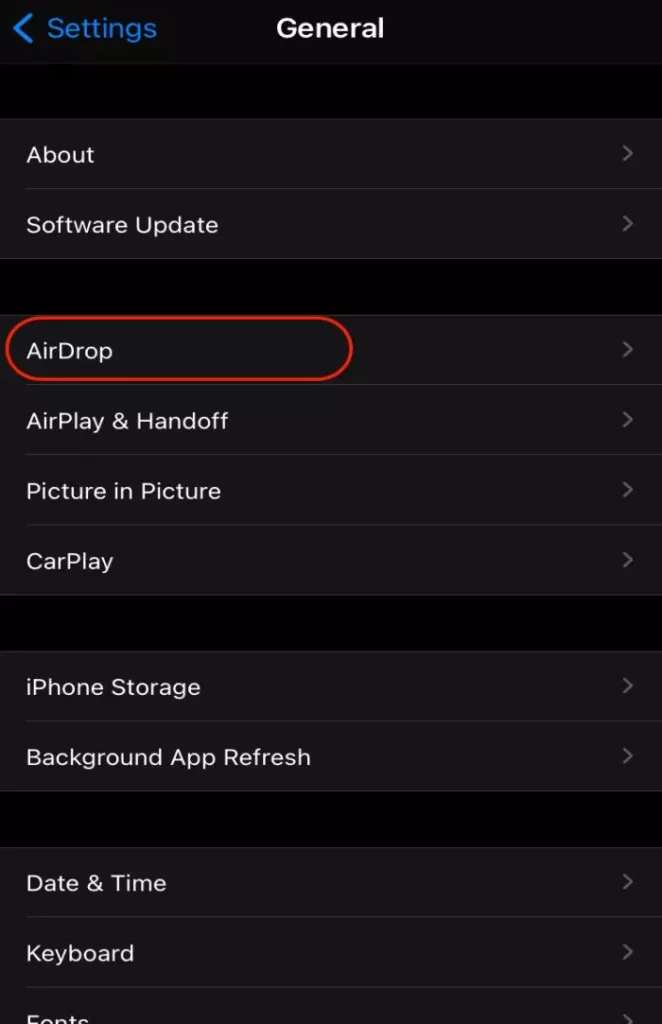
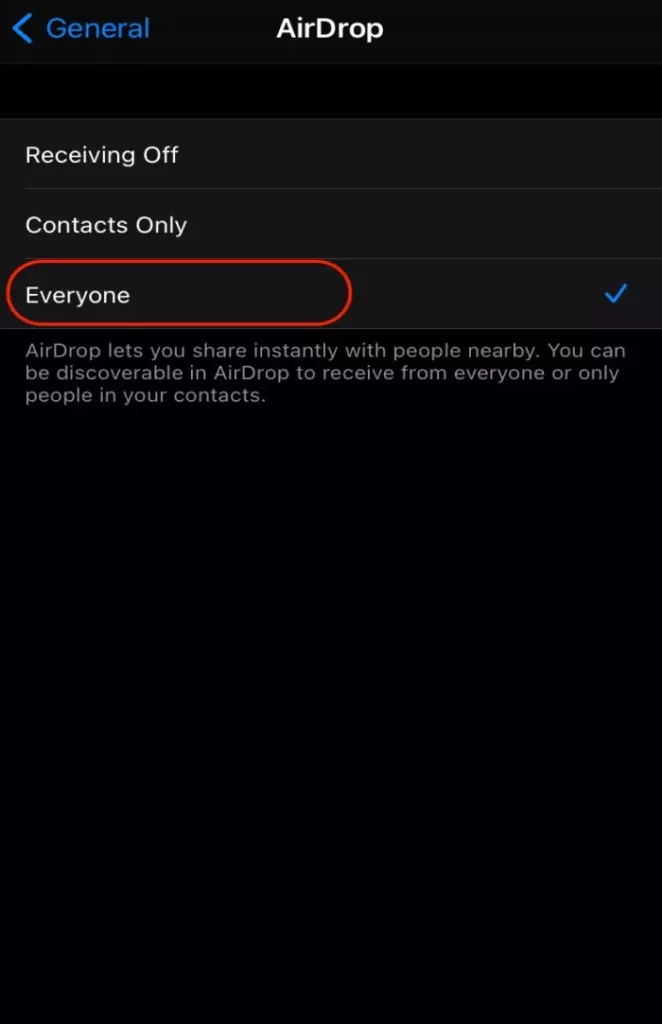
- Open the settings menu and then navigate to the “General” option.
- From the list of General Menu, click on the “AirDrop” option.
- Select if you wish to share with Contacts only or Everyone.
You can choose who can send you files over AirDrop; If you enable AirDrop only for contacts, people whose contact information is saved on your iPhone will only be able to send you files over AirDrop. However, Enabling AirDrop for everyone will allow anyone using an Apple iPhone, iPad, or Mac nearby to send you files over AirDrop.
Also read: Best Notes Apps for iPad and iPhone.
2. Restart your iPhone.
The simplest thing to do when AirDrop fails or when you are unable to send files from iPhone to Mac using AirDrop is to restart it. Sometimes, the feature does not work the way it is intended due to bugs. A simple restart should fix your AirDrop problem.
Besides, this is the workable solution that we have been using forever when AirDrop fails. Be it your iPhone, iPad, or Mac system, restarting the device should help you fix the problem.
To restart your iPhone 6, 7, 8, and SE series with a home button, Long press volume down button + Home button + Power button. It is that simple to restart your iPhone devices.
To restart your iPhone X and above series without a home button, long-press the volume up and down button + Power button.
Also read: Can Private Browsing be Traced on iPhone – A Brutal Truth
3. Update the Software.
When certain software features fail, it is mostly because developers fix the known and unknown bugs in the coming releases.
This is one of the reasons why you need to keep your devices updated with the latest stable software. In these latest releases, Developers fix the known issues and update the security patches.
However, if you are an Apple beta tester running beta testing apps, you will likely encounter more errors. In this case, we suggest you roll back to a stable iOS release and check if the AIrDrop is still failing or unable to send or save files over AirDrop.
To update the iOS software to the latest release –
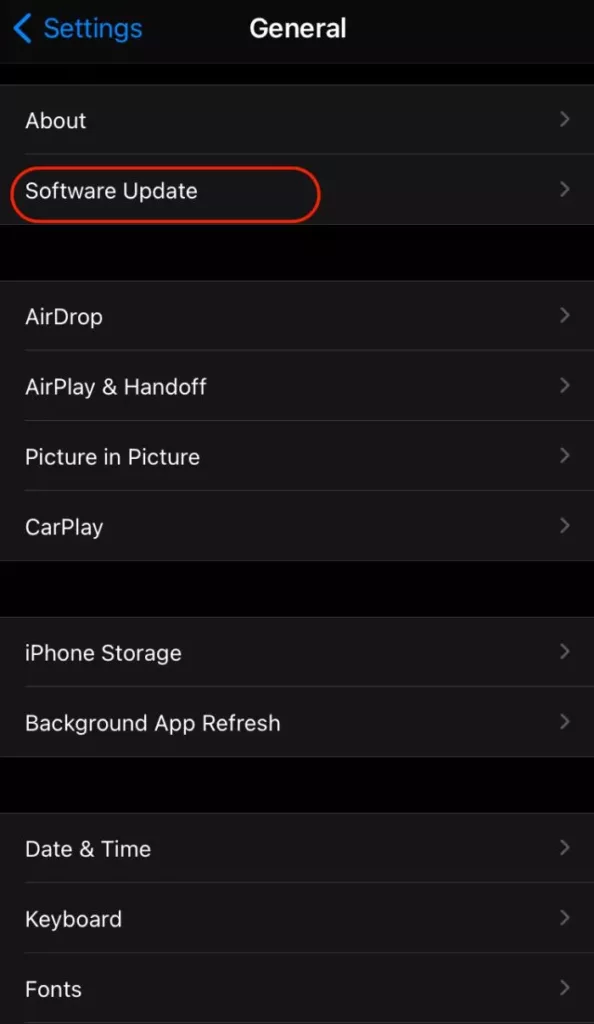
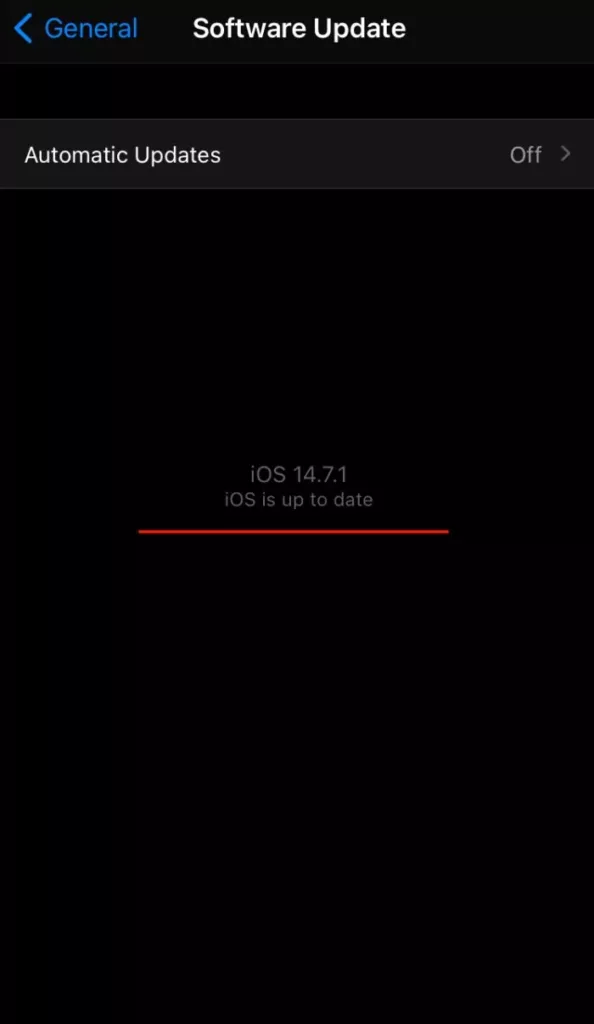
- Open the Settings app on your iPhone or iPad.
- Now, Click on the “General” menu and then tap on “Software Update” option.
- Your iPhone or iPad will now check for the latest iOS or iPadOS release.
- If a new release is available and there is enough space on your device, you can download and install the latest update.
Now that you have updated the device software check, you can send files from your iPhone to Mac or iPad and vice versa. If the problem persists, the best you can do is wait until a new update to fix the AirDrop failing issue.
How to Fix AirDrop not Working on Mac
Mac devices are the most common to encounter the AirDrop failing or unable to send files over AirDrop. We have commonly experienced not finding the other device in AirDrop, such as an iPhone or another Mac system nearby, to send files if you face similar problems with AirDrop and are unable to save files or find them.
Here are some solutions to make AirDrop work like before –
1. Ensure AirDrop is turned on.
When connected to WiFi, the AirDrop feature is automatically turned on macOS Big Sur and above. However, most of the time, AirDrop is turned off on the Mac accidentally, or possibly you forgot to switch it back; there are two ways you can use to turn on AirDrop on macOS Big Sur and above.
To turn on AirDrop on your mac –
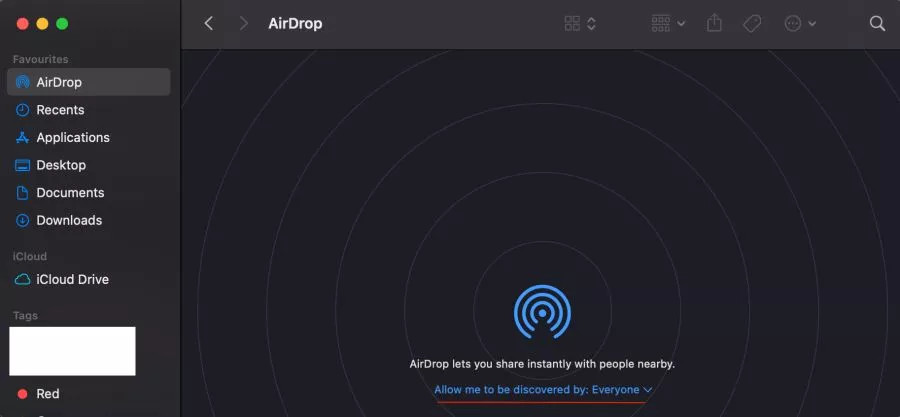
- Click on the Finder window.
- From the left pane/sidebar, you can find the “AirDrop” option in the favourites section.
- Now, you can find the AirDrop status; “Allow me to be discovered by” notification at the bottom center.
- Here, you can select if you wish to share the AirDrop connection with everyone or only with the contacts.
Alternatively, you can also turn on AirDrop using the control center –
- Click on the Control Center from the right-side of the notification bar.
- Now, click on the AirDrop option and turn on the AirDrop option.
- Select whom you wish to share the files with on AirDrop, you can either select Everyone or only with the contacts.
Also read: How to Block a Website on Mac | Content, and Privacy
2. Restart your Mac.
The most common solution that works for us on our Mac is restarting it. If you have trouble sending files over AirDrop, you can restart your Mac and check if the problem persists. Most of the time, these solutions intend to work and fix the AirDrop issue.
In our case, One of the reasons why AirDrop fails on Mac is when you keep your device in sleep mode or keep the lid closed without turning it off for a long time.
A restart on your Mac should fix the AirDrop not working issue –
- Click on the Apple icon from the left top notification bar.
- Tap on the Restart option from the menu.
- Your mac should be restarted in a few seconds.
3. Run a Software Update.
It is common to have bugs that may wreck one or the other favorite features of yours on any software-based device. The best option is always to keep your mac device updated to the latest software release.

Apple developers fix common errors such as AirDrop failing, iPhone Camera Freezes, and more in these releases.
To update your mac software –
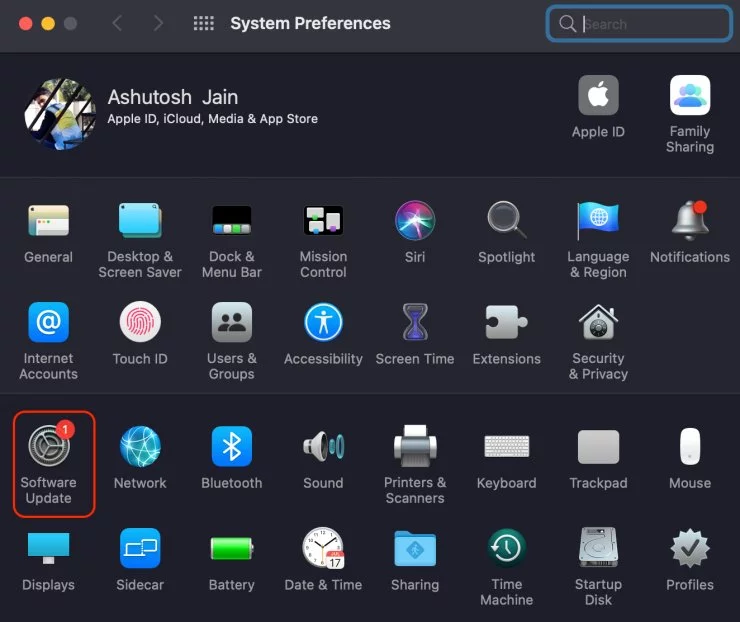
- Click on the Apple icon from the top left notification bar.
- Now, click on the “System Preferences” option.
- Select “Software Update” from the grid menu.
- Now, your Mac will check for latest updates. If you have enough space and a new version is available, it should be easy for you to download and install it.
Also read: Does Walmart Take Apple Pay?
Where are AirDrop Files Saved?

AirDrop is so fast that sometimes the files are sent, and you won’t even realize it. But where are these files saved on your iPhone or Mac systems? Don’t worry; you are not the only one facing this issue.
On Mac systems, the AirDrop files are directly saved in the Downloads folder. So, if you have sent files from iPhone, iPad, or another Mac system, Download is the folder where you have to look for the file.
To make the finding process easier, you can arrange the items based on file type and look for the file. So, if you have sent a PDF file or an image file, you can easily find it in the sorted downloads folder.
On iOS devices, users can find image-based files directly stored to photos and other files store in files. If the file type is a document or other than an image, you will get an option to choose a location to save it.
Also read: How to Fix AirPods Not Connecting or Working.
Why AirDrop is Not Working on iPhone, iPad, or Mac?
Ever wondered why AirDrop fails? What must be the reason? We know your head is piled up with questions, and here are some of the reasons why AirDrop fails.
1. The Device is Not Unlocked.
It is common to face AirDrop failing when the device you are trying to transfer the files to is not unlocked. For AirDrop to work, users must unlock their devices. Be it transferring files from iPhone or iPad to Mac or vice versa, ensure the devices are not asleep and ready to accept the files via AirDrop.
2. Understanding WiFi Connections.
AirDrop works on a WiFi connection, and the basic requirement is both the devices are connected to the same WiFi network. This means, both the sender and receiver device should be connected to the same WiFi network for AirDrop to work.
But also note: It is okay if you do not have an internet connection over WiFi; AirDrop only uses the WiFi aerial connection and does not require internet.
If you share WiFi (Personal Hotspot) from iPhone to iPad or Mac device and then send files over AirDrop, it will fail. This is because AirDrop demands the WiFi to be enabled on both devices. So, when you turn on the personal hotspot, WiFi is disconnected.
If there is no WiFi connection available, you can connect both the devices to the third iPhone and then share files using AirDrop. This may sound not very easy, but they are, and here are the steps –
- Enable the personal hotspot on a third iPhone.
- Connect your sender device: iPhone, iPad, or Mac device to this iPhone over WiFi.
- Connect your receiver device to the same iPhone network over WiFi.
- Now totally, two devices are connected to the personal hotspot.
- You can now share the files between sender and receiver device using AirDrop.
Also read: How to Fix Message Blocking is Active? What Does it Mean?
3. Check for Bluetooth Devices.
For AirDrop to work, Bluetooth must be turned on. Be it iPhone, iPad, or Mac, when you are sending a file over AirDrop, if the Bluetooth is turned off, your device won’t be able to detect the other device. Though you are connected to the same network, keeping the Bluetooth toggled on is also important.
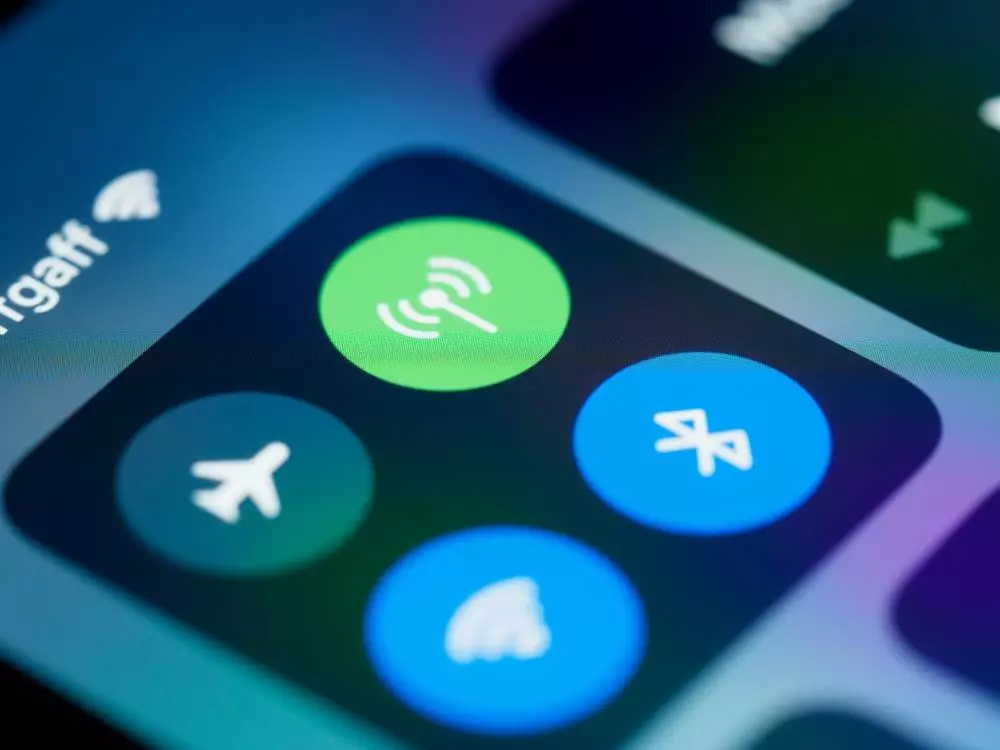
To turn on Bluetooth on iPhone and iPad –
- Open the Settings menu on your iPhone or iPad.
- Now, Click on “Bluetooth” and toggle it on. You should now see it as “Discoverable” with list of nearby and past devices.
- You can also toggle the Bluetooth using the control center; Swipe up the control center and then click on Bluetooth.
To turn on Bluetooth on Mac Devices –
- Open the System Preferences (Settings) application from the App drawer.
- Now, from the bottom section, click on Bluetooth and turn it on.
- You can also toggle Bluetooth using the control center on macOS Big Sur and above. Click on the control center and enable “Bluetooth” option.
Additionally, check if any other device such as a Bluetooth TWS earphone is connected to your device and interferes with AirDrop. In this situation, you can disconnect the device and check if the AirDrop works perfectly.
Also read: 7 Best Third-Party App Store Alternatives To Try.
4. File is too Big.
There is no limit on what size of files you can transfer on your AirDrop connection, but there is a little twist. When the file size is big, the time involved in preparing the file is a bit long. So, you might think the AirDrop feature is not working or fails; however, it is only taking some time to prepare the file.
Once the file is prepared, it will also take time to transfer from an iPhone, iPad, or Mac to the receiving device. Though sharing files over AirDrop is fast like magic, some files like 4K 1080P long videos or high-quality images in bulk will often take time.
One of the things you can do in this situation is sending files in chunks or individually. This will make the sharing process a little faster. All you can do is wait until the entire process completes for assembled videos, such as those in 4K 1080P and huge in size. Don’t worry; AirDrop is not broken.
5. Device is Far Away.
For AirDrop to work, the devices must be in close proximity. If the devices are far away from the range of the AirDrop of the second device, it won’t be able to detect.
Keep your devices in close proximity for AirDrop to detect and share files easily and fast. Besides, ensure the device is unlocked and ready to accept files sent through AirDrop from other devices.
Also read: How to Create Memoji and Save it on iPhone [Simple Guide]
6. Not in Contacts.
AirDrop feature can be used in three modes: Receiving off, Contacts Only, and Everyone.
If the device sharing the files has been configured to use AirDrop only with the saved contacts, it is likely it won’t detect your device. To fix this, you can ask the person sending the file to either change the preferences of AirDrop to “Everyone” or save your contact information.
Once the contact is saved, or the AirDrop preferences are set to “Everyone,” you will be able to send or receive files on AirDrop from iPhone to Mac and other devices.
Additionally, it is wise to sign in to your iCloud account as it helps link contacts, and it becomes easy to share files over AirDrop contacts.
7. File is not Supported.
AirDrop allows you to send a dozen file types such as images, videos, contacts, wallet passes, and even Apps. But hey, that does not mean you can send anything over AirDrop.
There are only a limited set of file types for transferring files over AirDrop.
For instance, you can share music over AirDrop to other devices, maybe to your friends or siblings, but what exactly happens? When you share music, the entire music track is not sent over AirDrop; instead, only a link to download the music is sent.
So, it differs on what you can file you can send and how it is received on the other device.
List of Devices that are Compatible with AirDrop.
If you are wondering AirDrop feature is compatible with all Apple devices, you’re mistaken. Not all iPhone models and Mac devices support AirDrop; here is the list of compatible devices –
AirDrop between Mac and iPhone or iPad
- Mac from 2012 or later (excluding the mid-2012 Mac Pro) using OS X Yosemite or later
- iPhone, iPad, or iPod touch using iOS 7 or later
AirDrop between two Macs
- 2008 MacBook Pro and onwards (excluding the 2008 17-inch MacBook Pro)
- 2010 MacBook Air and onwards
- 2008 MacBook and onwards (excluding the white 2008 MacBook)
- 2009 iMac and onwards
- 2010 Mac mini and onwards
- 2009 Mac Pro and onwards (as long at it has an AirPort Extreme card)
- iMac Pro (any model)
Most of the Macs after 2012 support AirDrop between iPhone and iPad; however, Mac Pro 2012 excludes the list. So, if you have this older Mac, you might want to have an alternative for AirDrop. Mac systems supporting Mac OS X Yosemite or later and iOS devices above iOS 8 should support AirDrop seamlessly without any problem.
Also read: 7 Best File Manager Apps to Manage Files on iPhone & iPad.
Common Questions
There are several reasons why AirDrop might not work on your Mac devices; Check if you have Bluetooth connected and all the AirDrop devices are under the same network. In addition, if you are trying to send a big file, it will take some time for AirDrop to prepare it and send it.
To make your Mac Discoverable for file sharing on AirDrop, Go to Finder and click on AirDrop. Now, check the AirDrop status and set it to Everyone or Contacts as per your requirements. This way, you can make your Mac discoverable on AirDrop.
Yes, you have to be on the same WiFi network for AirDrop. Additionally, AirDrop will not work if you use a personal hotspot on your iPhone to share files.
You have to be at least in 30 feet of proximity for AirDrop to work seamlessly. If you are away more than 30 feet, you won’t be able to find nearby AirDrop devices such as iPhone, iPad, and Mac.
You don’t need internet to AirDrop files, but you should be connected to a WiFi network the same as that of the other devices.
You may also like to read,
- How to Download & Install GBA4IOS on any IOS Device – A Walkthrough Guide
- AMOLED vs. OLED | What is the Difference and Which is the Best?
- How to Block Website on iPhone and iPad – Content Restriction on IOS
Conclusion
It is that simple to fix AirDrop not working on your iPhone, iPad, or Mac devices. Both the devices must be connected to the same WiFi network; however, it is not important to have an active internet connection. If you are using a personal hotspot as a WiFi connection to your Mac, you won’t be able to use AirDrop. Ensure the Bluetooth is active and your AirDrop connection is discoverable to everyone (the best option) or the contacts.
If you are still having troubles sending files over AirDrops or AirDrop fails continuously, you can let us know in the comment section.


