

Internet is useful but at times, you might want a break from the connected world or limit yourself from accessing the unsafe trap of the web. In this guide, we will learn how to block a website on iPhone and iPad and limit the internet to a safer world. If you are a parent and want to limit your child from accessing the obscure parts of the web, you might want to read our additional guide on parental control apps below.
Also read: Parental Control Apps And Social Media Detox
How to block a website on iPhone and iPad
Before heading to the guide on how to block a website on iPhone and iPad, we need to enable screen time. Additionally, you might want to write down the websites you want to whitelist and allow access from the safari browser.
Also read: How to Change the Default Browser on a Mac [2 Methods]
How to Enable Screen Time
To block a website on iPhone and iPad, the first step is to enable screen time on your Apple device.
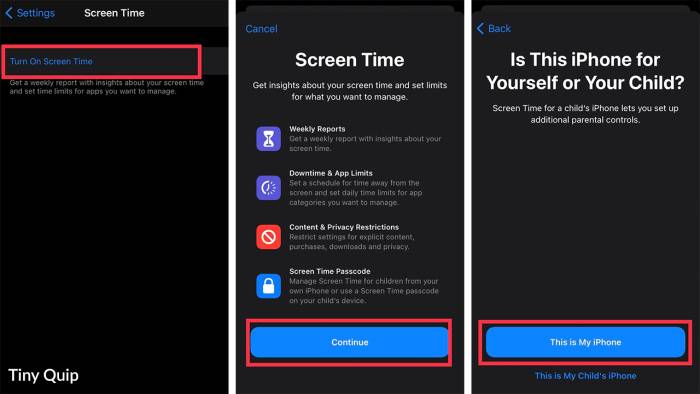
Below are the steps to enable screen time on IOS 13.0 and above –
- Open settings application on your iPhone or iPad.
- Navigate to Screen Time
- Select “Turn on screen time”
- In the next window, click “Continue” and
- The final step is to select if this is your iPhone or your child’s iPhone.
The screen time settings will be shown according to the option you have chosen. If this is your iPhone, you are going to have full control over the usage limits and screen monitoring. Moreover, if this is your child’s iPhone, all the settings are controllable from the parent device.
The best part about screen time is the parental control settings without having to install third-party apps. Additionally, you can manage all the settings through the iCloud account and enable or disable features on your child’s iPhone or iPad.
Limit Websites on iPhone and iPad
Once you have enabled screen time on your iPhone and iPad; you can limit certain websites and also allow only selected/specific websites. This allows you to use the internet without having it completely isolated from the web.
The best practice is to note down the websites you want to block or whitelist. This will help you in separating useful and obscene websites.
As I have mentioned earlier, you can whitelist a few useful websites that are always accessible. These can be reference materials, online course portals, college websites, and a few more. In such a way, content restrictions won’t affect such websites.
- Open screen time on your iPhone or iPad device.
- Scroll down and select the “Content and privacy restrictions” section.
- Click on enable content restrictions and select the “Content Restrictions” tab.
- Scroll down and select “Web Content” and select “Limit Websites“.
Now, you get options to “allow” and “never allow websites” of your choice. Add the websites of your choice that you always want to allow, despite the content restrictions. Similarly, you can “never allow websites” that won’t be allowed on your device. You can website on iPhone and iPad in this way.
Only Allow Selected Websites
This is the most extreme way to block websites on your iPhone and iPad devices. Here, you can whitelist selected websites and only these websites can be used on your safari browser. No other websites other than these will load on your IOS device.
- Open screen time on your iPhone or iPad device.
- Scroll down and select the “Content and privacy restrictions” section.
- Click on enable content restrictions and select the “Content Restrictions” tab.
- Scroll down and select “Web Content” and select “Allowed Websites Only“.
Here, you can find educational websites already whitelisted and you can add more websites to the list. Most of the whitelisted websites are Wikipedia, Disney, scholastic, and a few more. Moreover, this is the best feature when your child is too young and should be on the safer side of the internet.
Also read: [IOS 13] How to set Your Favorite song as iPhone Ringtone
Conclusion
We have successfully blocked and limited websites on your iPhone and iPad. You can also block and limit websites on your MacBook in the similar way.
You may also like,
Subscribe to our newsletter or join the telegram channel for more amazing tech related content.


Great tips! I had no idea it was so easy to block websites on my iPhone. The examples you provided made the process super clear. Thanks for sharing!
Great post! I never knew blocking websites on my iPhone could be so easy. The examples you provided were really helpful. Thanks for sharing!