
Want to make your blog more dynamic and powerful by switching from Blogger to WordPress but need help with how to do it? Well, this step-by-step guide will leave you with no complaints. Here, I discuss migrating your blog content, redirecting URLs, and starting with WordPress from Blogger. So, stay with me till the end and let the magic happen.
Quick Links
- Why Move from Blogger to WordPress | The Stats You Can Skip or Get Amazed Reading Them
- How to Move from Blogger to WordPress? No More a Rocket Science for You
- Step 1: New Domain Name For Your WordPress Website
- Step 2: Getting and Preparing a Server for Your Website
- Step 3: Getting your Kinsta Servers Ready for WordPress
- Step 4: Basic WordPress Setup | Everything You Need to Do on Your New Website
- Step 5: Moving Content from Blogger to WordPress | Content Migration
- Step 6: Setting up Redirection from Blogger to WordPress [Most Important]
- Frequently Asked Questions [FAQs] | Blogger to WordPress
- Wrapping up: Moving Blogger to WordPress | A Detailed Guide
Also read: How to Check Google Nest Compatibility | Simplest Guide
Most bloggers perform excellently on Blogger, but while building a web brand, it is crucial to be able to have a platform with more control. Blogger is absolutely one of the perfect choices when you are starting out to blog and don’t want to spend money on it. But when building a brand, it becomes crucial that you have more control, such as dedicated server performance, own domain name, being able to customize your website with more freedom, and doing a lot more than just blog with the help of plugins.
WordPress is one such CMS that helps you get more control over your website and connect fast servers and design a beautifully great website. But as a blogger, migrating or moving your blog from one CMS, such as “Blogger,” to another CMS, like WordPress, requires thorough knowledge. You cannot afford to lose all your hard work and search engine positions. This is where I come in to help you with a step-by-step guide.
So, let’s get started.
Why Move from Blogger to WordPress | The Stats You Can Skip or Get Amazed Reading Them
There are a lot of reasons why you should be moving out from blogger, especially when you are a growing website. For me, the top reason is to get complete ownership and get access to thousands of free resources from other CMS platforms. But why only WordPress? Why not Joomla, Wix, or Squarespace? Well, these, too, are some of the best CMS platforms, but WordPress is the most powerful one, and here is the why.
- As per data from HubSpot, more than 43.2% of internet websites use WordPress. That’s roughly 410 million existing websites and the top 10 million new websites being added every 2 minutes.
- Considering all the CMS platforms such as Joomla, Wix, and Squarespace, WordPress accounts for more than 65.2% of the websites that use CMS.
- Get access to more than 60,000 free plugins from the WordPress directory alone. More plugins can be found on store websites such as ThemeForest.
- You can self-host your website on WordPress servers or connect cloud, physical, virtual, personal, or any kind of other web servers from a third party to host your website.
- Install plugins like Wordfence and use tools like Wpscan to instantly check vulnerabilities and easily fix them. One of the best CMS platforms with security.
- Dedicated web shop management plugins such as WooCommerce help you run your online shop better.
WordPress has a versatile collection of themes, plugins, site builders, and a good stand against vulnerabilities. No doubt, CMS platforms like Wix and Squarespace account for a good 2.6% to 2.8%, and the nearest possible platform is Shopify, with a total of 6.6%, while WordPress accounts for 65.2% and counting, which shows users love switching to this platform.
Also read: How to Solve Critical Error on WordPress | My Website is Down Issue
How to Move from Blogger to WordPress? No More a Rocket Science for You
You can’t just press a button, and within seconds, your entire blog is migrated to WordPress; that’s not how it works. Most of the things on Blogger came ready in a plate for you; there was no domain registering, no server management, and a fully restricted blog appearance and use. So, we will first fix these things and then move all the blog content and work on redirecting all old URLs to your new WordPress website.
Step 1: New Domain Name For Your WordPress Website
When you are creating your internet presence, one of the things that matter the most is how people will find you. Usually, it is the web address or name of your website in the search bar or search engine like Google or Bing. This is where we need to understand how important the website name is, as it will help users find you on different channels such as search engines, social media, community platforms, and more.
While most users on Blogger prefer to use the free version of the domain name, the website looks something similar to numberoneblog.abc.com. That’s not catchy, and it is hard to build the trust of audiences on such domain names. It is time you look for your favorite domain names, such as numberoneblog.com or numberoneblog.org, and get your unique identity. You can then use the same name on all the social and digital platforms and help users find you easily.
Domain names come with a yearly fee, and based on the domain name, the price can go from $1 to anywhere in the hundreds and thousands. Short and catchy names are usually the costlier ones, as they are easy to remember.
You can register domain names online, and there are several platforms, such as GoDaddy, Namecheap, Google Domains, and many more, that help you get one. Once you find your catchy domain name, let’s subscribe to it and hop on to the next step.
Note: It is best to avoid frequently changing domain names, always stick to one domain name as it will represent your website as a brand.
Also read: Err Connection Timed Out Error on WordPress? Here is the Fix
Step 2: Getting and Preparing a Server for Your Website
On Blogger, there was no need to get physical or virtual servers to keep your blog available, and this is because you are allowed small server space from the Blogger platform itself. But that comes with a lot of limitations, such as no customizations, lesser page speed, poor CDNs, RAM and disk space, and more.
The better thing to do in such a situation is to get your own server and customize it as per the requirements of your website. There are several options out there, such as shared hosting, VPS, cloud servers, and more. If you are not too sure about operating and managing your own server, you can get WordPress-managed servers that would just do most tasks for you.
WordPress-managed servers are available on most platforms, but if you need better page speed, faster click response, and lower first input delay, cloud servers are the one for you. But they are pretty expensive, and managing them gets difficult.
To tackle this, you can always get best priced WordPress-managed hosting cloud servers from Kinsta. Kinsta uses cloud servers from Google and ensures that your website loads at least 30% faster than that of the shared hosting platforms. It comes with several options ranging from personal websites to professional businesses and helps you pick the best money-saving plan.
Get 30% to 200% Faster Website Performance
- High-performance CDN
- Google’s cloud servers
- Reduce load times by almost 49% (TTFB, cache, and more)
- Site backups and uptime checks
- Free SSL certificates
There are also other platforms, such as Amazon web services and Google Cloud, that offer pretty costly cloud services, and you may or may not find WordPress-managed hosting servers on them.
Step 3: Getting your Kinsta Servers Ready for WordPress
Since Kinsta’s managed WordPress servers do most of your tasks, you still need to prepare it for pointing your DNS from the domain service to the server. Besides, there are a couple of other things, such as configuring your WordPress website details, database, and admin setup.
1. Pointing DNS to Kinsta Servers
Let’s point to the DNS servers first, and to do that, we first need to know what DNS servers are and why they are crucial in the web business. When we buy a domain name, they look something like this – 123.123.123.14, and at this point, the servers would have no idea how to resolve it. This is when the DNS (Domain Name Server) from the hosting server comes into the picture. A DNS resolves this address and sends the relevant data from the server to your screen.
Here is how you can add a DNS server from your Kinsta’s managed WordPress hosting,
- Navigate to the platform from where you have bought the domain name and log in using your account credentials.
- Under the domain details, you can find the “Manage DNS” option or something similar; tap on it.
- Here, you can find the default DNS records from the domain platform; we need to edit them and add DNS details. If you are less aware of DNS records, you can check this guide on DNS records on Kinsta.
Usually, it takes a couple of minutes to up to 48 hours for DNS records to update, and it is fairly based on the platform/service you use.
Thankfully, with Kinsta, you get free SSL certificates for all your domains and sub-domains. So, when you are adding a website to your Kinsta’s WordPress-managed hosting, an SSL is added free to it.
But before doing that, let’s set up our website on Kinsta servers.
Also read: How to Check Error Logs on WordPress Website | Handy Guide
2. Setting up WordPress on Kinsta Servers
From your Kinsta dashboard, you can find a couple of options, such as adding your first site, free migration from another hosting, and more. The free migration does not work if you are migrating from Blogger to WordPress; here, we will have to do that manually. Now, tap on the “Create a website” option, and you will now see a form on your screen.
The first thing we will choose here is installing WordPress on our server. You can also skip doing that, but skipping doesn’t make any sense if you are not going to clone another environment, and it doesn’t work when you are coming from Blogger.
In the next step, install relevant details such as domain address, the one we bought in step 1, site name, audience location, admin, username, passwords, and other relevant details. In a couple of minutes, your website should be ready, but it will still be empty. Let’s configure it further.
Now, head to the “info” section, and here you will find the data center location and site IP address under the basic details; we require the site IP address, so will copy it and head to the domain platform from where we bought the domain name for your website.
For this specific domain name, we will head to the “Advance DNS” option from the domain platform and then enter the IP address as a new DNS record. To get a better of this, you can check this official guide on DNS records on Kinsta.
3. Adding a Free SSL to your New Website
While setting up your new website, it is important that you ensure its security. To do that, let’s add an SSL certificate to your new website and protect it from hackers and data stealers.
As I said before, Kinsta offers free SSL certificates on its hosting, so you are not spending anything extra here.
Here are the steps you can follow,
- Go to the settings page for your domain name, and here you can find all the options, such as domains, backups, tools, redirects, and more. We need to select tools from the menu options.
- Once you tap on the tools, you can find an immersive set of tools you can use on your new website; you need to scroll down till the end, and here you will find the option – SSL Certificate.
- Tap on the “Enable HTTPS” button, and you will see a small sub-menu that allows you to generate a free SSL certificate or add a custom one.
- Let’s generate a free SSL certificate; that would save us some bucks. So, tap on the “Generate free SSL” option and wait for a few seconds till the task is complete.
Having an SSL certificate on your website is great, but what’s amazing is always directing all the traffic through HTTPS only. And this can be done using the Force HTTPS option.
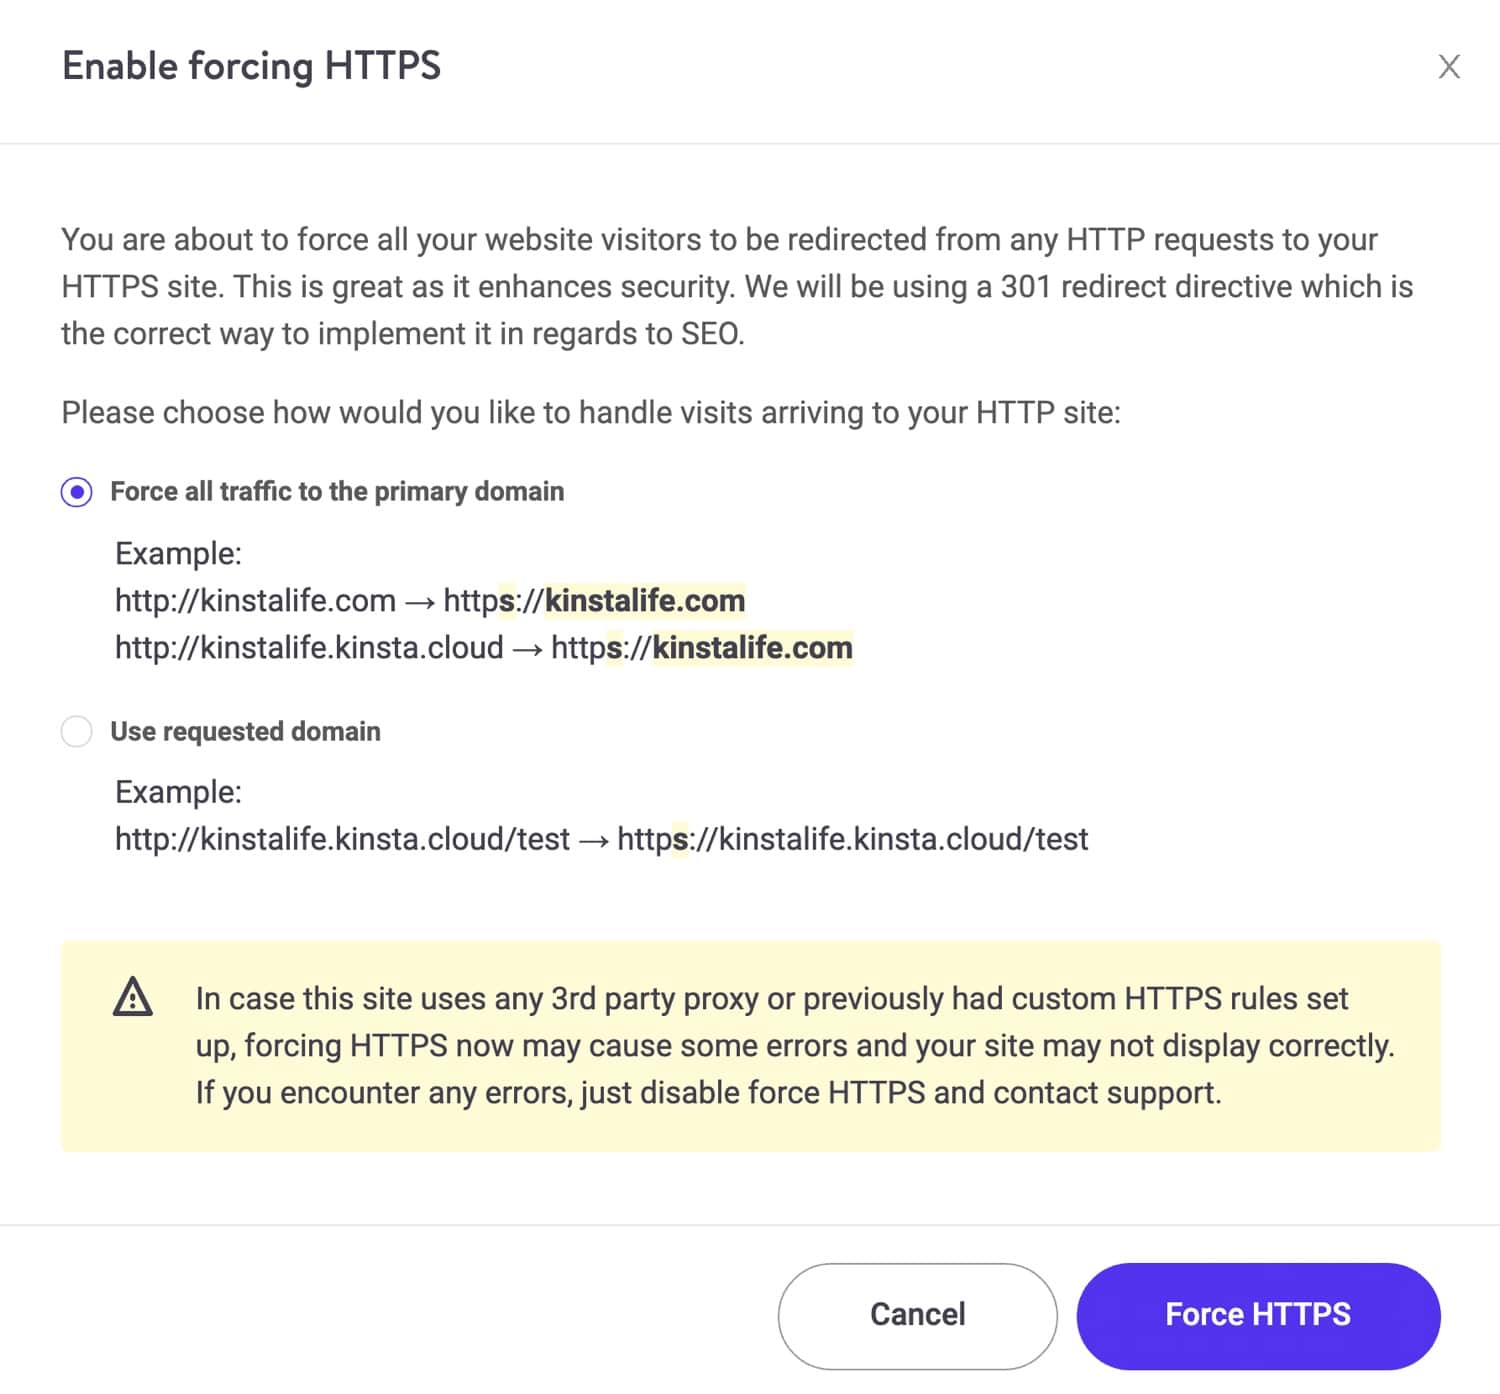
This is a great option to avoid users accessing your website only through HTTPS. If not enabled, users might see an error when they try to access your content with an HTTP request.
To enable Force HTTPS,
- Navigate to the “Tools” section and then scroll down until you find the “Force HTTPS” option. Usually, this is just beside the SSL Certificate.
- Now, select the “Force all traffic to the primary domain” option to ensure users face no issues in accessing your website.
- The last step would be to tap on the “Force HTTPS” button from the bottom, and you are good to go.
4. Checking SSL, WordPress Dashboard, and Frontend
We have now pretty much completed the skeleton of our website, meaning the early setup, and all it wants now is content. But wait, with all this setup; it gets crucial for us to know if our new website is working properly and is accessible to everyone.
A quick check will also help us know if there are any issues with SSL or if WordPress is not correctly installed or configured.
Let’s start with checking the SSL certificate. For this, all we need to do is open an incognito window on your browser and enter your new website’s URL in the search bar. You can also use another device to check if the website is accessible on it. Once your website loads, which is usually faster than the bolt (Thanks to Google Cloud servers offered by Kinsta), you should see a padlock icon on the left of the URL. Padlock shows that your website is secure, and you can even check HTTP and HTTPS requests.
Now, let’s inspect if the WordPress dashboard is accessible to us. To ensure that, here are some of the steps you can follow,
- From your site information from Kinsta’s dashboard, tap on “Open WordPress Admin” or head to yourwebsite.com/wp-admin/ to view the login page.
- Enter your admin login information, the one we set while installing WordPress on Kinsta servers.
- Login using admin details, and you should now see the WordPress dashboard with all the tools and options.
- Play around and try getting yourself familiar with all the options. It’s always best to know where the tools are and how you can use them to make your website better.
Also read: How to Enable WordPress Error Logs | The Handy Guide
Step 4: Basic WordPress Setup | Everything You Need to Do on Your New Website
Our new website is working great so far, but it still needs to be ready before you start moving all your content from Blogger to WordPress. For instance, setting up your WordPress with themes and plugins, setting up permalinks, and more. This is important because once you import all your content, customizing then would be a lot harder.
So, let’s set up these basics first.
1. Setting up Permalinks Structure
Setting up permalinks or URLs of all the media and other content on your website is the most important thing for your web visibility. Once the URL is indexed, changing it later can cost you losing your media and content positions from the search engine. Besides, users trying to access the blogs are either redirected to some other content or shown a 404 not found error, which you would definitely not want.
So, let’s quickly set up our permalinks structure with the simple steps below,
- Navigate to your WordPress dashboard and log in using your admin credentials.
- On the left of your screen, you will find all the tools and options. We are looking for Permalinks, which is located under the “Settings” option.
- Tap on the “Permalinks,” and then you will find multiple pre-defined URL structures.
- Choose the one that suits your website needs; for instance, if you are going to be a solo blogger and will be only posting articles, the “Post name” permalink structure should be the best fit.
- You can also choose to create a custom permalink structure using the tags below, and once you are satisfied with it, one last thing to do is save changes.
Creating a custom URL structure comes in handy as it allows you to be more specific about your posts. For instance, if you are a news website, the best structure would be to include the month, day, year, category, and post id or name.
To keep things the same as Blogger, let’s set up our permalinks with the month and name tag. And then save the changes.
If you are planning to set up a shop on your website using WooCommerce, the best practice is to first install the WooCommerce plugin and then set up the product and shop permalink structure using the same URL structure setting.
Also read: How to Fix 403 Forbidden Error on WordPress | The Handy Guide
2. Install a WordPress Theme | Beautify and Make your Blog Efficient
Installing a WordPress theme is one of the best ways to make your blog appealing and efficient. In fact, a lot of themes are lightweight in nature along with being attractive and have all those features to make your blog a highlight.
But how do you add a theme to your blog? How do you make it look like a professional blog website and not the same old Blogger theme?
Well, to do that, let’s install a WordPress theme using the simple steps below.
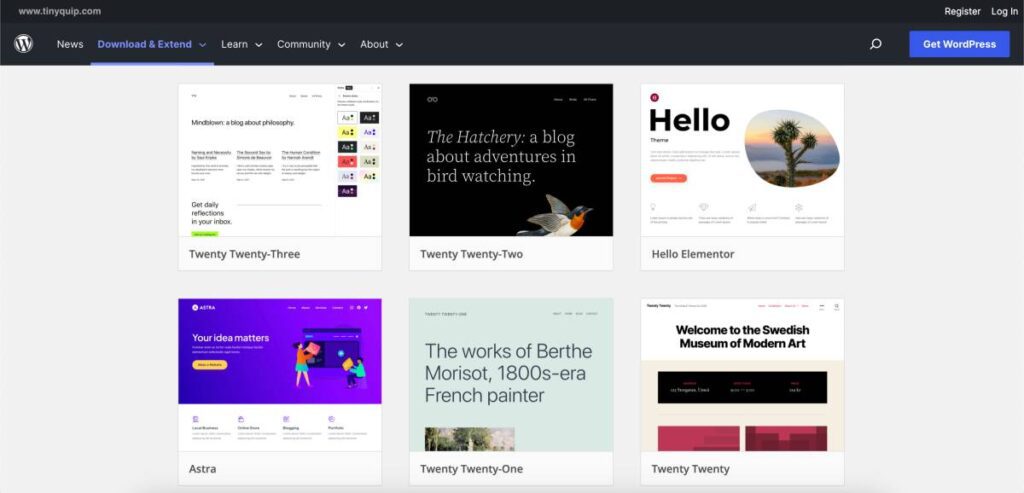
- Head to your WordPress dashboard, and on the left, you can find all the tools and options. We are here specifically looking for the “Themes” under the “Appearance” option.
- Once you tap on “Themes,” you can find a few pre-added themes on your website, and these can be readily activated. But let’s look for something that suits your content.
- Tap on the “Add New” button on the top, just beside the “Themes” label, and you can see a pool of free themes for your website. Divi and Astra are the two most used free themes from the WordPress repository.
- Scroll down and select the theme you desire, something that you and your audience will find appealing.
- Tap on the “Install” button on the theme and wait for a few seconds while the theme is being installed. Once done, click on the “Activate” button, and the theme is applied to your website.
- You can now customize the theme, such as adding a logo, footer, and how users will interact with your website.
Fact: Do you know there are more than 10,000 free themes on the WordPress repository? All you need to do is find the best one for your need and install it.
If you are unable to find a theme that suits your content taste, you can get one from third-party platforms. One such platform that I like the most is “ThemeForest,” and there are tons of paid WordPress themes that are optimized for the best experience.
3. Installing Plugins on your WordPress Website
Plugins add superpowers to your WordPress website and make it just more than a blog. For instance, have you seen those chat bubbles, event calendars, social plugins, contact forms, pop-ups, and more on websites? They are due to plugins; these make website blogs a more engaging platform.
Also, did you know there are more than 60,000 free plugins in the WordPress repository? All you need to do is install them, and it will make your plain website blog into a more powerful engagement platform. And not just these, but there are also SEO and speed optimization plugins that are helpful in meeting some of the crucial ranking factors.
But how do you add a plugin? Follow these simple steps,
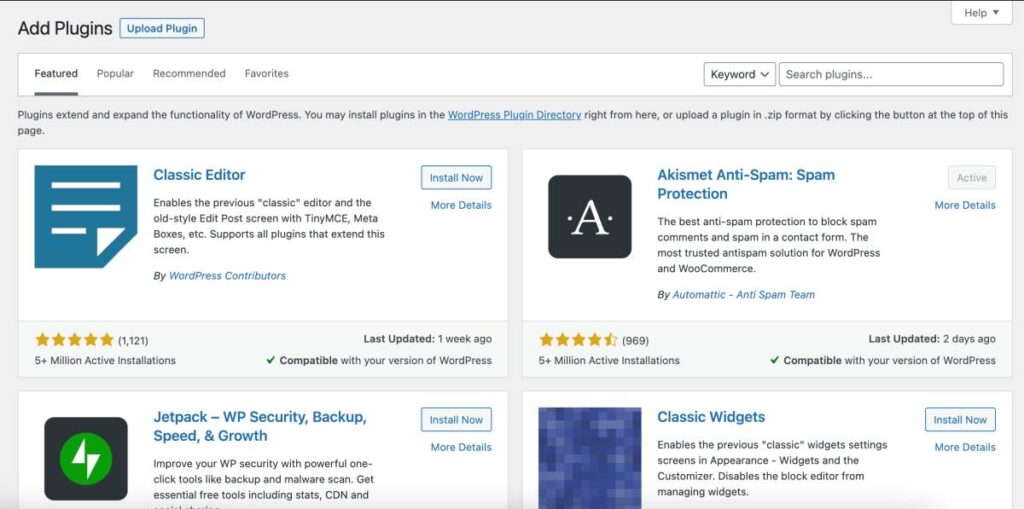
- Head to the WordPress dashboard and choose the “Plugins” option from the left of your screen.
- Tap on the “Add New” option beside the “Plugins” label, and you will now see a repository of free WordPress plugins.
- Using the search bar, look for the plugins that you wish to install on your WordPress website and then tap on the “Install” button to install the plugin.
- One last step is to “Activate” these plugins using the “Activate” button and set them up from the “Plugins” screen.
It is likely that you are unfamiliar with WordPress plugins, so here are some of the must-have plugins for your website.
| WordPress Security | Wordfence and Loginizer |
| Online Shop | WooCommerce |
| Speed Optimizations | Hummingbird and Smush |
| Search Engine Optimization | Yoast SEO or RankMath |
It is best to have these plugins installed and set up on your WordPress website for better visibility and performance.
Also read: How to Solve The Response is Not a Valid JSON Response Error
Step 5: Moving Content from Blogger to WordPress | Content Migration
Now that we have most of our basic stuff done, all we now need to do is move our content from Blogger to WordPress.
Migrating from Blogger to WordPress is a tedious task, honestly, a time taking process. The last thing you would want to do is copy each content and media, and thankfully, there are some better resorts to move content from Blogger to WordPress.
1. Importing Content from Blogger to WordPress
The first and foremost thing we can do is restore all our content from Blogger to WordPress using backup and import options. Thankfully, there are a few ways that can make this process easier. Let’s discuss each of these methods in simple steps.
1.1 Exporting Our Blog from Blogger
- Open your blog on the Blogger platform and log in using your account credentials.
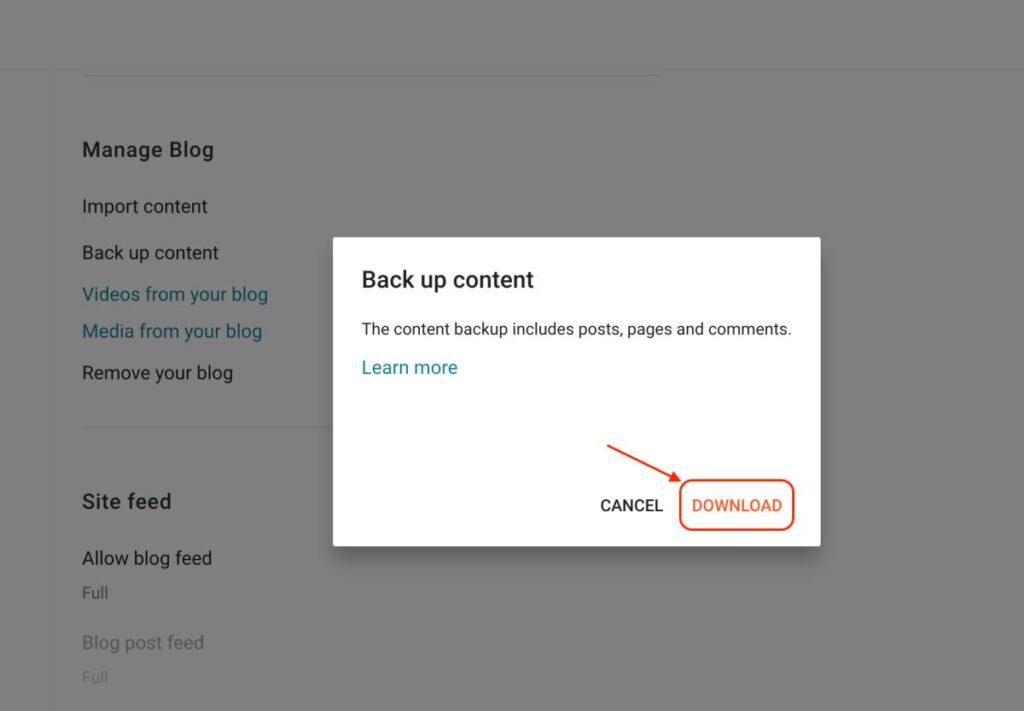
- Go to the “Settings” page and tap on the “Others” option from the list.
- On your screen, you can find the “Backup up content” option; tap on it to start making a copy of your blog. This can take some time, depending on the amount of content on your blog.
- You can then find an XML file on your computer which we will use later on WordPress.
Also read: How to Check Google Nest Compatibility | Simplest Guide
1.2 Migrating Blogger Content to WordPress with Import Option
To move your blog content from Blogger to WordPress, we can use the in-built “Import” option that comes with the WordPress dashboard. You don’t really need a plugin to import your content, but you can surely use one for complete automation on importing your blog from Blogger to WordPress. Let’s save it for the next section and first discuss the traditional method.
- Open your new website’s WordPress dashboard and log in using your admin credentials. Ensure you are logged in as an admin and not as a user.
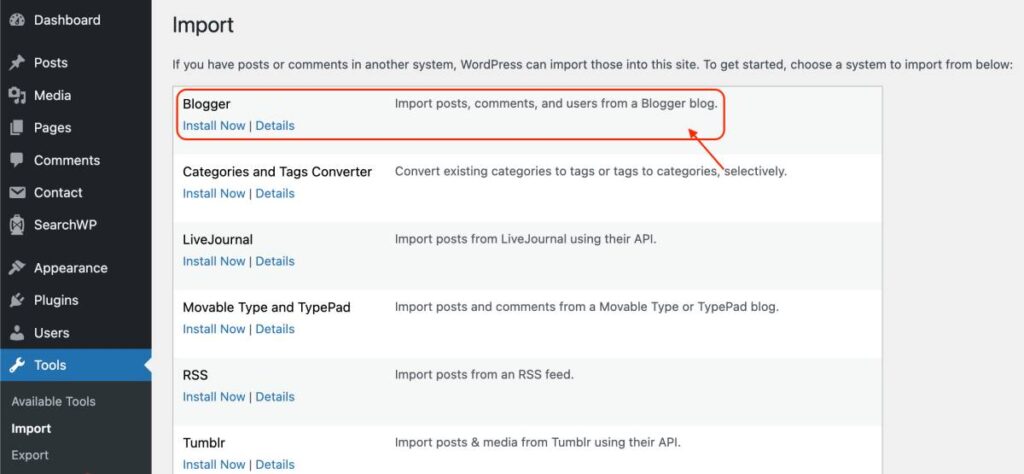
- On the left of your screen, you can find the “Tools” option; choose the “Import” tool from the options.
- Now, let’s install the “Blogger” tool as we migrate our blog from Blogger to WordPress.
- Once the Blogger importer is installed, we need to run this importer by tapping on the “Run Importer” link.
- On a new screen, you will now see an option to upload the backup “XML” file; this is the same backup file we exported from Blogger earlier.
- The uploading process should now start, and once it is done, you need to assign an author for all your posts; by default, it would be the admin.
- You can now check all your posts under the “All posts” option and check if all your posts are now imported.
If you are unable to upload the file and see a maximum file size upload error, contact your hosting provider, in this case, Kinsta, and they will increase the file size limit for you. This is usually an issue with large blogs, and proportionally the backup file is also bigger than usual.
2. Migrating Blogger to WordPress using a Plugin
Blogger is a near-perfect import option when it comes to moving your blog from Blogger to WordPress. But at times, you might want this process to be quick and hassle-free. In such a case, the best thing you can do is install the “Blogger Importer Extended” plugin, and it will make things easier for you.
So, let’s quickly check out how to move your content from Blogger to WordPress with a plugin,
- Login to your WordPress website and click on the “Plugins” option from the left of your screen.
- You will now see a list of all the installed plugins on your screen. On the top, just beside the “Plugins” label, you can find the “Add New” option; tap on it.
- Using the search bar, let’s look for the “Blogger Importer Extended” plugin and install/activate it on our WordPress website.
- To use the plugin, head to the “Tools” option and tap on “Import” from all the available tools.
- Now, look and choose the “pipdig WordPress Migrator” tool and install it on your WordPress website. Once done, run this importer tool using the blue link “Run Importer” and head to the next step.
- On a new screen, you will be asked to connect your Blogger account as the entire migration process from Blogger to WordPress is done automatically using this import option.
- You can now see the progress bar displaying how much more content migration is left from Blogger to WordPress.
3. Fix Missing Images after Moving from Blogger to WordPress
If you are missing out on images that you had earlier used on your Blogger website but cannot find them on WordPress, first and foremost, do not panic. This is a common issue, and we can easily resolve it.
To solve this issue of missing images from Blogger to WordPress, we can use a plugin called “Import external attachments” and later pair it up with Velvet Blues Update URLs plugin.
Here are the steps to correctly use these plugins to solve the missing images or media content on your new WordPress website from Blogger,
- Open the “WordPress” admin dashboard and look for the Plugins option on the left.
- Using the “Add New” plugin, search, install, and activate for “Import external attachments” plugin.
- Head to the “Media” tab and click on the “Import media content” button.
- Follow the on-screen steps, and you should now be able to see the missing images in your WordPress library. The plugin only imports 50 images at a time, so give it some time to complete the process.
Also read: Dell U2723QE Ultrasharp 4K KVM Monitor Review
3.1 Setting up Image Redirections from Blogger to WordPress
Once all the images are imported, you can still not be able to view them in your blog posts on the new website. And this is because the redirection is not set properly for these images, and you can still see them having the old Blogger URL in the media library.
To fix it, let’s use the Velvet Blues Update URLs plugin and set up the media redirection.
- Open the “WordPress” admin dashboard and look for the Plugins option on the left.
- Using the “Add New” plugin, search, install, and activate for “Velvet Blues Update URLs” plugin.
- Now, head to the “Tools” section on your WordPress dashboard and tap on the “Update URLs” option.
- Here, you can find a configuration page; all you need to do is enter the URL of the older website and the URL of the new WordPress website in the respective fields. There are more options, but let’s keep them untouched for this article.
- That’s it, the URL redirection for the media content should be done by now, and you can now find them without any issues in the imported blogs.
Step 6: Setting up Redirection from Blogger to WordPress [Most Important]
Suppose you have been on Blogger for a long time and built an audience over it through channels like SEO, social media, and sharing web links. You wouldn’t want those audiences to see a dead Blogger website and would rather pull them on your new WordPress website.
This is the most crucial part of this entire guide, as without an existing audience, most of your hard work on the Blogger would go in vain when you migrate to WordPress.
To fix this, we can do a simple hack: first, let’s install a plugin on our WordPress theme to generate a redirection code and then use this code on our Blogger website to set up redirection.
1. Generating the Redirect Code for Blogger to WordPress
To create a redirection for all your articles from Blogger to WordPress, we need to download a plugin on our WordPress website.
Here are the easiest steps for this guide,
- Open the WordPress website and log in to your dashboard using your admin credentials.
- On the left of your dashboard, you can find the “Plugins” option; tap on it and then click on the “Add New” button to see all the available plugins.
- Now, search for the “Blogger to WordPress Redirection” plugin and install it on your WordPress website.
- After you activate the plugin, head to the “Tools” section and then tap on the “Blogger to WordPress Redirection” option.
- We now need to configure the tool, such as connecting our Blogger account to view all our blogs and generate code for each blog.
- Once done, you can see the “Get Code” button beside each of the Blogger blogs; tap on this button and copy this code. We will require it later.
Also read: Anker 737 Power Bank Review | The Powerful Battery Pack?
2. Reverting your Blogger Theme to Classic on Blogger
You must be wondering what theme on Blogger has to do with setting up redirections on your new WordPress website. But let me tell you, this is the step that you cannot miss out on.
Head to “Settings” on your Blogger website and find the “Theme” option. We here want to change the theme to classic, so choose the “Classic” option from all the available themes and apply your new changes.
Once done, you can find the “Edit HTML” button on your screen; tap on it to view the HTML code for your classic Blogger website. If you haven’t made changes to your HTML code on Blogger, you can instantly scrap the existing code and paste the new code we generated using the plugin.

Ensure to save the changes once you are done with pasting the code and visit your website once to trigger this. That’s it; you have the redirection setup now, and if asked if you want to redirect the mobile version, too, just choose desktop and save the changes.
But that’s not all about redirections from Blogger to WordPress; we are still missing out on the RSS feeds, which are pretty crucial. So, let’s quickly learn how to redirect the RSS feed from Blogger to WordPress before wrapping up this detailed guide.
Also read: ExpressVPN Review | Why is this the Best VPN Service?
3. Redirecting RSS Feed from Blogger to WordPress
RSS Feed is pretty helpful when it comes to connecting our blog with various other platforms. For instance, Google News uses RSS Feed to show all your articles. Likewise, there are many more platforms. If you have used RSS Feed on your Blogger website, all the other platforms using this RSS Feed will only see the older website and not the new migration to WordPress.
To fix this, let’s redirect the RSS Feed from Blogger to WordPress using a simple hack, and after this, all the platforms will show new posts from your WordPress website rather than the old Blogger website.
Here are the steps,
- Head to the Blogger website and tap on the “Settings” option
- Now choose “Others” from the list of available options.
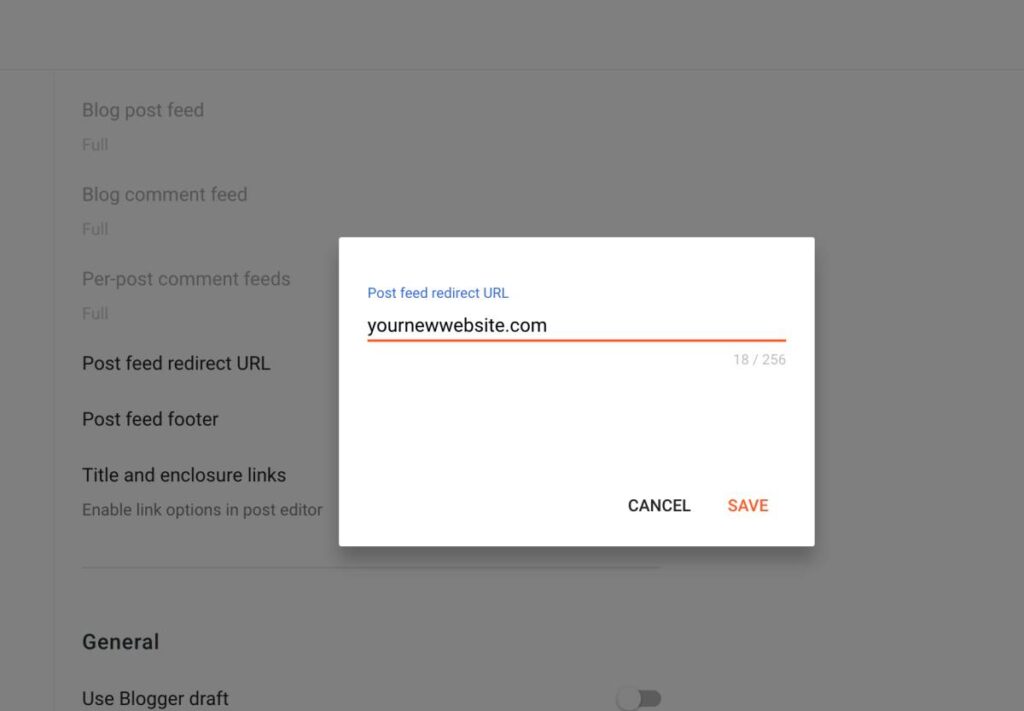
- On the right of your screen, you can find a bunch of options under the “Site Feed” label; we will work in this area.
- Here, you will find the “Post Feed Redirect URL” option, tap on it and enter the URL of your new WordPress website. Ensure to use HTTPS if you are using an SSL certificate.
- Now, save the changes to this setting, and it’s done.
Now, let’s test our new website and know if everything went well with moving from Blogger to WordPress. Navigate to your new website, check for valid SSL, check for page speed (Best when you use Kinsta Managed WordPress Servers), look for redirections, and see if everything else is well. You can play around, add new themes and plugins, and connect Google and other analytics and performance-measuring platforms.
Also read: MagEZ Slider Review | The Best 4-in-1 Wireless Charger for Apple?
Frequently Asked Questions [FAQs] | Blogger to WordPress
If you delete the Blogger once your new website is set up, you will end up losing all your redirections to the existing content. Also, all the content will be lost from the search results.
RankMath and Yoast SEO are two of the popular and widely-used SEO plugins for WordPress websites.
Using a lightweight theme and optimizing servers can help you improve the page speed on your WordPress website. Hosting platforms such as Kinsta is well-optimized and use cloud servers to give an additional 20-30% speed compared to traditional servers.
Wordfence is the most recommended security plugin for your WordPress website and gives you real-time attack updates and quick actions against malware and virus.
If you are now using WordPress to create new posts, they won’t be visible on Blogger, and likewise, if you are creating new posts and pages on Blogger, they won’t be visible on your WordPress website unless you manually import them. It is best to stick and create new posts on WordPress only, as you now want the audience to keep visiting this website alone instead of the Blogger.
Before You Leave
Get Our Prime Content Delivered to your Inbox for Free!! Join the Ever-Growing Community… Right Now.
Give this article a quick share,
Wrapping up: Moving Blogger to WordPress | A Detailed Guide
This calls for an end to the detailed guide on how to migrate your Blogger website to WordPress. No doubt, there is always more on how you can improve your WordPress website or add new functionality to it; for this, you can check out some amazing guides on our website and keep following us on social platforms.
Get Powerful Managed WordPress Hosting
Check out Kinsta WordPress Managed Servers for powerful cloud server performance, high page speed, and managed deliverability.
- Cloud servers with your choice of data center among 35 locations
- HTTP/3 quick support
- Malware security pledge
- Staging environments, site management, and optimization tools
- Cloudflare Enterprise and CDN
I hope to have solved your concern with how to move from Blogger to WordPress, and if you have any questions or queries, feel free to comment below. If you like this article, do give this a quick share on your social media handles, and do tag us. Also, join our Telegram channel, Facebook page, and Twitter to never miss a quick update.