
Are you experiencing 403 Forbidden Error on your WordPress website? If you are the site admin and you came across this error, then this guide is all you need.
403 forbidden error is both a user and admin-centric error, and both kinds can get this error. A user gets this error while browsing websites that have a private page and is trying to access them. In such a case, you can get your IP whitelisted by the admin and access the page, if that’s possible. Or you cannot do really anything about it.
If you are a WordPress admin and facing this error, it is likely that you have a corrupted htaccess file. An empty or corrupted htaccess file can cause several problems on your website, and it is due to plugins, themes, or manual changes. There are also some other possibilities for this error; for instance, due to CDN, hotlink protection, and file permissions.
In this guide, let me show you some helpful solutions to fix the 403 forbidden error on WordPress.
Also read: How to Solve Critical Error on WordPress | My Website is Down Issue
Get 30% to 200% Faster Website Performance
- High-performance CDN
- Google’s cloud servers
- Reduce load times by almost 49% (TTFB, cache, and more)
- Site backups and uptime checks
- Free SSL certificates
How to Fix 403 Forbidden Error on WordPress | The Handy-Guide
When you face the 403 forbidden error on WordPress, the first thing to do is try refreshing the page. The 403 HTTP code occurs when the server understands the request but does not authorize you to access it. In some cases, it is due to the default permissions or due to a corrupted or empty htaccess file.
1. Solving the htaccess File Issues to fix 403 Forbidden Error
This solution can only be used by website admins as it requires access to the WordPress dashboard and the server of that particular website. WordPress Websites that use Ngnix servers do not create an htaccess file, and it is likely some other issue. On the other hand, if your website uses Apache servers, it can be an issue with the htaccess file.
1. Check if your htaccess File is Empty
A few plugins and themes can modify the htaccess file of your WordPress website, and in certain cases, it can also be emptied. So, if you are facing the 403 forbidden error, it is likely because of this empty file. Also, this is one of the core files of your website, and a mistake can take your entire website down. So work around it with precaution and only modify it if you have a clear understanding of how it works.
To check your htaccess file, here are a few handy steps:
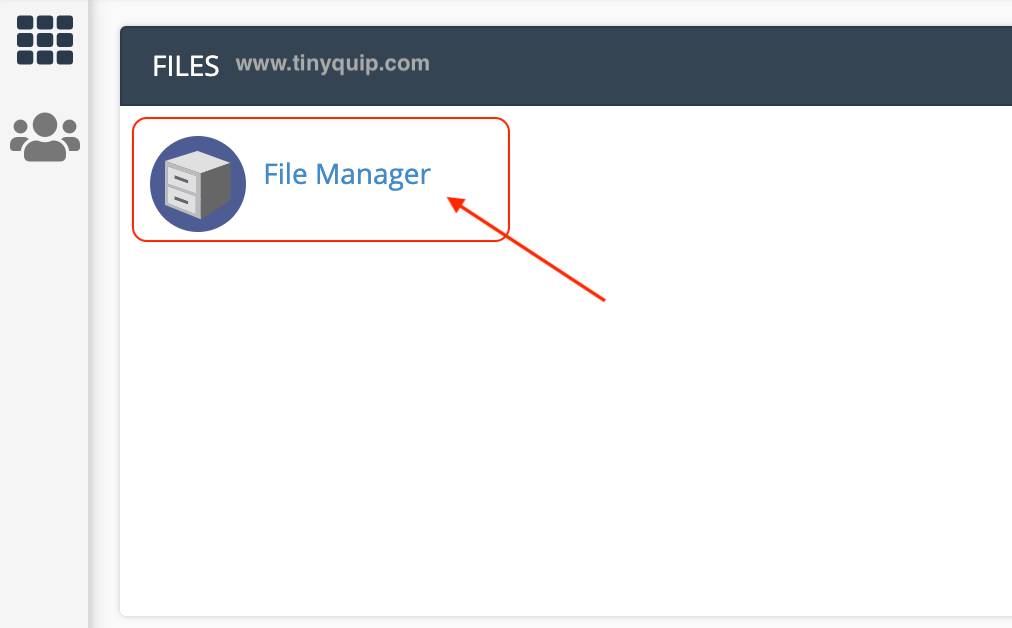
- Login to the server on which your site is currently hosted.
- From your dashboard, look for the “File Manager” option and tap on it. This feature will help you look through all the files and folders on the server that are hosted by you.

- Now, you need to navigate to the destination folder with all your website files. Usually, it is the home directory > www > website name, and there you can find all your website files. You can also use the search option with the “File Manager” to help you look for the file.
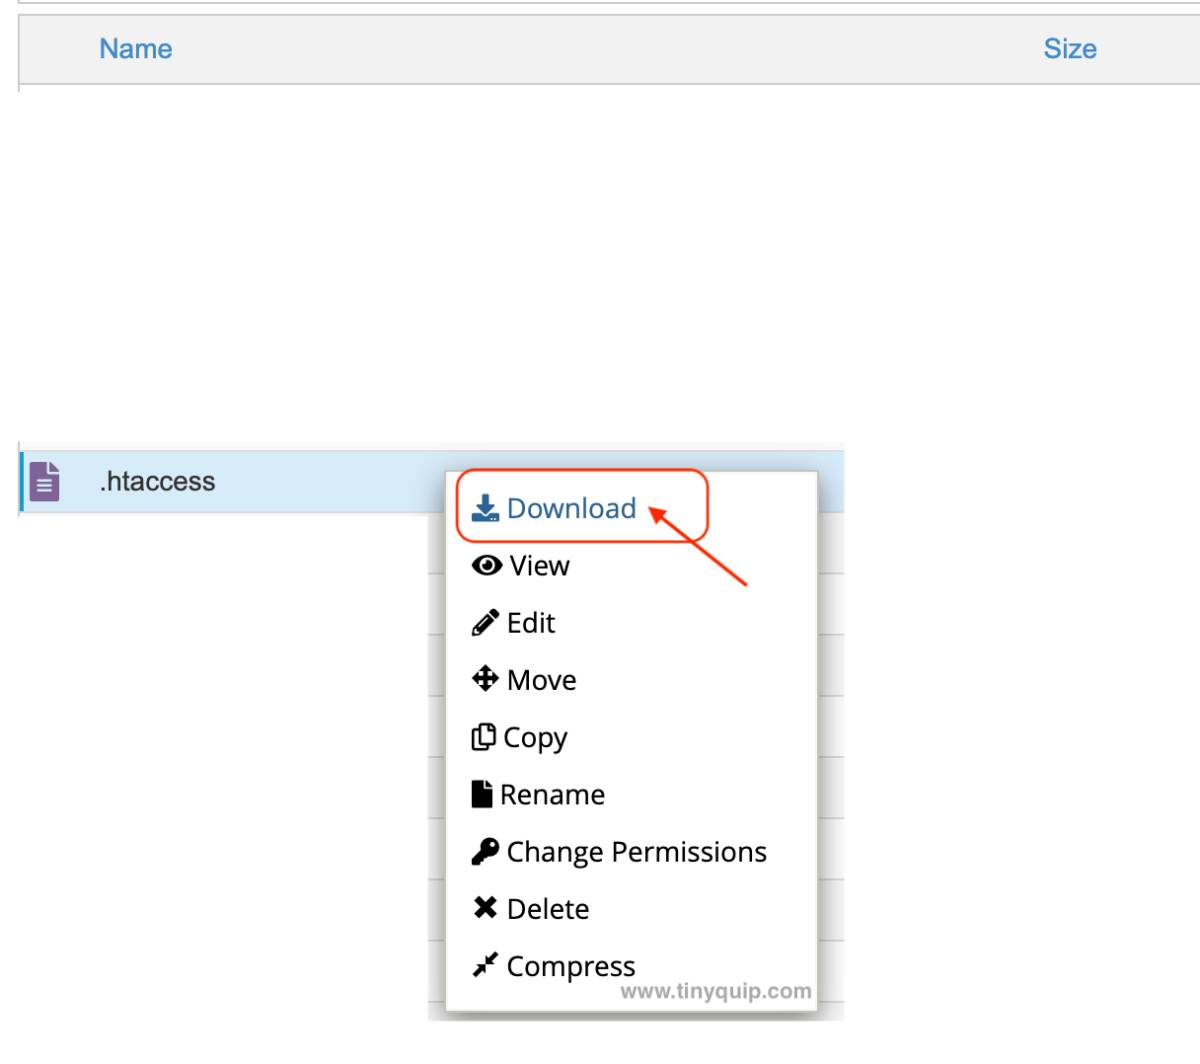
- You can now see a list of files, including the htaccess files. With certain servers, this file is hidden, so if you are unable to find it, tap on the “view” option and then click “Show hidden” items to view the file.
- Tap on the htaccess file, and you will find the “Download” option from the sub-menu or in the top bar.
- After the download is complete, open the file on your device and check if the file is empty.
If you are unable to find the htaccess file after all the introspection of the file manager, it is possible that the file no longer exists.
2. Corrupt htaccess File | 403 Forbidden Error on WordPress
A corrupt htaccess file is a huge obstacle causing the WordPress 403 Forbidden Error on your website. But viewing the file will not help you determine if the file is corrupt, especially when you are a complete rookie.
Here are the steps that we need to follow,
- Login to your server and, using the “File Manager,” locate your website folder and the htaccess file for it.
- Tap on the htaccess file to view all the related options with it. You can either find it in a sub-menu beside your selection or in the top bar.
- Now, download the file to your computer for backup purposes.
- Let’s delete the htaccess file from your server. Keep the htaccess file intact on your computer, which is stored for backup purposes.
- After deleting the file from the server, check if you are able to browse your WordPress website without the 403 forbidden error. If that is the case, the issue is due to the corrupt htaccess file on your server, and you need to create a fresh copy for it.
Also read: How to Check Error Logs on WordPress Website | Handy Guide
3. Creating a Fresh Copy of the htaccess File for your WordPress Website
If there is no htaccess file or it has been corrupted for your WordPress website, we will need to create a fresh copy of it. For this, it is recommended that you have a copy of your earlier htaccess file on your computer and delete the one from your server for that particular website.
Once done, here is the easiest method to create a new htaccess file,
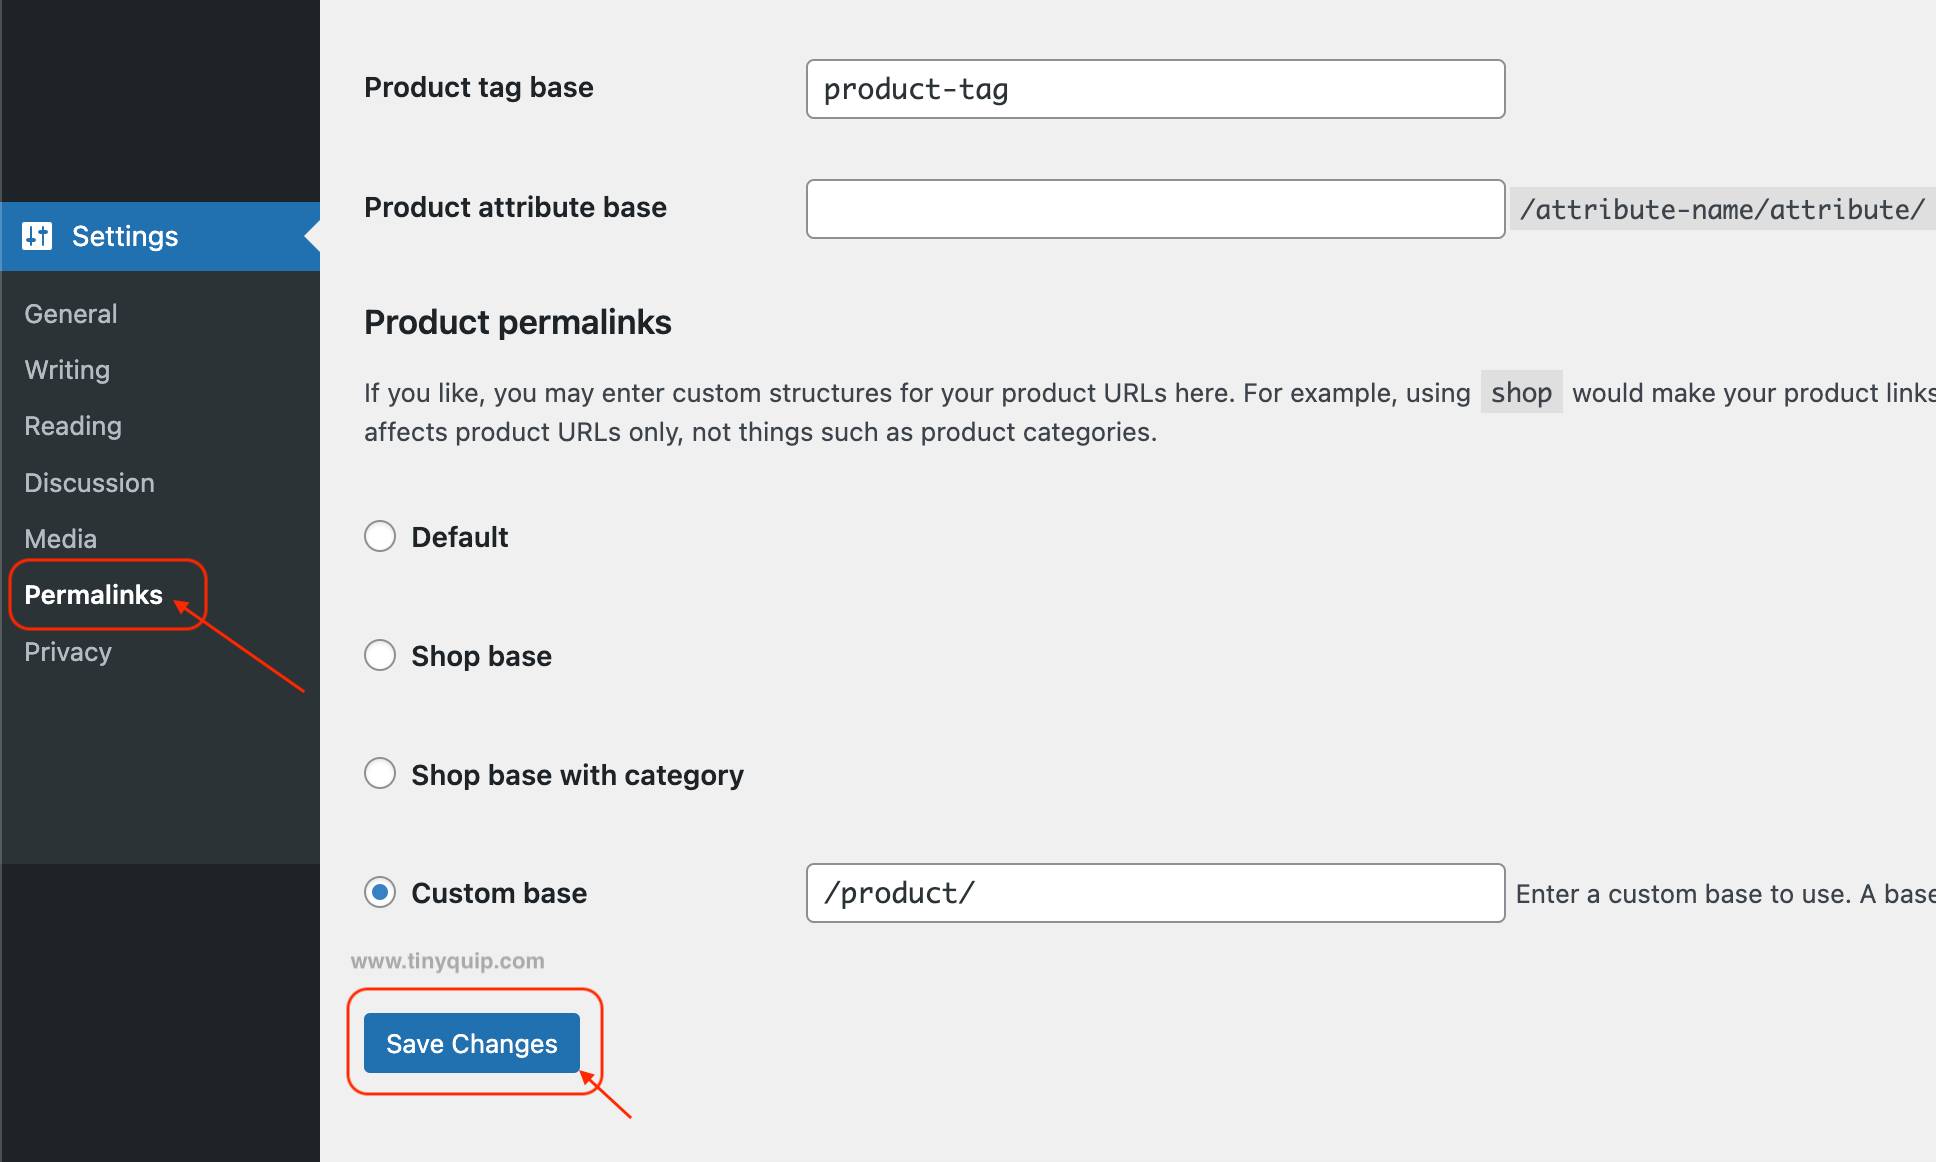
- Login to your WordPress website and navigate to the dashboard.
- On the left of your screen, you can find the “Settings” option; tap on it to view additional options.
- Tap on “Permalinks” from the list.
- Now, do not change anything here, as it will affect the search visibility of your website.
- Without changing anything, tap on the “Save Changes” option, and WordPress will automatically create a fresh new copy of the htaccess file for your website.
This is the easiest way to create a new copy of the htaccess file for your WordPress website and solve the 403 Forbidden error caused due to the corrupted version. If you are a tech expert, you can manually create this htaccess file on the website folder of your server.
2. Check the File Permissions
File permissions help the server know who can access certain files of your website on WordPress. You can set read, write, or modify access to your folders and sub-folders, and this helps the server to know which user can perform what operation. Yet, if you misconfigure it, you will end up seeing the 403 forbidden error, and we need to fix it quickly.
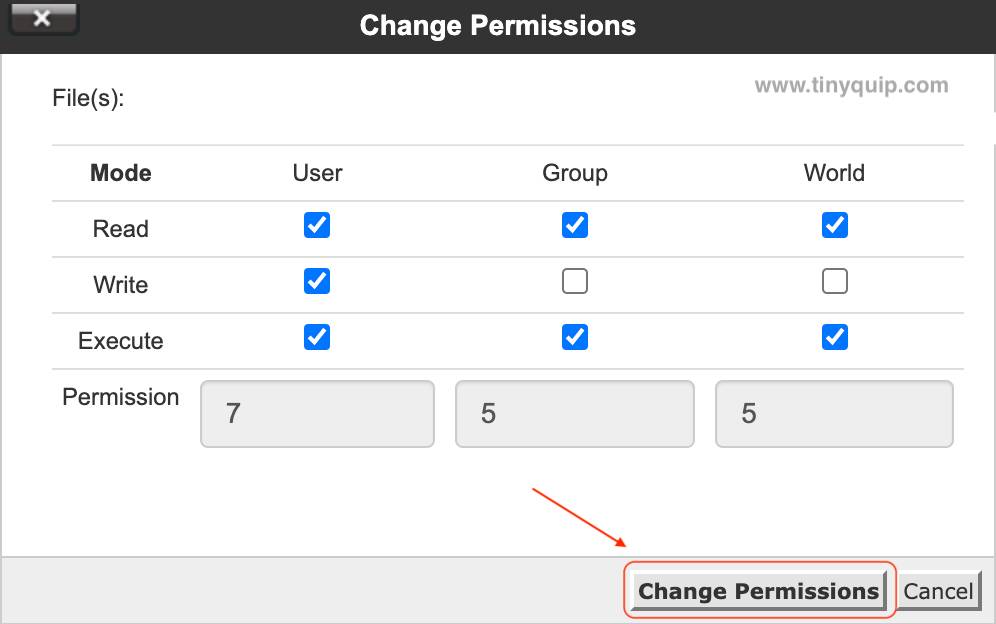
Setting file permissions on certain servers is easy, thanks to the “GUI” that shows the read, write and modify options, and you can check and uncheck these options as per your preferences. However, servers that use Linux or Linux-like systems will require you to enter three-digit numbers to set the file permissions.
Here are ideal permissions for WordPress folders and directories,
Files –
- 644 (The owner of the file can read and write the file, while the group can only read it), or
- 640 (The owner of the file can read and write it, group members can only read it, and all others have no read or write permissions).
Directories –
- 755 (The owner of the directory can read, write, or execute, group and other members can read and execute)
- 750 (The owner of the directory can read, write, or execute, group members can read and execute, and all others have no permissions)
However, there are also certain other ideal file permissions for different kinds of files. For instance, the core WordPress files like Wp-Config should be either set to 440 or 400 so that only admins can have access to them.
But how do you view and set permissions for files on your WordPress files and directories? Let’s have a close look.
How do You Set the File and Directory Permissions for WordPress Files?
- Login to the server and, using the “File Manager,” open the directory location to your WordPress website. It is usually installed in the home directory > www > WordPress > website name.
- Now, look for core files in your WordPress folder, especially the ones which are required to access your website.
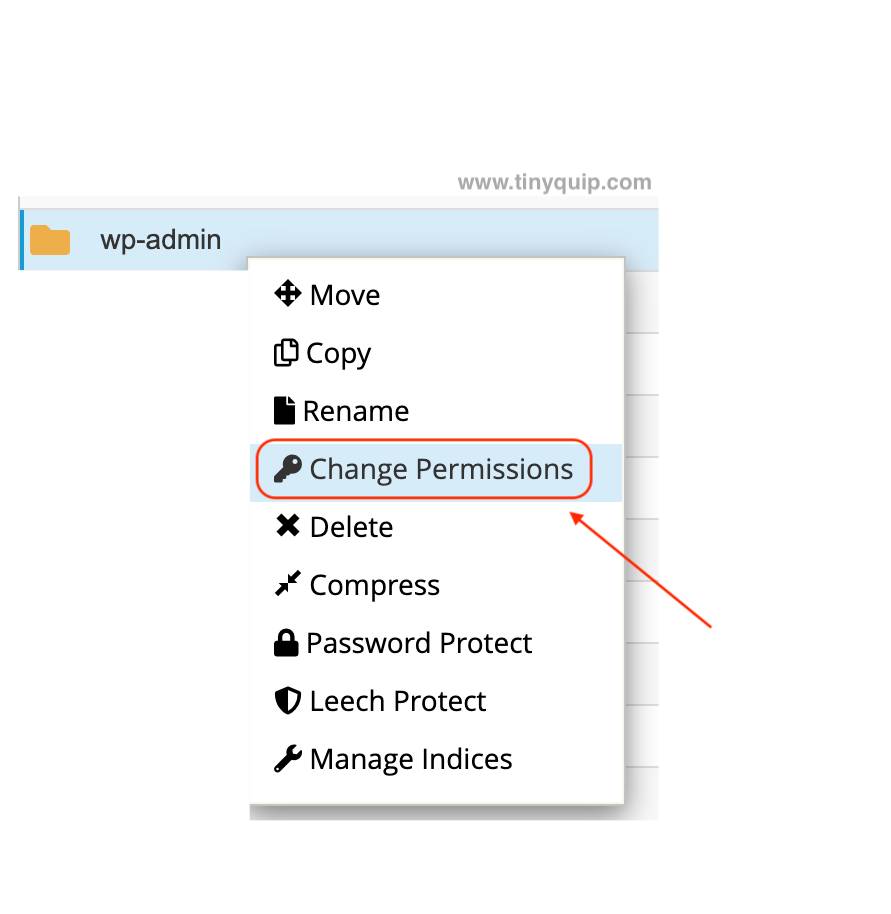
- Right-click on the file or folder for the file for which you wish to view the permissions, and then tap on “Permissions” from the sub-menu or the toolbar. In certain cases, instead of “Permissions,” you can find the “File Attributes” option in the sub-menu.
- You can now see a small window with the set permissions, and you can change it for admin, group, and other public users as per your preferences.
- Now, change the preferences either by using the GUI or the numerical, and check if you are still facing the 403 forbidden error for your WordPress website.
You don’t have to change the permissions for sub-files or sub-directories each time. If you change the permissions for the parent directory, it will be automatically applied to all the sub-folders and directories inside it. However, it is not recommended for home directories or other major directories that can help attackers gain access to all your sensitive content.
3. Plugins and Themes | 403 Forbidden Error on WordPress
Unsupported, conflicting, or buggy plugins and themes are always one of the big issues for your WordPress websites and can create issues like the 403 Forbidden Error.
Let’s clarify one of the first few things first; certain popular or unpopular plugins may or may not be supported with the current WordPress theme on your website. One of the major reasons for this is how the theme is designed and what PHP version you are using. This is also the reason why themes come with their own set of plugins that you can install during or later the installation.
Secondly, do not install themes and plugins from third-party, poorly trusted websites from a security point of view. They are definitely luring but have backdoors and will only harm the server in the longer run.
Lastly, if you are installing new plugins and themes, it is likely that they are buggy and causing issues like the 403 Forbidden Error on your WordPress website. So, one thing you can do is try deactivating the plugins and themes one after the other to check which is the one causing the issue.
What to Do?
The first thing to do is revert the theme to default twenty-twenty and check if the issue is due to the theme. If this isn’t the case, then try deactivating all your plugins one after the other, and in each instance, check if you are still facing the 403 Forbidden Error on your WordPress website.
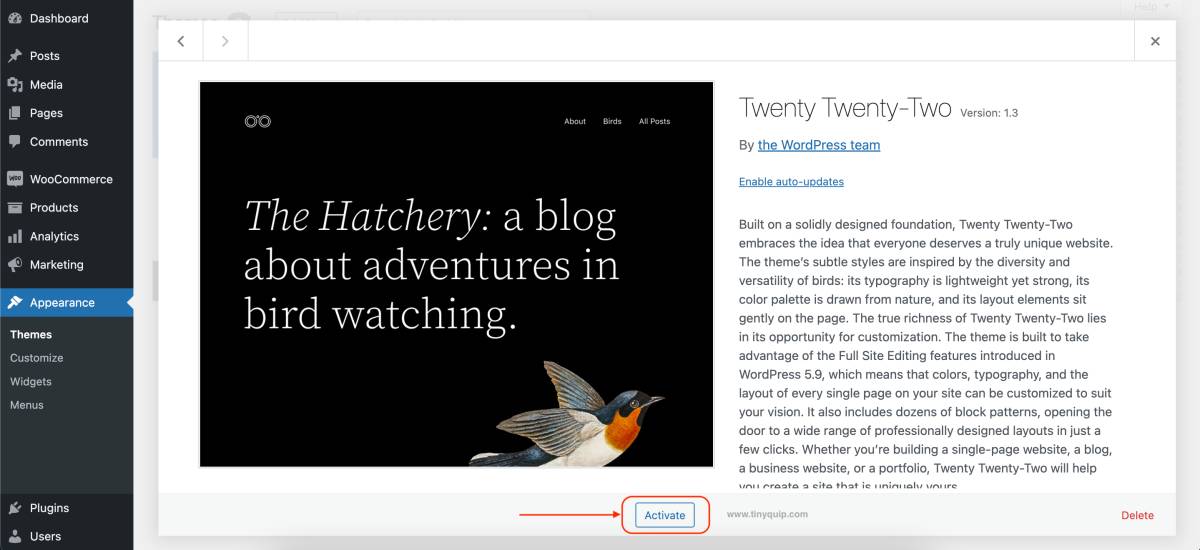
How to Revert your Current Theme to the Default Twenty-Twenty?
- Login to your WordPress website on your desktop or laptop
- On the left of your dashboard, you can find the “Appearance” option; tap on it.
- Now, choose “Themes” and then look for the default twenty-twenty theme and tap on it.
- Click on the “Activate” button, and the theme will be applied to your website.
If you rather wish to check for theme upgrades, you can visit the theme store from where you bought the theme and see if there are any new updates available. If there are any, download the WordPress installable files and, using the “Add New” button, upload the new version of the theme.
Check if you are still facing the 403 Forbidden Error for your WordPress website, and if that is so, we will need to check for buggy or troublesome plugins. In the contrary case, the theme file is broken, and replacing the theme version should help you solve the problem. You can also check with the theme community and support team to know if there are any particular steps that you need to follow to fix the issue.
Also read: How to Enable WordPress Error Logs | The Handy Guide
Deactivate the WordPress Plugins to Check for 403 Forbidden Error
Usually, it is the speed optimization and cache plugins that cause an error like the 403 Forbidden Error. But it cannot always be true; there is a good chance that a simple social plugin can also cause your website to be down. To solve this, let’s deactivate each plugin one after the another and see which is the black sheep among them.
To deactivate a plugin,
- Login to your WordPress website on your desktop or laptop
- On the left of your dashboard, you can find the “Plugin” option; tap on it.
- You will now see a new window with all the installed plugins, both active and inactive ones.
- Under each plugin, you can find the “Deactivate” option; tap on it, and within a few seconds, that particular plugin will be deactivated.
- Once deactivation is done, navigate to the page showing 403 Forbidden Error and check if it still exists. If that is the case, repeat the process with other plugins.
Deactivating each plugin can help you identify if the issue is due to a bad plugin. When you find one, it is best to deactivate it and find a better alternative.
4. Disabling CDN on your WordPress Website
Content-Delivery Network or CDN helps you deliver your website in regions that are far from your server and with some good speed. However, the CDN can also create issues such as 403 Forbidden Error on your WordPress website, and mostly it is when you also have a cache paired with CDN.
If the first three steps do not help you solve the Forbidden Error issue on your WordPress website, try disabling the CDN and check for the issue. If you are still facing the 403 Forbidden Error, one of the last reasons for this could be misconfigured Hotlink protection.
5. Misconfigured Hotlink Protection
Most times, other bloggers and website owners copy your web images or embed them in their websites. When this happens, most times, their visitors are viewing the images on your server bandwidth. To stop this from happening, you can enable Hotlink Protection, and you can find it in your server’s dashboard.
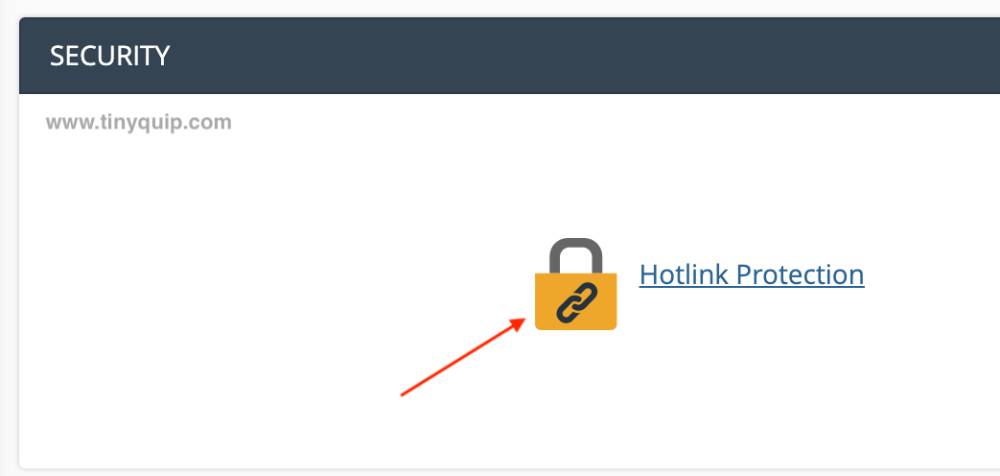
However, at times the Hotlink Protection can cause the 403 Forbidden Error on your WordPress website. So, if you are the website admin and finding your website to encounter such an error, try disabling the Hotlink Protection and check if the issue exists.
Also read: 8 Best Habit Tracker Apps for Android and iPhone
Are You Still Facing the 403 Forbidden Error? What to Do Next?
If you are still facing the 403 forbidden error on your WordPress website, it is best to contact the generous server support. Point them to the specific web page on which you are facing the WordPress 403 Forbidden Error, and they should get you back with a solution, mostly by whitelisting your IP address.
Frequently Asked Questions [FAQs]
If you are facing the 403 Forbidden Error on your WordPress website, it can either be due to bad plugins and themes, file permissions, and the corrupted or empty htaccess file.
To change your current WordPress theme to default, login to your WordPress website, and on the left of your dashboard, you can find the “Appearance” option; tap on it. Now, choose the themes option and activate the default twenty-twenty theme.
You can check for bad themes and plugins, file permissions, check htaccess files, turn off CDN, and disable Hotlink protection should help you solve the 403 Forbidden Error on your website.
Before You Leave
Get Our Prime Content Delivered to your Inbox for Free!! Join the Ever-Growing Community… Right Now.
Give this article a quick share,
Wrapping up: Fix 403 Forbidden Error on WordPress Website
403 Forbidden Error is one of the common issues you will face as a WordPress website owner, and there are a couple of reasons for this error to occur. For instance, bad plugins and themes, htaccess files, file permissions, CDN, and misconfigured Hotlink Protection. This guide should help you solve the issues with 403 Forbidden Error on your WordPress website. However, if you are still facing an error, it is best to contact server support and look for a more precise solution.
Get Powerful Managed WordPress Hosting
Check out Kinsta WordPress Managed Servers for powerful cloud server performance, high page speed, and managed deliverability.
- Cloud servers with your choice of data center among 35 locations
- HTTP/3 quick support
- Malware security pledge
- Staging environments, site management, and optimization tools
- Cloudflare Enterprise and CDN
I hope to have helped you with how to solve the 403 Forbidden Error on your WordPress website. For any views and comments, feel free to use the comment box. If you like this article, do give this a quick share on your social media handles and do tag us. Also, join our Telegram channel, Facebook page, and Twitter to never miss a quick update.