
Want to enable WordPress error logs to keep track of your website’s health? This handy guide is all you need as a WordPress website owner.
WordPress is one the easy-to-use CMS platform that allows users to create their website, customize it, and also start their online business on it. But most WordPress users keep testing their website with new plugins, themes, and customizations, and at one point, the website crashes or shows some vague information on the front end. In some other cases, a conflicting update or change on your WordPress which is not manually triggered can allow snoopers to access your website and play with it.
But how do you know what error is causing all this mess? You can know it with the help of an error log. An error log is a document that lists all the errors that your website is facing due to updates, plugins, or manual or automatic changes.
To enable error logs on your WordPress website, you will need access to the server on which your WordPress website is hosted. You can then follow this handy guide that will help you with the process of how to enable the WordPress error logs.
Also read: How to Solve Critical Error on WordPress | My Website is Down Issue
Get 30% to 200% Faster Website Performance
- High-performance CDN
- Google’s cloud servers
- Reduce load times by almost 49% (TTFB, cache, and more)
- Site backups and uptime checks
- Free SSL certificates
How to Enable the WordPress Error Logs | The Handy Guide
To enable the WordPress error logs, you will first need access to the core WordPress files on your server. If you are the admin, there is nothing to worry about, as you will have all the file permissions; however, if there are several users and admins, you can set or check the file permission to the WordPress files using this guide.
Once you have all the permissions, follow the below steps,
Step 1: Finding the wp-config.php File on your WordPress Hosted Server
- Login to the server with your WordPress website using an FTP client. The FTP client allows you to view all the files and folders, and a few also help you manage other important aspects of your server. If you are using Cpanel, log in to your hosting.

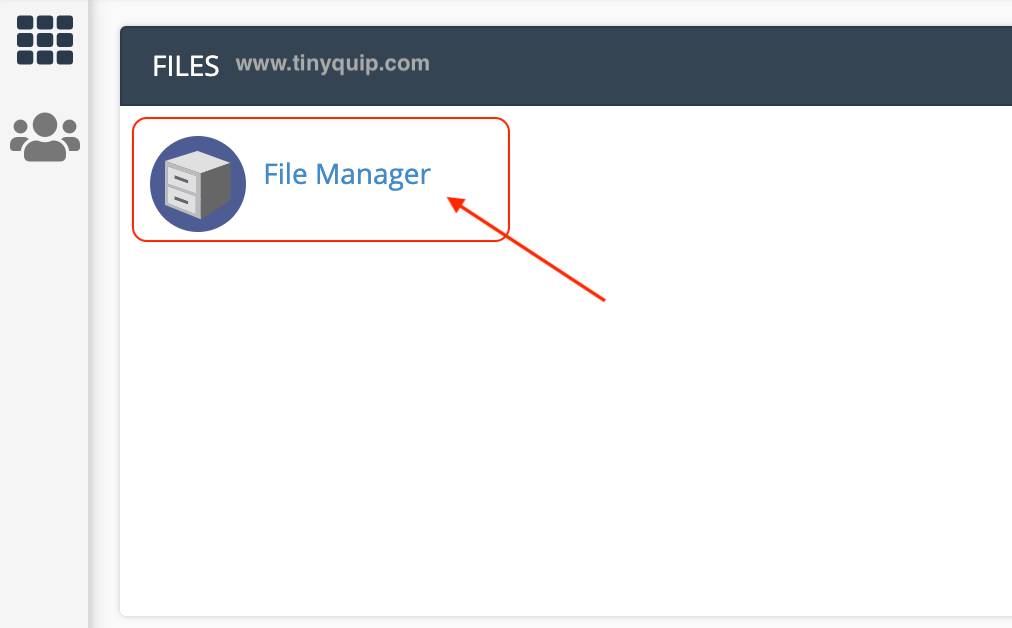
- Look for the “File Manager” option; it should be placed under the File Sections. With certain hosting platforms, the File Manager is renamed as “Files” or “Folders,” but ultimately, it shows all the files and directories.
- Under the home directory, look for “www” or “website” and navigate to your WordPress website folder.
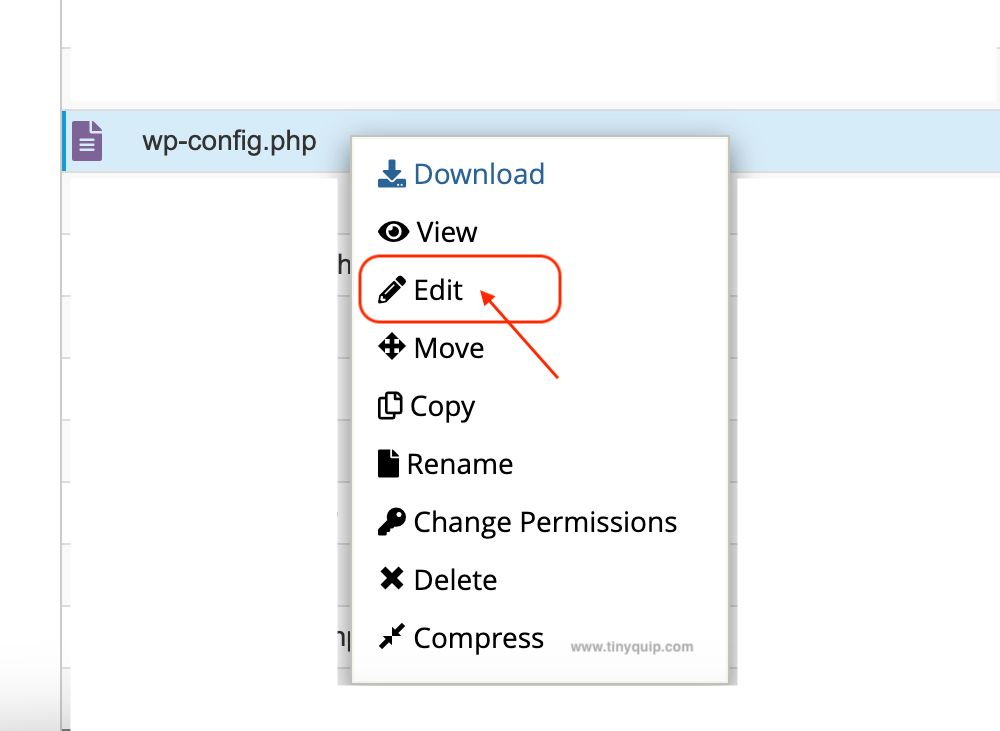
- Now, look for the wp-config.php file and select the “Edit” option from the toolbar or by right-clicking on the file.
Step 2: Enable the WordPress Error Log by Turning on the Debug Mode
In the earlier step, we found the wp-config file for our WordPress website on our hosting. But we still haven’t enabled the log file, and this step will be a crucial one.
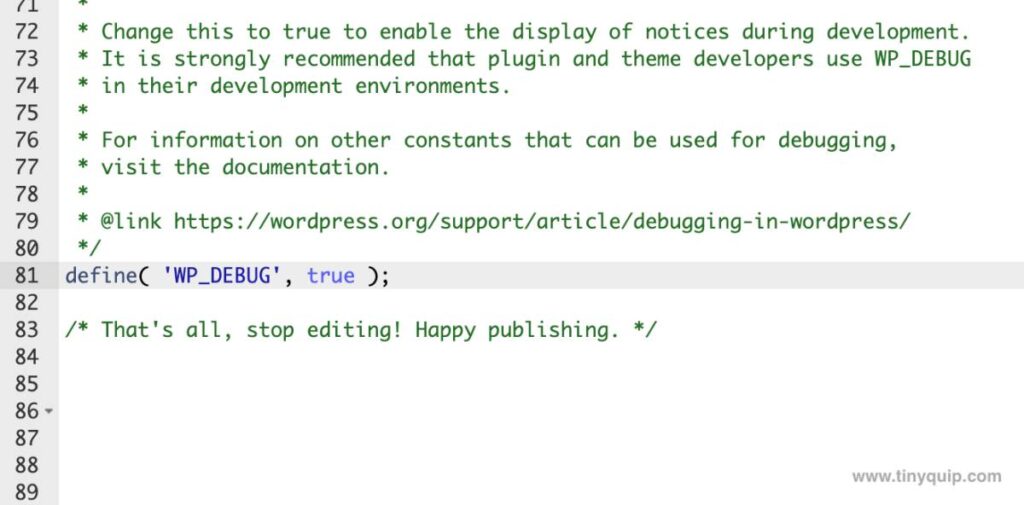
After opening the wp-config.php file in the edit mode, we need to look for the code,
define( 'WP_DEBUG_LOG', false ); We now need to make a minor change in this code and replace the “false” phrase with the “true” phrase and save the changes.
If you cannot find this code, place your cursor below the statement, “Stop editing! Happy blogging,” and enter the following line,
define ( 'WP_DEBUG_LOG', true );Once done, save the changes and you can now see errors and logs of your WordPress website and make necessary changes.
Also read: How to Check Error Logs on WordPress Website | Handy Guide
Step 3: Disabling Showing Errors to the Public or Visitors on your Website
When you enable WordPress error logs using the wp-config.php file, the errors and logs in certain cases are also visible to all the users. Meaning every visitor on your website without the need to log in can see these logs and errors, and this can be an opportunity to exploit by snoopers.
Your error log file contains a brief description of vulnerabilities and errors that can be exploited, so we need to make this file private and only accessible to admin users.
Here is how you can do it with a few lines of code,
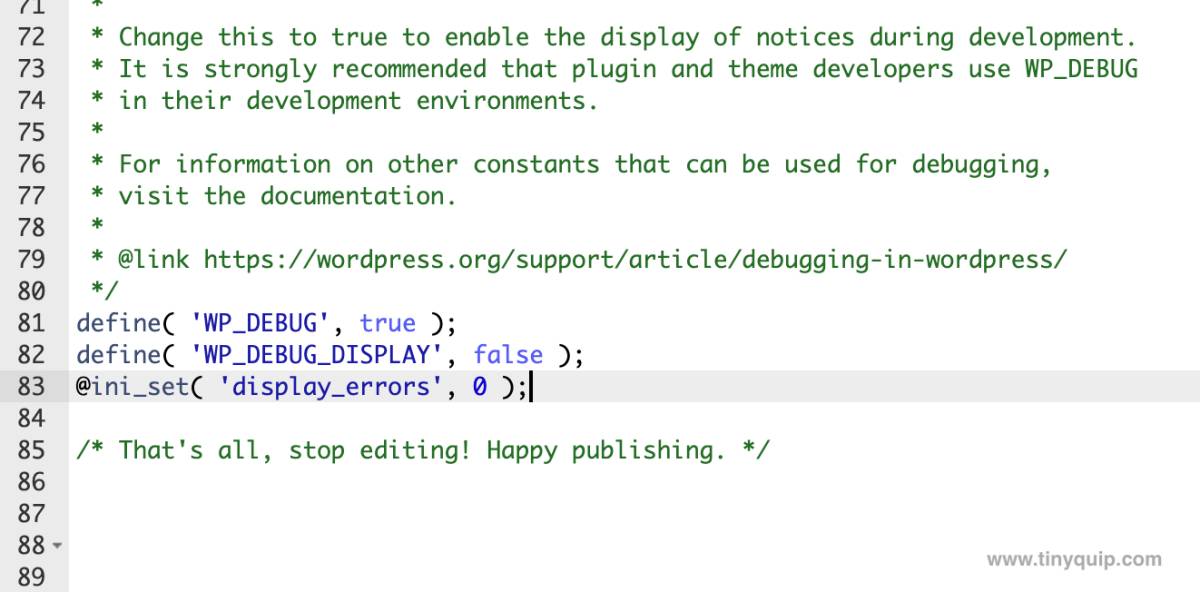
- Open the wp_config.php file and navigate to the “WP_DEBUG_LOG” line that you have worked on in the prior step.
- Below that line, enter the following two lines of code,
define( 'WP_DEBUG_DISPLAY', false );
@ini_set( 'display_errors', 0 ); - Now, save the wp_config.php file, and the error log file will no longer be shown in the front end.
Don’t want to make script changes to your core WordPress files? You can use a plugin instead.
Step 4: Using an Error Log Plugin on WordPress (Optional)
Plugins have been pretty helpful for every other WordPress user who has no idea how the technical things work on your WordPress. Though helpful, these plugins reduce the speed of your website. This happens as every instance or action on your website; plugin scripts need to be run.
If you are willing to use plugins, there are a bunch of good error log plugins that are available in the WordPress plugin store. A few namely popular are WP Debugging and Error Log Monitor plugins that are widely used to get the error log on a WordPress website.
To get plugins,
- Login to your WordPress website, and you will see the WordPress dashboard.
- On the left of your WordPress dashboard, you can find the “Plugins” option; tap on it.
- On the right of your screen, you can find the list of all the plugins that are installed; tap on the “Add New” option from the top to add a new plugin.
- Using the search bar on the left, look for a decent error log plugin such as WP Debugging or Error Log Monitor.
- Check for issues, ratings, reviews, screenshots, and compatibility; if everything suits your need, tap on the “Install” button to install the plugin on your WordPress website.
- Now, tap on the “activate” option, and you can then find it on your dashboard or settings menu.
At times, there are some bad plugins that can make it hard for you to use your WordPress website and, in some cases, crash it. So, it is best to use plugins that you really trust. It is also best to have a backup of your files and content using the server to restore or roll back the WordPress website if there is a critical issue.
Frequently Asked Questions [FAQs]
To enable the error logs on your WordPress website, add the following code to the wp_config.php file “define ( ‘WP_DEBUG_LOG’, true );” If you already have this code with a “false” phrase, change it to “true” and save the file.
To enable the WP_DEBUG mode, add the statement “define ( ‘WP_DEBUG_LOG’, true );” to your wp_config.php file. If you already have this statement, change the phrase “false” to “true” and save the file.
Open the WordPress website directory on your hosting and look for the folder “wp-content,” and you will find the file “debug.log” this is where all the error logs are stored.
Before You Leave
Get Our Prime Content Delivered to your Inbox for Free!! Join the Ever-Growing Community… Right Now.
Give this article a quick share,
Wrapping up: How to Enable WordPress Error Logs
This is how you can enable WordPress error logs on your website. In this guide, we came across two ways to enable the error logs: manually and through plugins. I prefer the manual method as it does not make the website slower, and there is always a chance of a bad plugin that can cause an issue like the 403 Forbidden Error. If you are sticking to the plugin method, WP Debugging and Error Log Monitor are two popular plugins, but they sometimes show incorrectly.
Get Powerful Managed WordPress Hosting
Check out Kinsta WordPress Managed Servers for powerful cloud server performance, high page speed, and managed deliverability.
- Cloud servers with your choice of data center among 35 locations
- HTTP/3 quick support
- Malware security pledge
- Staging environments, site management, and optimization tools
- Cloudflare Enterprise and CDN
I hope to have helped you with how to enable error logs on your WordPress website; let me know if this works for you using the comment section below. If you like this article, do give this a quick share on your social media handles and do tag us. Also, join our Telegram channel, Facebook page, and Twitter to never miss a quick tech update.