

Does Antimalware Service Executable use a high CPU? Here is how you can fix it.
Windows 10 and Windows 11 are one of the most popular operating systems, and the Antimalware Service Executable program is a part of them. Windows has a series of programs running in the background, such as task manager, windows defender, antivirus, and more. Antimalware Service Executable is part of the Windows Defender and is responsible for checking files for malware. This is a background process and sometimes consumes high CPU or disk usage that can slow down your PC. In this guide, we will fix “Antimalware Service Executable” using a simple step-by-step guide.
Also read: 4 Best Ways To Disable Windows 10 Auto Update
What is Antimalware Service Executable Program?
Antimalware Service Executable is a program that is part of the “Windows Defender” service. It runs in the background and checks for files containing malware that can affect the computer. This service is also responsible for checking background system scans, installing antivirus updates, and anything that the windows defender asks for.
If you have keenly noticed, you might have encountered a pop-up on your windows screen while installing dangerous software. The Antimalware Service is responsible for checking and restricting such files. It is Microsoft’s inbuilt security system that stops malicious services from overriding the system.
Other than restricting dangerous software, Antimalware Executable Service is also responsible for updating the virus definitions. Windows defender uses these virus definitions to avoid basic virus attacks on your windows system.

It is also known as the MsMpEng.exe file and is bundled with the Windows Operating System. The problem can arise on any Windows OS, including Windows 10, Windows 8,8.1, Windows 7, or Windows XP. One common doubt that needs to be addressed is that future updates will not reduce the High CPU or Disk Usage or fix this issue.
Windows defender is not that efficient compared to the latest malware. Devices must be secured and alerted at the right time. This is the main reason why we use BitDefender Antimalware software. It is the #1 antimalware and antivirus system which is also available at a lower price. After using it for the past five years, we highly recommend our readers check it out once.
Antimalware Service Executable High CPU – The Problem
The major problem that users face with the Antimalware Executable Service is high CPU or disk space usage. There can be several reasons for this problem, and sometimes caused due to high-level malware.
But how? Isn’t the service responsible for checking such files? The answer to this is simple; high-level malware easily bypasses such security as they run their own service with the same name; Antimalware Executable Service.

BitDefender Total Security
5 Devices | 2 Years of Protection
Features:
- #1 Malware Detection
- More than Virus Protection.
- Compatible with Windows, Mac OS, iOS, and Android.
- Webcam protection.
- Multi-layer ransomware protection.
- Secure online transactions, anti-theft & anti-loss tools
It also includes BitDefender VPN service (200MB/day), Password Manager, File Shredder, Anti-tracker, and PC Optimiser.
How to Fix Antimalware Service Executable
Several issues can cause or interfere with Antimalware Executable Service in the task manager. A few problems include the malware acting as faux and consuming the CPU power in such situations. Here are a few solutions that help in solving the MsMpEng.exe high CPU or disk usage issue.
1. Change Windows Defender Scheduling
Antimalware Executable Service is associated with the Windows Defender program and runs in the background. If the MsMpEng.exe is consuming high CPU or disk usage, it mainly scans files in the background. One of the solutions is to reschedule the windows defender real-time protection service.
Here is the step-by-step process/guide –
- Open the “Run” window on your windows computer using Windows Logo Key + R.
- In the dialog box, enter taskschd.msc and click on the enter option. This should open the Task Scheduler Library window.
- From the Task Scheduler Library, navigate to Windows Defender. You can find it at Task Scheduler Library > Microsoft > Windows > Windows Defender.

- Double-click on the Windows Defender Scheduled Scan from the right-side pane.
- In the General tab, uncheck the option “Run with the highest privilege.”. This option is responsible for running Windows Defender on the highest priority, which consumes high CPU or disk usage.
- The next step is to click on the “Conditions” tab and untick all the options.
- Confirm the changes and boot your Windows computer.

Also read: How to Resolve tcpip.sys BSOD on Windows 10/8/7
2. Add Antimalware Executable Service to Exclusion List
Adding the MsMpEng.exe service to the exclusion list is one of the best ways to solve the high CPU usage issue. Moreover, the Windows Defender’s scanning system is added to exclusion and removes the security on your computer. To protect the computer, you can use BitDefender Security, an external antimalware and antivirus software known for overall protection.
Here is how to add the MsMpEng.exe service to the exclusion list –
- Launch the Windows Defender program and click on Virus and threat protection feature.
- In the Virus and Threat protection feature, look for Exclusions and then click on Add/Remove Exclusions.
- Click on Add Exclusions. You can find a drop-down below right beside it; select “Process” under the drop-down menu.
- Add MsMpEng.exe service to the exclusion and click on the Add button to confirm it.
- Now, the MsMpEng.exe service is added to the exclusions list and should no longer use high CPU or disk usage.
If you have trouble adding exclusions to the list, you can check this Microsoft guide on defining exclusions.
Also read: How to Update Windows 7/8 to Windows 10 For Free.
3. Disabling Windows Defender
If the above two solutions don’t work for you, the best alternative is to disable the entire Windows Defender service. The problem with doing this activity is that it will remove protection from your Windows Computer. However, If you do so, it is recommended to install any other antivirus or antimalware software.
Also read: How to Record PC Screen for Free using Powerpoint [PPT] on Windows [7,8,&10] and Mac
How to disable Antispyware, Step-by-Step Guide –
- Open the Run program on your Windows Computer key using the start menu or Windows logo key + R shortcut.
- We need to open the Registry Editor to disable the Antispyware; use the command regedit and click on ok.
- On the left side pane, navigate to the following location – HKEY_LOCAL_MACHINE\
SOFTWARE\Policies\Microsoft > Windows Defender - Here, you can find the “DisableAntispyware” service; double-click on it and set the value to “1” to disable it.
- If you cannot find the “DisableAntispyware” service, we need to create it using the following actions.
- Right-click on the main Registry Editor pane and select New > DWORD (32-bit) Value.
- Name this new registry edit as “DisableAntispyware” and then perform step 4.
Also read: How to Install WSL 2 on Windows 10? | Step-by-Step Guide
How to Disable Antimalware Service Executable?
Antimalware service executable is annoying, and if you are using another antimalware software, it is best to disable the default one.
1. Disable Microsoft Defender
MsMpEng.exe or Antimalware service executable can be stopped by disabling the Microsoft Defender. There are two ways of disabling the Microsoft defender: first, using the Registry Editor, and second, using the Command Prompt.
Disable Microsoft Defender using CMD Prompt
You can disable the Microsoft Defender using both Registry Editor and Command Prompt. The fastest and easiest way is to use the command prompt.
But how to disable Microsoft Defender using CMD?
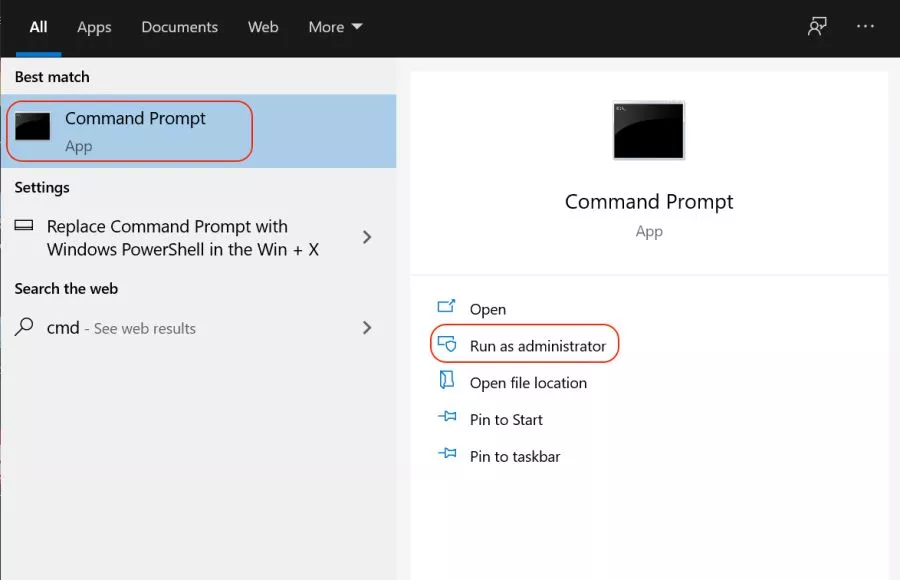
- Open the Windows Menu and look for the command prompt; you can also use the Windows search bar.
- Right-Click on the command prompt and run the command prompt as administrator.
- Now, enter the following command –
REG ADD “hklm\software\policies\microsoft\windows defender” /v DisableAntiSpyware /t REG_DWORD /d 1 /f - After the command is successfully executed, you can find the Antimalware Service Executable disabled.
- It is important to run the command prompt as administrator to fully utilize the admin privileges and make changes in Windows Defender.
Also read: How to Check if your PC is TPM Compatible for Windows 11?
Disabling Microsoft Defender using Registry Editor
You can disable the Microsoft Defender program using the Registry Editor, and it is a much simpler method to stop Antimalware Service Executable.
Here are the steps to disable Microsoft Defender using the Registry Editor –
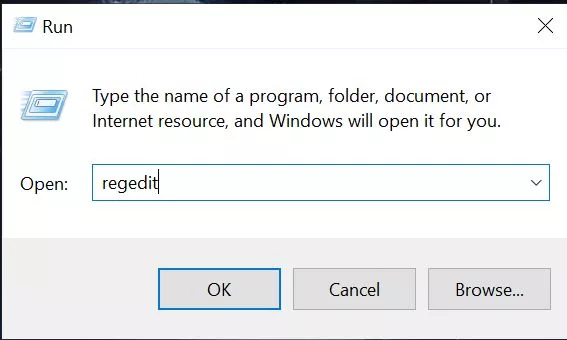
- Open the Run window using the Windows + R shortcut; alternatively, you can use the search in the windows menu and open the Run window.
- Enter the following command –
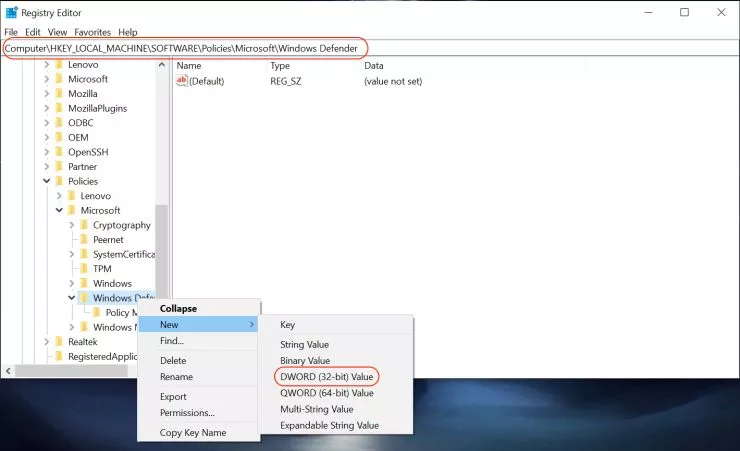
regedit - Now, navigate to the following location –
HKEY_LOCAL_MACHINE/SOFTWARE/Policies/Microsoft/Windows Defender - In the left pane, you can find a list of registry folders. Right-Click on the Windows defender and select New > DWORD. In most cases, it is DWORD 32-bit.
- A new DWORD registry is now created. Double-click on the file and then name it DisableAntiSpyware.
- The final step is to set the value of DisableAntiSpyware to 1.
You should now be able to disable the Antimalware Service Executable and Windows Defender in general. It is best to have an Antivirus and Antimalware installed after disabling the Windows Defender.
2. Use Group Policy Editor
The second best method to disable Antimalware Service Executable and Windows Defender is to use Group Policy Editor. Ensure you have first installed the group policy editor on your Windows computer.
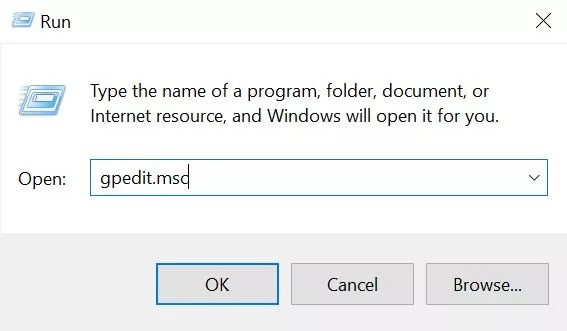
- Open the Run window using the Windows + R shortcut; you can alternatively also use the search in the windows menu and open the Run window.
- Enter the following command –
gpedit.msc - From the left pane, navigate to the following directory –
Computer Configuration/Administrative Templates/Windows Components/Microsoft Defender Antivirus/Real-time Protection - Turn off the real-time protection and then select the “Enabled” option.
- Click on “Apply” and save the changes to disable the antimalware service executable and Windows Defender.
It is worth to note this will disable the antivirus system on your Windows computer. To protect the PC, ensure you install a secure antivirus and antimalware on your Windows PC.
Our best recommendation is BitDefender Antivirus and Antimalware, which is both highly secure and budget-friendly.
Also read: How to Fix DPC WATCHDOG VIOLATION Error on WINDOWS 10
3. Stop Windows Defender Service
If you cannot disable the Antimalware Executable Service, you alternatively stop the service. This is the best option to temporarily stop Windows Defender from scanning the system and consuming high-CPU usage.
- Open the Run window using the Windows + R shortcut; alternatively, you can use the search in the windows menu and open the Run window.
- Enter the following command –
services.msc - Now, you can see a list of services on your Windows computer.
- Look for “Windows Defender Antivirus Service” from the entire list.
- Right-Click on “Windows Defender Antivirus Service” and set the startup type to automatic.
- Now, click on the “Stop” button, and this will temporarily disable the Antimalware Executable Service on your Windows PC.
Also read: How to Use Clubhouse on PC | Windows, Mac, and Linux
Why Antimalware Executable Service uses High Disk Memory?
Most people have this common question, why does Antimalware Executable Service consume high CPU usage?
When your PC is infected by malware, there is the best chance that it replaces the Antimalware Executable Service program with an infected one. This infected program that acts as a Windows Defender service uses all the resources of the CPU to an extent to make it fail.
So, when you see an Antimalware Executable Service using high CPU / disk memory, it is actually the infected program.
This program continuously scans the memory and utilizes all your resources, making it unavailable for other uses.
You may also like,
- 5 Best File Managers for Windows
- How to Remove Windows 10 Password From Login Screen?
- [Guide] How to Activate Twitch TV on www.twitch.tv/activate
Frequently Asked Questions
MsMpEng.exe or Antimalware Executable Service is a program of Windows Defender Service. It is responsible for checking for malware and virus threats in the background.
There are several solutions to solve the MsMpEng.exe using high CPU or disk usage; a few of them are:
– Change Windows Defender Scheduling.
– Add Antimalware Executable Service to the Exclusion List.
– Disabling Windows Defender on Windows Computer.
Yes, you can end the antimalware service from the task manager when you see it using high CPU or disk usage. If the problem persists, reschedule the Windows Defender or disable it entirely.
Also read: How To Recover Deleted Files On Windows – Easiest way.
Before you leave…
Get Our Prime Content Delivered to your Inbox for Free!! Join the Ever-Growing Community… Right Now.
Wrapping – Antimalware Service Executable uses High CPU
These are simple steps on how to solve Antimalware Executable Service using a high CPU or disk. Remember, using any of the above solutions can leave your computer at risk of cyber-attacks; you must have a strong antivirus and anti-malware installed on your computer. We recommend using BitDefender.
If you have any more questions on how to fix Antimalware Service Executable high CPU usage, do let us know in the comment section.