
Windows 11 has a compact and beautiful layout compared to its predecessors Windows 10, 8, and 7; we can find a bunch of attractive UI designs such as pastel colours, rounded corners, and newer interfaces. Moreover, one of the things we wanted to see for a long time on an operating system like Windows was the Snap Layouts. The Snap Layouts allows you to place multiple windows on a single screen making it much easier for productivity. However, since Windows 11 came into action, a lot of users are facing a bunch of errors and problems. It is common and if you are facing any issues such as Snap Layouts not working on Windows 11 then this is the right guide for you.
Also read: 5 Best File Manager for Windows
How to Use Snap Layouts on Windows 11?
Before heading to solutions on how to fix Snap Layouts not working on Windows 11, we first need to know the correct procedure to enable and use the Snap Layouts. But why should one set up Snap Layouts? With the help of Snap Layouts, users can create a much cleaner and easy to use desktop; it allows you to place all the desktops on a single screen and use them all at once. This is something quite similar to the split window screen option but with more screens and a new arrangeable format.
To use the Snap Layouts on Windows 11, users need to follow the below steps.
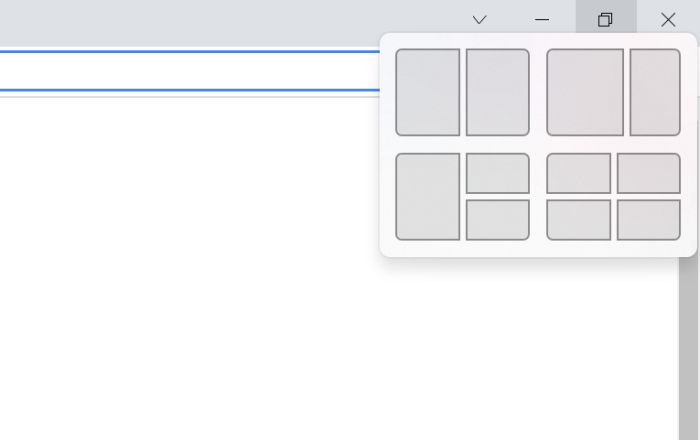
- Suppose that you are using are multiple windows on your desktop; hover the cursor to the maximise button of one of the desktop and then right-click on it.
- Now, you will find an option for tile-like arrangements; tap on the desired arrangement or layout as per your convenience and desire.

- Once you tap on the layout, your desktop screen will arranged in that layout. All the other desktop screens are presented in the form of thumbnails for other tiles.
- Using the “Alt-Tab” operation, repeat the procedure and set all the desktop screens in your preferred snap layout. You can also tap on the tiles and select the window you wish to present.
That’s it. You are ready with the snap layout and have all the desktops on a single screen. You can rearrange the windows in different snap layouts and also maximise the entire desktop using the maximise button at the top; this will allow you to restore the screen view of the app you are using to the default larger size. The snap layouts can be configured in the settings app to rearrange the screen using multiple operations.
Now that we know what are Snap Layouts and how to use them, we will now look at the solutions on how to fix them when they are not working on your Windows 11 computer.
How to Fix Snap Layouts Not Working on Windows 11?
Snap Layouts is one of the best features added in Windows 11; though the OS is not completely revolutionary and Microsoft has worked more towards the UI, Snap Layouts is the best addition to the user experience on Windows 11. The interface is much cleaner and clutter-free and people have quite attached themselves to it. However, there are a few bugs that restrict the users from experiencing it fully; this can be due to TPM incompatible PC, third-party apps, or buggy updates.
If you are facing trouble or errors while using the Snap Layouts feature, there must be something wrong that needs to be fixed. Below are some of the solutions that work perfectly towards how to fix Snap Layouts not working on Windows 11.
1. Have You Correctly Enabled Snap Layouts on Windows 11?
The first and foremost thing to fix the Snap Layouts not working issue is to check if the feature is correctly enabled on Windows 11. Though the feature is by default enabled, if you are unsure, you can enable the feature manually using the below steps.
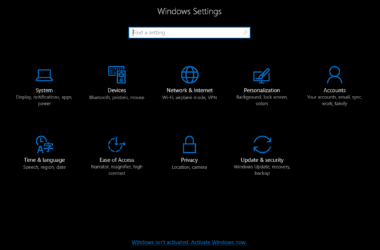
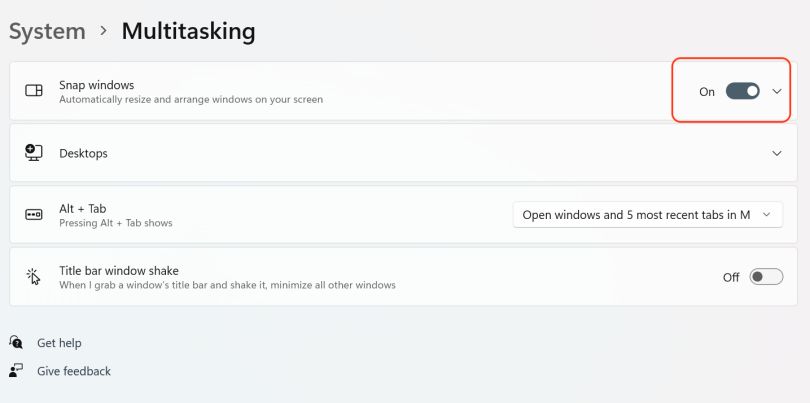
- Open the Windows Settings panel on your Windows 11 computer.
- On the left menu, you can find the system tab; this setting can also be accessed using the search feature in the settings menu.
- Now, under the “System” tab, you can find the multitasking option.
- Here, you can find the Snap Windows option, toggle it on. This can also be accessed directly from the search (Settings Panel > Search > Snap Windows).
- Now, you should be able to use the Snap Layouts on Windows 11 as described in the above section.
2. Try Using Keyboard Shortcuts
If you are unable to see the Snap Layouts after right-clicking on the maximise window, there should be some bug that is restricting you. In such a case, the best you can do is use the keyboard shortcuts.
Using keyboard shortcuts is one of the fastest ways to access Snap Layouts or any other feature on Windows 11. There is always a keyboard shortcut for every feature be it any operating system from Windows to macOS. However, in this case, there are two keyboard shortcuts to access the Snap Layouts when you are facing trouble using the cursor due to buggy updates.
- The first keyboard shortcut is by using the Win+Z which quickly displays the Snap Layout.
- Second keyboard shortcut for Snap Layouts is using the Win+Arrow keys.
Both the keyboard shortcuts quickly enable and display the Snap Layout options. The first keyboard shortcut displays only the Snap Layout but when you use Windows+Arrow keys, you can decide which window or desktop the layout should be assigned. Different arrow keys act as allotments for different tiles in the Snap Layout.
Unless the Windows 11 buggy updates are replaced, this is one of the best solutions to fix Snap Layouts not working issue. If you are still facing issues; Don’t worry, this is not the only option that can cause trouble; app compatibility is also one of the reasons why you may be facing the Snap Layouts not working issue.
Also read: How to Convert EXE to APK on Android and PC
3. App Compatibility
Snap Layouts is one of the new features on Windows 11 and there is a good chance that not all the apps support this feature. So, if you are unable to use the multiple layout feature on your Windows 11 computer, it is pretty obvious that the apps don’t support it yet. But how do you know if an app supports the Snap Layout feature yet?
There are a few ways to do this; the first and foremost way is to try resizing the app window using the cursor. Certain apps cannot be resized to maintain the user experience and interface. If you are unable to resize the app window, it is understandable that the app cannot currently support the Snap Layout feature yet. You may get to see the resizing options in future updates.
The second way to check if the apps support the Snap Layouts is by checking with the other apps. If a certain app is not supporting the Snap Layout resizing, try with the other apps. If you can resize the other apps for the Snap Layouts, the problem is with specific apps only.
Checking the app compatibility is one of the best ways to check and solve the Snap Layouts not working issue on your Windows 11 computer.
Also read: How to Schedule a Zoom Meeting in Advance on Android, IOS & PC
4. Snap Layouts Not Working for Firefox Browser
Firefox users are constantly complaining about the Snap Layouts incompatibility and issues while it works perfectly with other browsers. The reason for this is Firefox browser has a “custom control box” that is to be manually set up. Once you enable the custom box, you can resize the window and use features such as resizing, positioning and tile bar (Snap Layouts).
To enable the tile bar in the Firefox browser,
- Open the Firefox browser on your Windows 11 computer and ensure it is the latest version.
- Now, right-click on the toolbar to find a bunch of system options.
- From the options, click on “Customise toolbar” to proceed further.
- You are now shown a set of toolbar options, look at the bottom to find the “Tile bar” option.
- Enable the “Tile bar” and save changes.
Now, check if you can use the Snap Layouts with Firefox browser; if you are still facing Snap Layouts not working issue, it is not the browser and there is some other problem. However, if the Firefox desktop can now be used along Snap Layouts, the error is fixed.
Also read: How to Unsend an Email in Gmail on Android, iOS, & PC
5. Troubleshoot Your Windows 11 Computer
The next best thing you can do to solve the Snap Layouts issue is to check if there are any system-related problems. We understand it is hard for non-tech geeks to identify system-related issues; However, there is a simple way to find them and also quickly fix them; using the troubleshooting window.
Troubleshooting helps in running a health check-up for all the system-related files and fixing them if they are broken. Do remember, this is not an antivirus or anti-malware tool, it is only used to check the system files working conditions. If you are looking for a combination of antivirus and antimalware, Bitdefender is our topmost recommendation with a budget-friendly price and better service.
Troubleshooting also comes in handy to fix a lot of problems such as fixing Antimalware Service Executable as discussed in one of our previous posts.
But how do you use it? Below are the steps to follow.
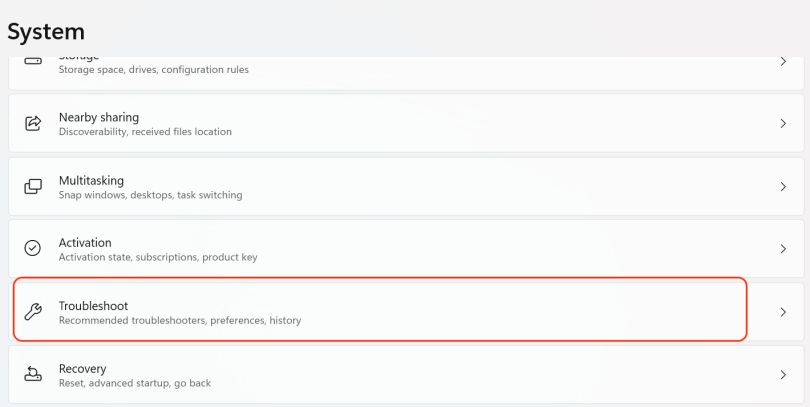
- Open the “Windows Settings” option on your Windows 11 computer.
- From the left side pane, select the “troubleshoot” option. You can also choose to search in “Settings” if you are unable to find it.
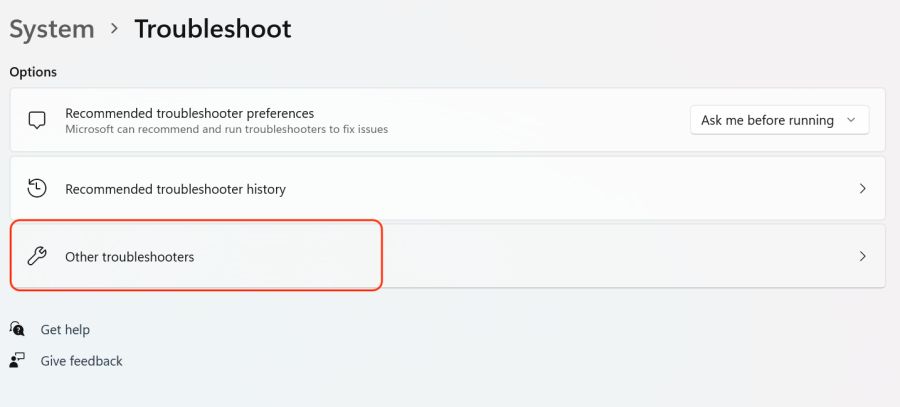
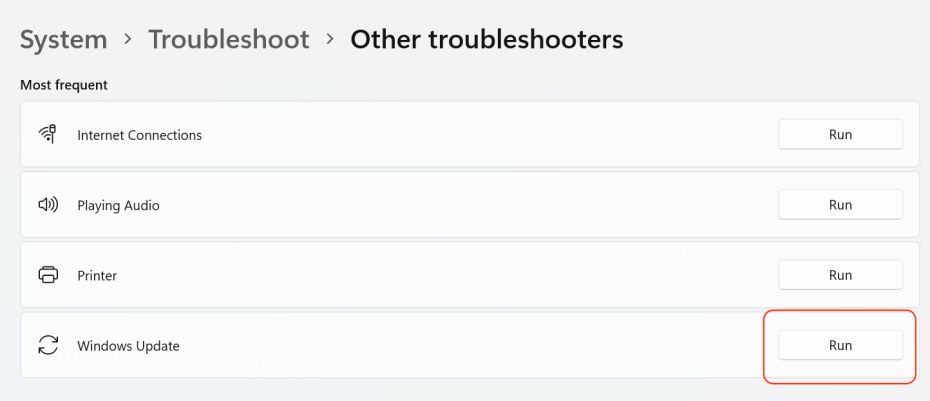
- From the troubleshooting menu, select “Other Troubleshooters” and then tap on “Run” for “Windows Update” option.
- After troubleshooting, check if you are now able to use Snap Layouts on Windows 11.
At times, the troubleshooting window downloads a few files which may require a faster internet connection. In such a case, you can use the best in quality ethernet cables or look for the best WiFi speed boosters and extenders to help you with.
6. Remove Similar Apps
If you are unable to use the Snap Layouts feature on your Windows 11 computer, one of the good chances is that similar apps are interfering. A lot of users prefer installing custom themes and apps on their Windows computers to make them look fancier. However, there is no guarantee that these apps will work perfectly on your device.
One of the prime reasons for this is “Windows has not developed them” and they are custom made. These custom made themes, widgets, or apps are good to block the system resources and create problems like Snap Layouts not working. To tackle this, you can either restore the factory version of the operating system or remove similar apps.
Once you remove such conflicting apps, you can then check if you are now able to smoothly use the Snap Layouts feature. However, if the problems persist, hop to the next solution.
Also read: How to Resolve tcpip.sys BSOD on Windows 10/8/7
7. Update Windows 11
One of the reasons why Snap Layouts are not working on your Windows 11 can be a minor buggy update. There are a lot of minor updates that Windows consistently show you in the update tab; Sometimes, these updates unintentionally break other features and is a good possible chance of why Snap Layouts are not working on your computer.
Here, a simple major update (if available) or all the minor updates can help you fix the problem. However, a lot of users don’t know how to manually start an update; below are the steps that one can follow.
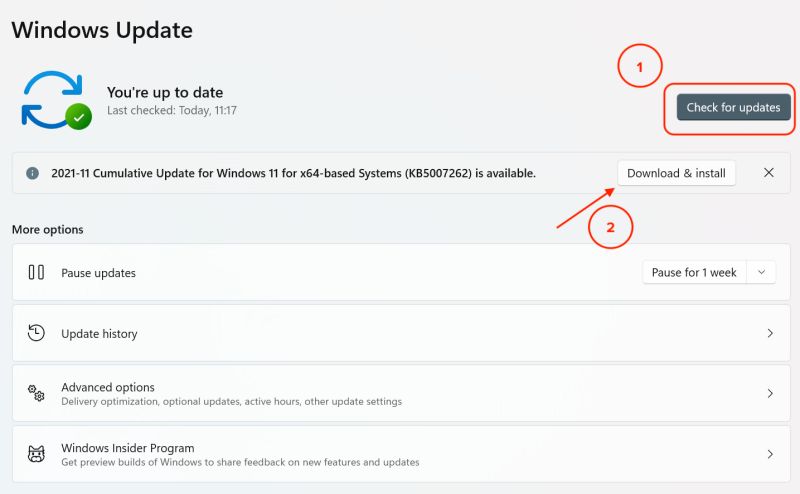
- Open the “Windows Settings” panel on your Windows 11 computer.
- Now, look for “Windows Update” on the left pane of the Settings page; click on it.
- From the update menu, click on “Check for updates” button and also look for the availability of minor updates.
- Once done, restart your computer.

When such errors occur due to buggy updates, there is a good chance that Windows is working on fixing it. An update should help you and if there are no updates available, waiting is the last best option.
Frequently Asked Questions [Faqs]
You cannot exactly use the Snap Layouts feature on Windows 10; however, the parent mind behind it “PowerToys” can be used to create layout tiling of windows on Windows 10 and earlier. To no surprise, Snap Layouts are extracted from PowerToys and still provide experimental features.
There can be a couple of obstacles that might be restricting or blocking the use of Snap Layouts on your Windows 11 computer. Most of these are App conflicts and buggy updates.
Two keyboard shortcuts can be used to enable the Snap Layouts in Windows 11; the first is “Win+Z” and the second keyboard shortcut is “Win+Arrow keys.”
You may also like to read,
- How to Use Clubhouse App on PC | Windows, Mac, and Linux
- AMOLED vs. OLED | What is the Difference and Which is the Best?
- How to Fix DPC WATCHDOG VIOLATION Error on WINDOWS 10
Wrapping Up: Why Snap Layouts are Not Working on Windows 11
These are some of the easy to use solutions to fix Snap Layouts not working on the Windows 11 issue. If you are still unable to use the Snap Layouts, you can switch to “FancyZones > PowerToys” from the settings panel and use the custom layout grid. We recommend not to install third-party apps such as themes and widgets as they may block the functions or break features of your Windows 11 operating system.
We highly think of being able to fix this issue for you; However, if you are still facing issues and troubles on Snap Layouts not working on Windows 11; let us know in the comment section. Also, do subscribe to our newsletter and social channels to never miss any updates and know the in and around of the tech industry.