
Want to disconnect iPhone from a Mac? This is the only solid guide you need.
If you are an Apple fan and have multiple Apple devices, you can always have them in sync to share files, photos, notes, and much more. However, you might sometimes want to disconnect your iPhone from your Mac for privacy or other reasons. In such a case, what can be the best way to completely disconnect or remove your iPhone device from your Mac system? Here is everything that you need to know in this complete guide.
Also read: How to Turn Off AirPlay on iPhone
How to Disconnect your iPhone from a Mac? The Handy Guide you Need
To disconnect an iPhone from your Mac device, removing it from your Apple iCloud ID is not enough. You need to disable sync, remove from AirDrop, and even remove sync from your Mac’s personal hotspot.
Here is a detailed step-by-step guide for disconnecting your iPhone from a Mac device.
1. Remove iPhone from the Mac Finder
When you connect your iPhone to your Mac using a data USB cable, you can locate it in the “Finder” application. When you connect your iPhone to a Mac using a data cable, you cannot do much other than access your photos or take a backup and make some tweaks using iTunes.
However, if you now wish to disconnect the iPhone from your Mac, the correct way is to disconnect using the “Eject” option. Most users prefer directly unplugging their device, and this can lead to data malfunction or connection problems when you reconnect your iPhone the next time.
To “Eject” your iPhone from Mac,
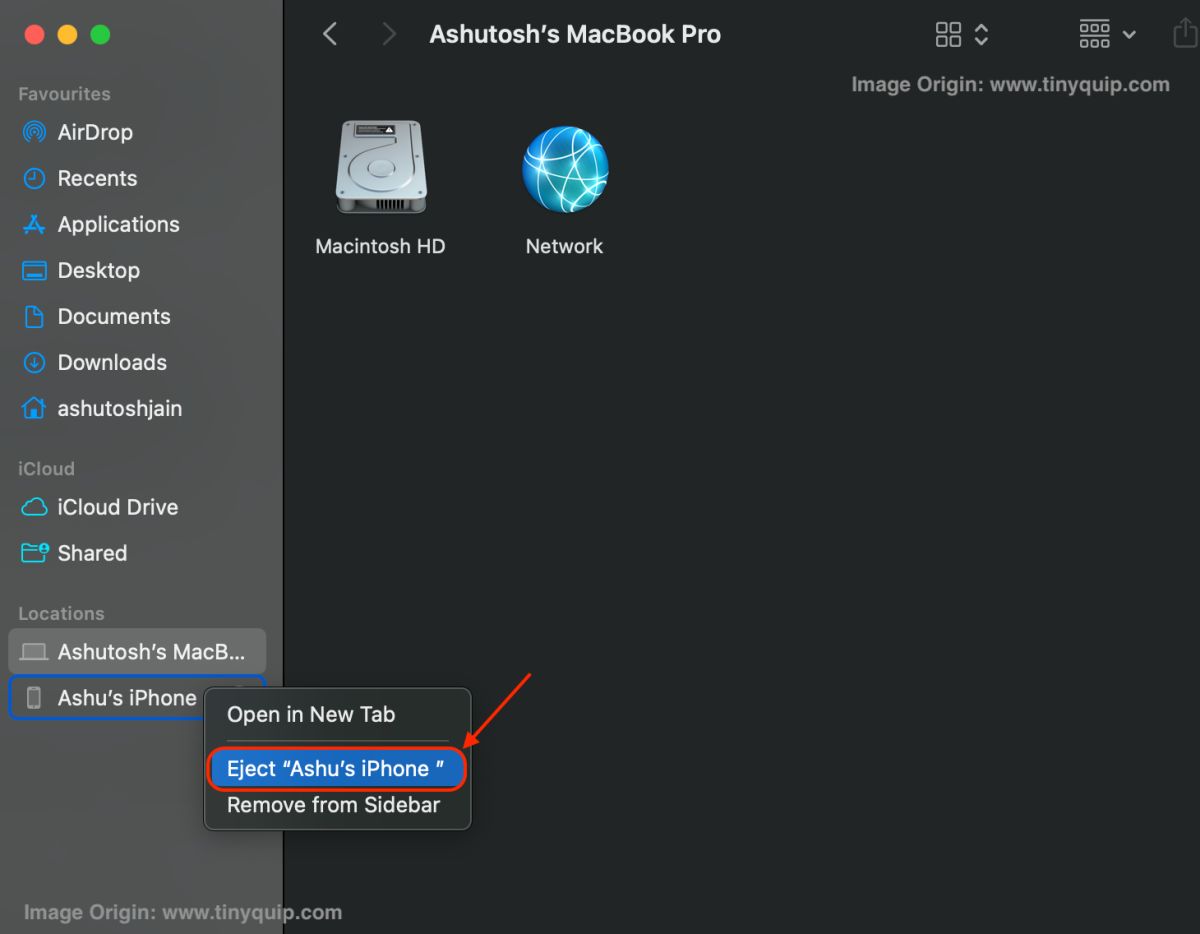
- Open the “Finder” application on your Mac
- From the sidebar of your “Finder,” right-click on the location “iPhone device” and then select “Eject”

Tip: If you cannot find your “iPhone” on the Finder sidebar, it is likely hidden. Here is how to show the iPhone location on your Finder – Finder Settings > Sidebar > Locations > Check CDs, DVDs, and iOS Devices
This way, you should be able to safely eject or disconnect your iPhone from a Mac. However, if you are not using a USB data cable and still finding the iPhone location in your “Finder” application, your device is probably connected through WiFi.
Here is how you can disconnect your iPhone from your Mac which is connected via WiFi,
- Open the iPhone location on your Mac, and under the “General” tab, uncheck the “Show this iPhone when on iPhone”
- Now, sync your iPhone device with the Mac

Now, you can find the iPhone to be disconnected from your Mac, and you will no longer find it on the “Finder” application unless you make the connection with a USB or with a WiFi connection.
Also read: How to Make a Live Photo into Video on iPhone & iPad
2. Disconnect iPhone Personal Hotspot from Mac
If you have an Apple ecosystem, you can always be assured of a seamless experience. For instance, if your Mac is disconnected from the WiFi connection, it will automatically connect to the personal hotspot on your nearby iPhone device. This way, you will never lose a good connection and easily do your job on the internet.
However, this feature can also be troublesome, especially when you have limited mobile data on your iPhone. For example, let’s take a scenario where the WiFi is automatically disconnected for a moment, and your Mac automatically connects to the personal hotspot on your iPhone while you are downloading and heavily browsing. In another case, you wouldn’t want to connect to the personal hotspot on your iPhone while in the middle of important work.
For this article, let’s disable the automatic personal hotspot connection between your Mac and iPhone device when the WiFi network fails.
Here is how you can do it,
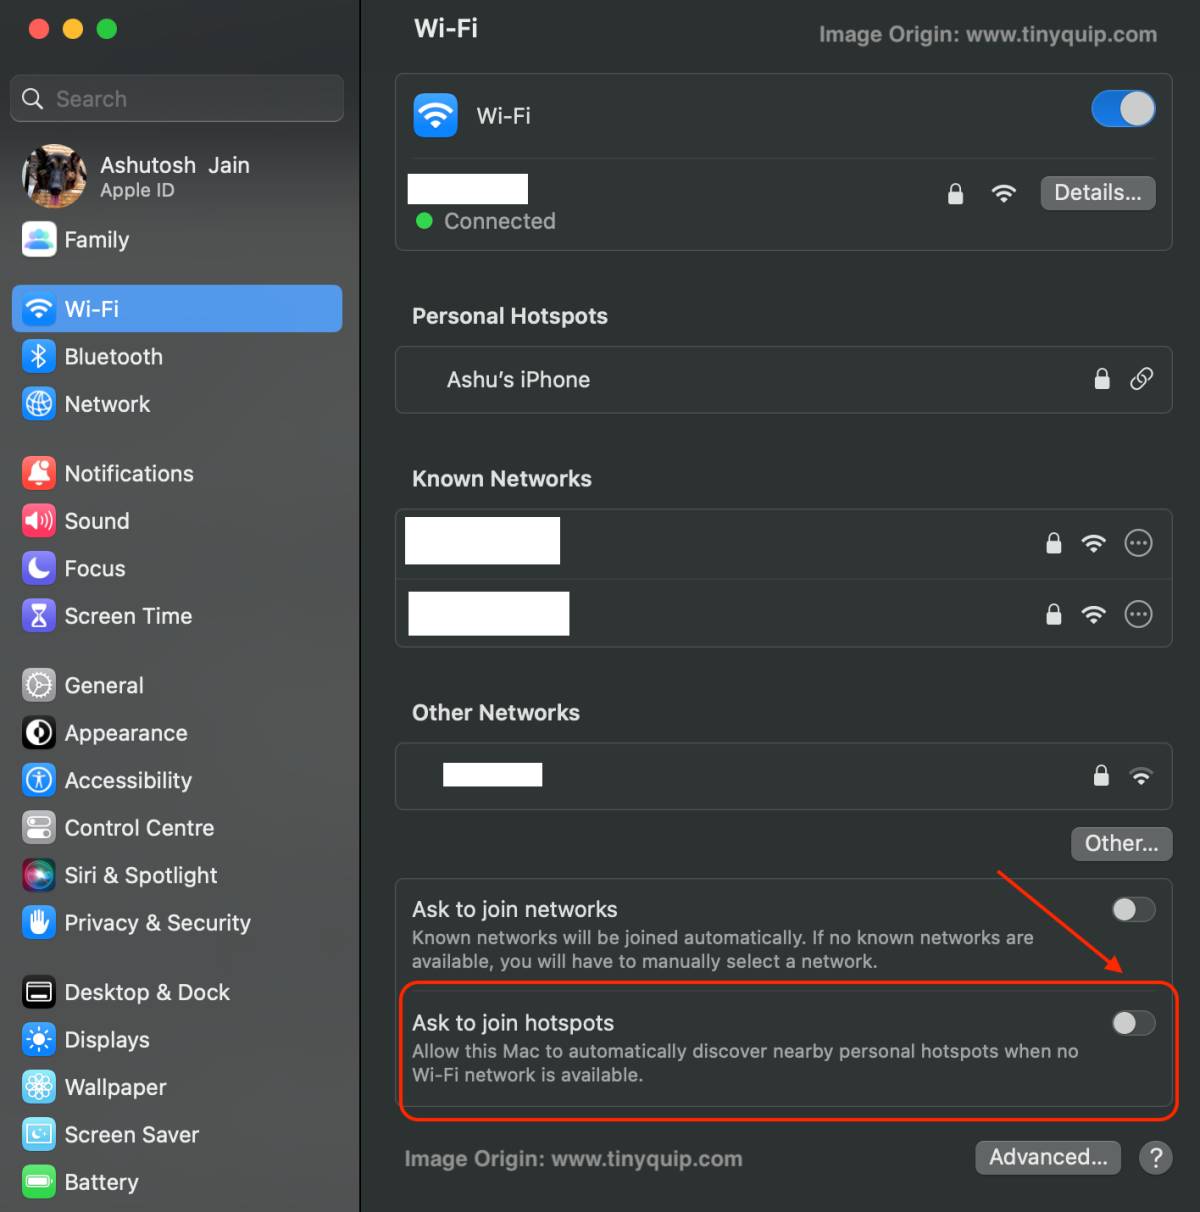
- Open the “System Settings” option using the “Apple” icon from the top-left of your Mac screen
- Now, tap on the “Network” option from the “Settings” sidebar and select the “WiFi” connection option
- In the end, you can find the option “Ask to join hotspots” toggle the switch to disable the option
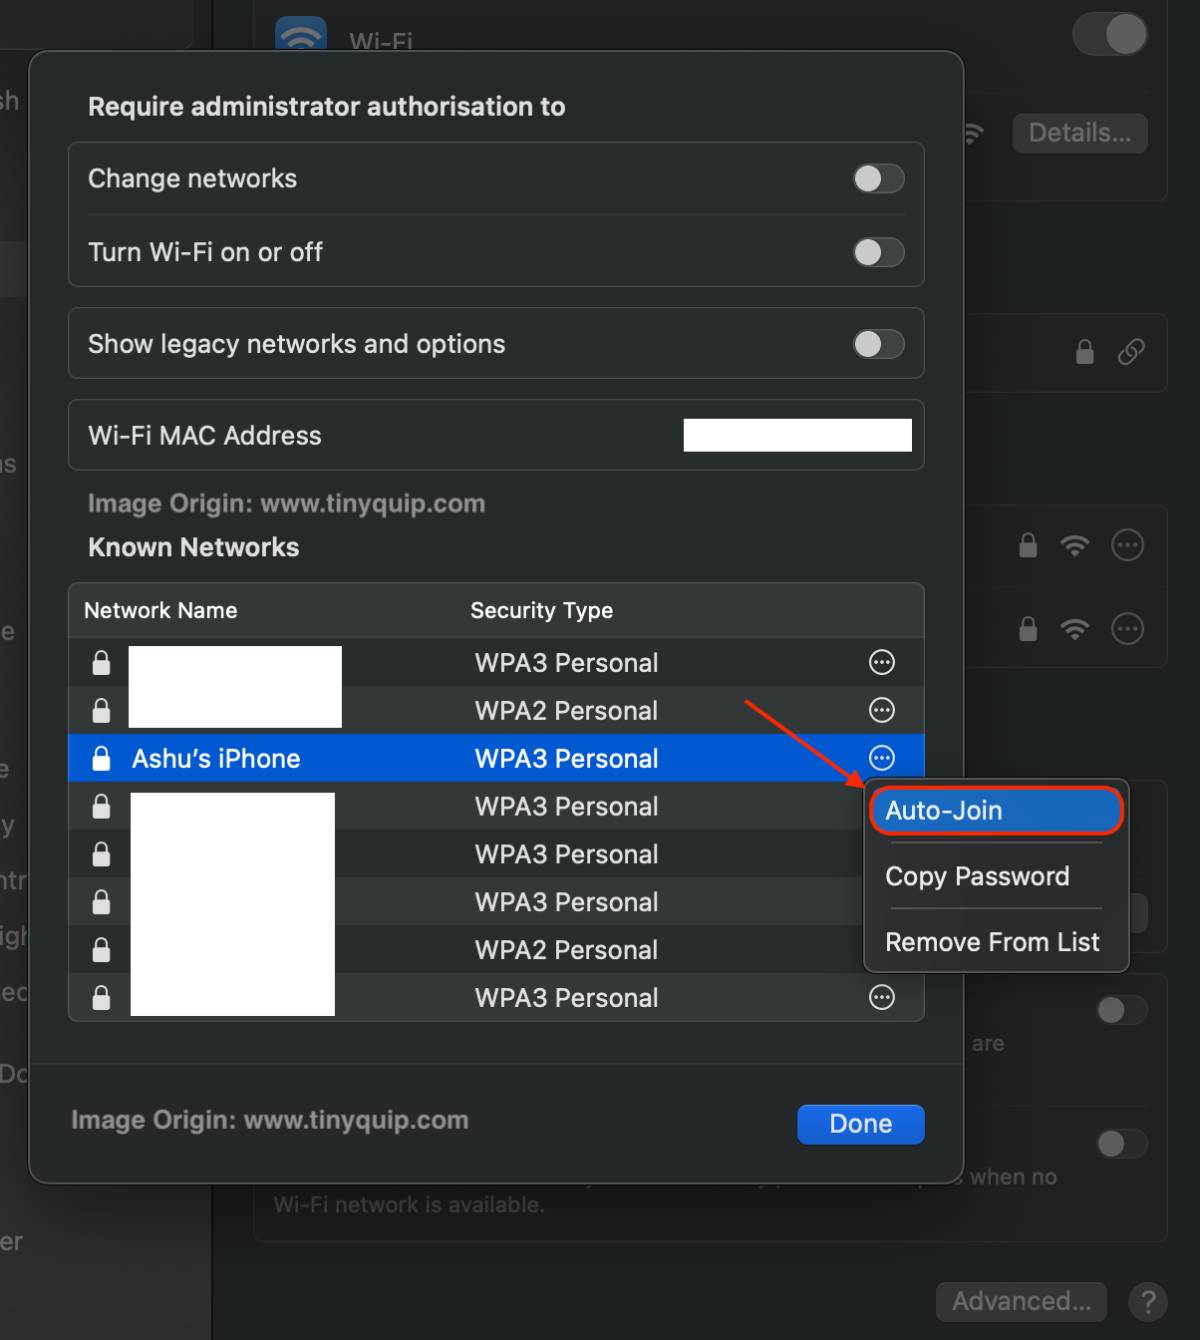
- Click on the “Advanced” button, and you can now find the “Known Network” section
- Select your iPhone personal hotspot from the list, and disable the “Auto join” option
Now, your Mac won’t automatically join your iPhone’s personal hotspot when the network drops. However, you will have to manually connect to the personal hotspot unless you enable the “Auto Join” feature again.
Also read: How to Clear Cache on iPhone and iPad | It is This Simple
3. Unpair Bluetooth between iPhone and Mac
Bluetooth on iPhone and Mac might sound unnecessary as it rarely comes in use. You cannot share many types of files using Bluetooth, but it is an important feature for other connections. For instance, it is important to enabling Bluetooth for AirDrop, screen sharing, and many more.
Regardless, if you have connected Bluetooth between your iPhone and a Mac from work or a public Mac and now want to disconnect it, you can easily do it by forgetting the device.
Here are the steps you can follow to disconnect Bluetooth between iPhone and Mac,
- Open the “System Settings” option using the “Apple” icon from the top-left of your Mac screen
- From the “Settings” sidebar, tap on the “Bluetooth” option to view all the Bluetooth-related options and settings
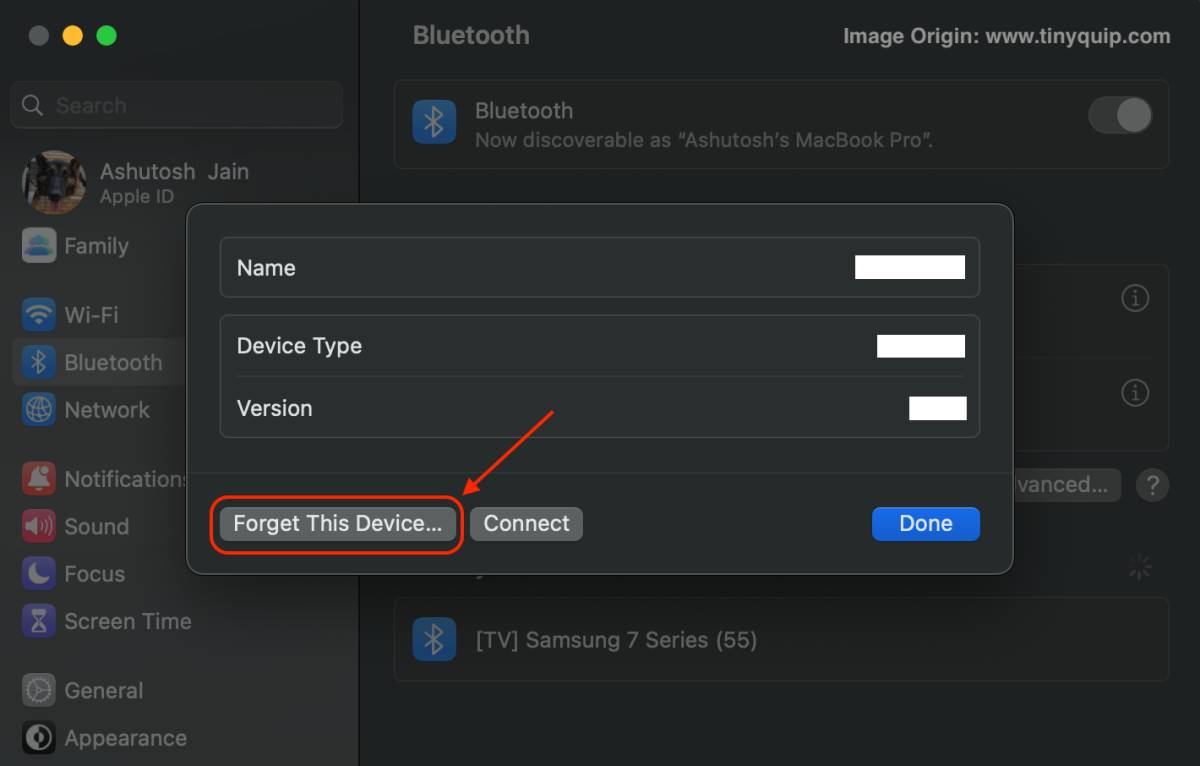
- Tap on the “i” icon beside your iPhone from the list, and you can find all the Bluetooth-related information for your iPhone
- Now, click on “Forget this Device” to remove the device from your Bluetooth list on Mac
That’s it; using the above simple steps, you can easily disconnect Bluetooth from your iPhone and Mac.
Also read: How to Install youtube-dl on Mac | Download YouTube Videos like a Pro
4. Disable iCloud Sync between Mac and iPhone
iCloud syncing is the “seamless way” that connects your iPhone to your Mac and other Apple devices. Using iCloud, you can instantly access files from any of your Apple devices and get your work done. However, iCloud comes with limited storage, or you might want to maintain privacy between a shared Mac; in such a case, you can always disable iCloud sync between your Apple devices.
iCloud sync lets users share photos, notes, contacts, reminders, calendars, and more. Disabling iCloud sync should help you save some privacy and storage.
Here is how you can disconnect iCloud on your iPhone to your Mac,
- Open the “Settings” app on your iPhone device
- From the top of your “Settings” menu, tap on your Apple ID account
- Here, you can find the iCloud option; click on it
- Now toggle off important applications that you don’t wish to sync with other Apple devices like Mac, such as Photos, contacts, calendars, and more
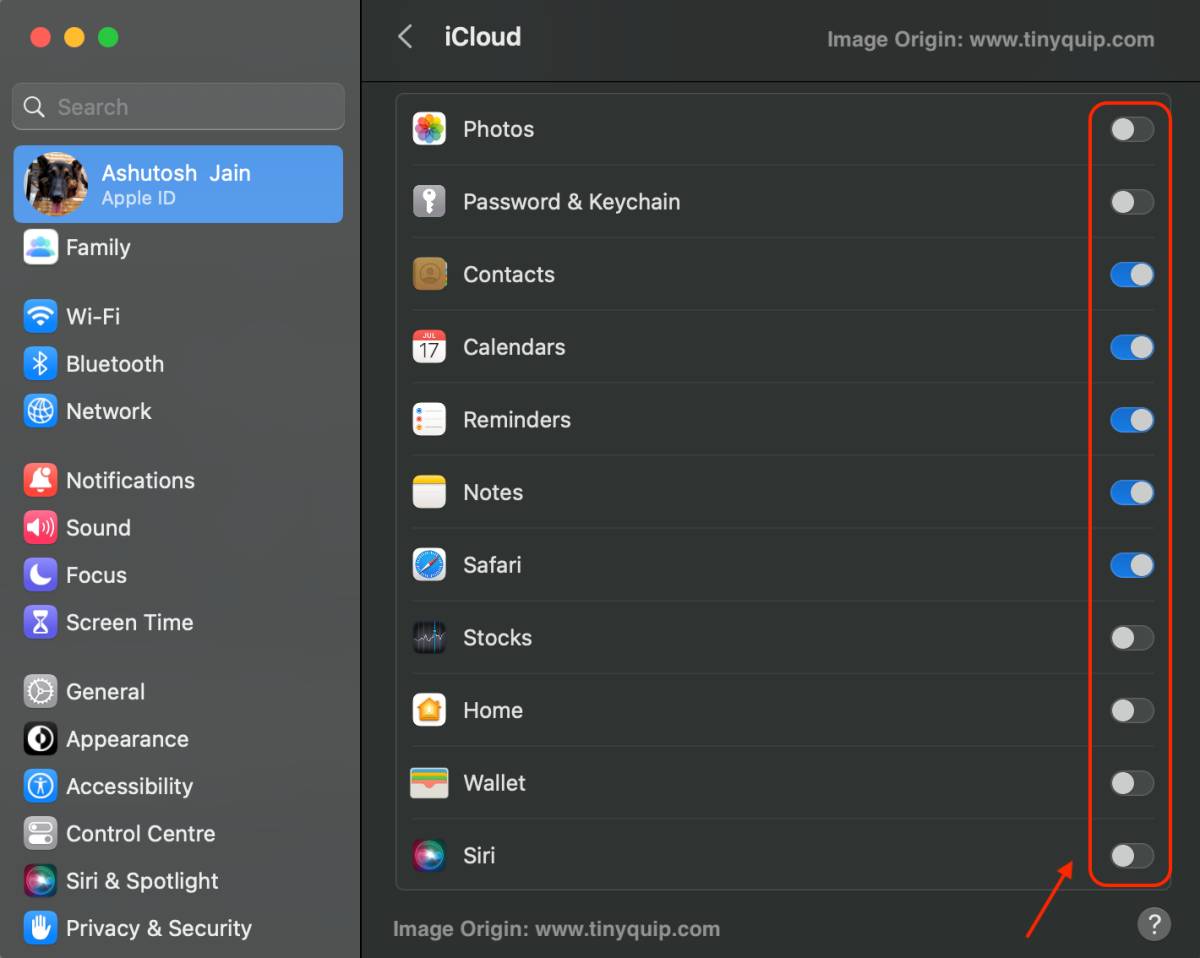
Once you toggle off all these applications, iCloud sync is disabled from your iPhone to all other Apple devices. This is a handy method to disconnect your iPhone from your Mac using iCloud, but it isn’t enough. You also need to disable some other features too.
Also read: How to Access iCloud on Android: Photos, Calendar & More
5. Disable iPhone from Mac | AirDrop Connection
AirDrop is a helpful feature for sharing files between Apple devices, and if you have an iPhone and a Mac, it gives you a seamless file-sharing experience. However, when you don’t own the Mac or want to restrict file sharing on your Mac from your iPhone, you can change the preferences.
Here, we precisely want to disable the AirDrop connection to “Contacts Only” or “No One” to ensure your Mac only connects to known AirDrop connections.
Here is how you can remove AirDrop for your iPhone on your Mac,
- Open the “Finder” application on your Mac
- From the sidebar, tap on the “AirDrop” option
- On your AirDrop screen, at the bottom, you can find the “Allow me to be Discovered by:” preference
- Change the preference to “No One” or “Contacts Only”
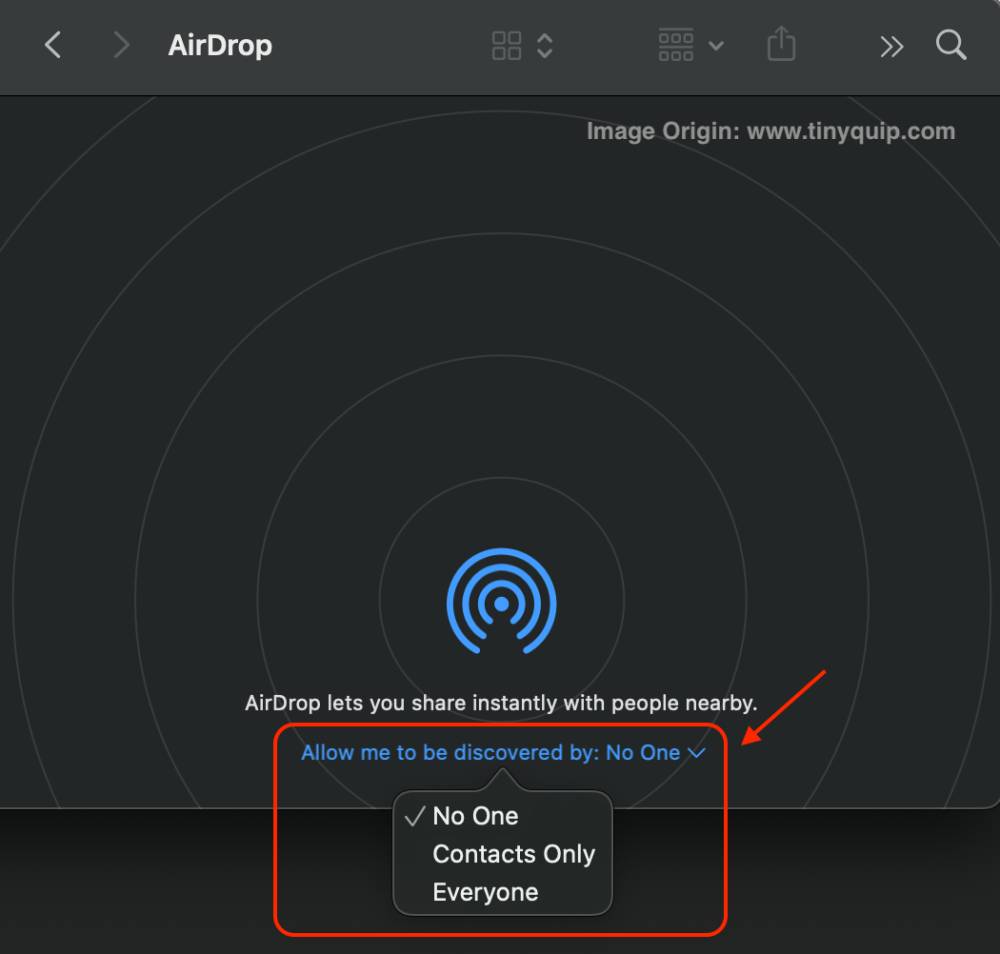
There is not really an option to remove your iPhone device from a Mac computer for AirDrop. However, changing the preference is the only option you can do to disconnect the AirDrop connection from iPhone to Mac. Other times, you can keep the AirDrop off to ensure it is not visible to any other Apple users near you.
Also read: How to Delete Duplicate and Multiple Contacts on your iPhone
6. Disable Handoff on your Mac
Handoff is a helpful feature when you want to continue using what you do on your iPhone on your Mac. This is a pretty helpful feature when you are a productive mind and use multiple devices for work. For instance, if you use the Safari browser for work on your iPhone, you can seamlessly continue using it on your Mac.
However, many users don’t like the Handoff feature as the apps keep popping up on the screen while you are using both iPhone and Mac together. It’s quite a distraction for some users, and turning it off can help you have a clear mind while working on both your Mac and iPhone.
On macOS Monterey and earlier, the Handoff setting was available directly in the “General” menu. In the later versions, this setting is moved to the dedicated “AirDrop and Handoff” under the “General” menu page.
Here is how to disable the Handoff feature between iPhone and Mac,
- Open the “System Settings” option using the “Apple” icon from the top-left of your Mac screen
- Tap on the “General” menu from the “Settings” sidebar
- On the right pane, you can find the option “AirDrop and Handoff;” tap on it
- Toggle off the “Allow Handoff between this Mac and your iCloud devices” feature
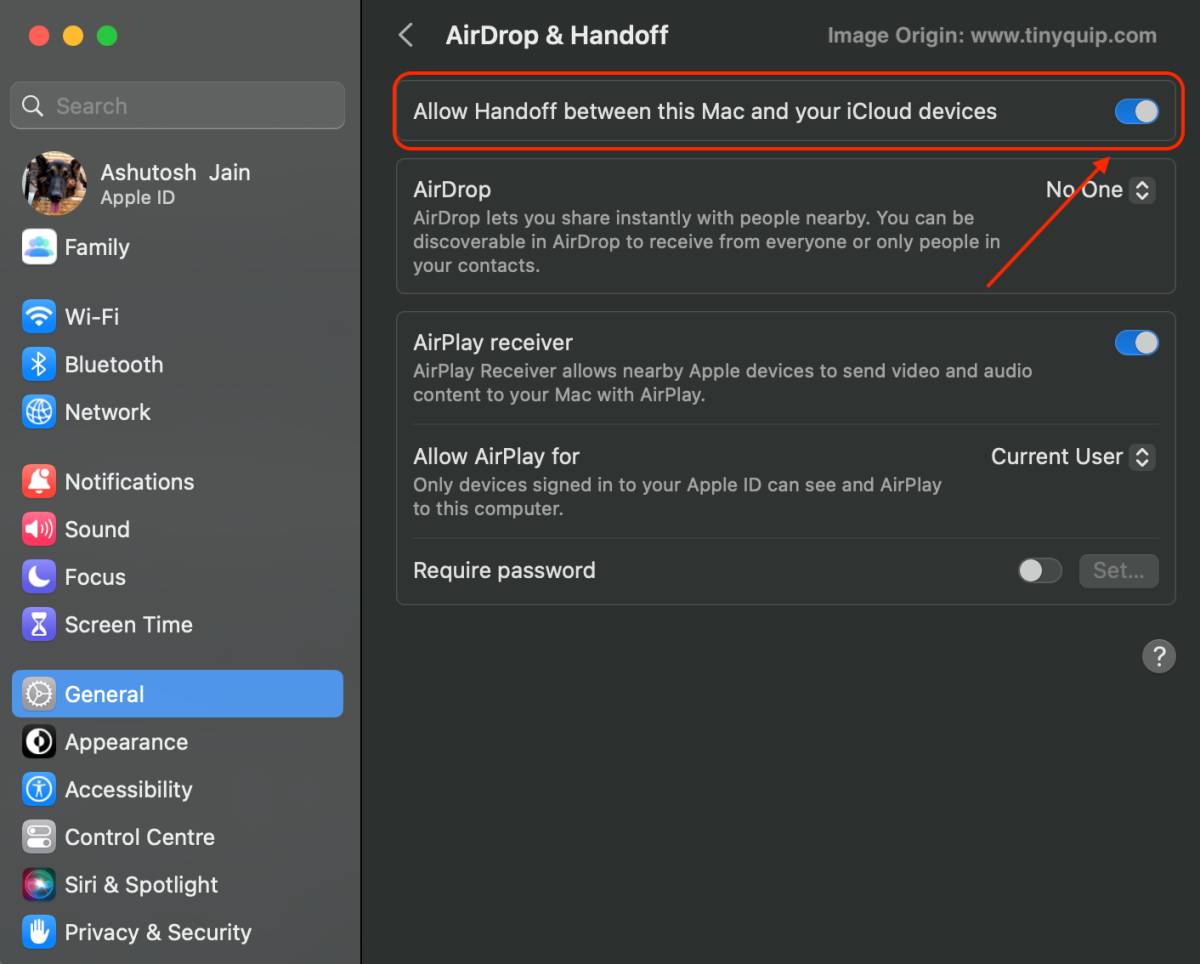
With this, you can easily disable quick communication between the devices. However, it is important to note that disabling this feature will turn off additional features like universal clipboard copy and paste between Apple devices.
Also read: How to Erase a Locked iPhone When You Forget the Passcode?
7. Remove iPhone Text Message Sync from Mac
Promotional and advertising text messages are pretty annoying but to see them twice: on iPhone and Mac can be frustrating. Apple allows you to see the text messages on your iPhone directly on your Mac, which is by default when you sync contacts and iCloud ID. However, the good thing is you can always disconnect the iPhone text message sync from your Mac when you find them too annoying.
Here is how to remove iPhone text message sync from Mac,
- Open the “Messages” app on your macOS
- On the top bar, you can find the “Message” tab; click on it and then tap on the “Settings” option
- In the “iMessage Settings” window, you can find the “@ iMessage” tab; tap on it
- Now, uncheck the mobile number and email

Once you uncheck the mobile number and email option, you will no longer receive your text messages from your iPhone on your Mac. However, text messages are not the only ones to completely disconnect your iPhone from your Mac. You need to disconnect other services like calls and notes too.
Also read: How to Send WhatsApp Messages Without Saving Number to Contacts [Guide]
8. Disable Call Sync between iPhone and Mac
Picking up calls on my Mac rather than from my iPhone has been a helpful and productive feature for me. However, I wouldn’t like to receive calls on my Mac while in I am in public, and the conversation will be on the loudspeaker. I am sure you are facing a similar issue, especially when you are in a meeting or a college student studying in the library. Additionally, the loud ringtone on Mac creates additional attention, which you might want to skip out on.
The best thing to do is disable the call sync on Mac from iPhone. Here is how you can do it.
- Open the “FaceTime” application on your Mac and select the “Settings” option from your top bar
- Under the “General” menu from the FaceTime settings, look for the option “Calls from iPhone” and uncheck it
- Also, uncheck your mobile number from the FaceTime settings
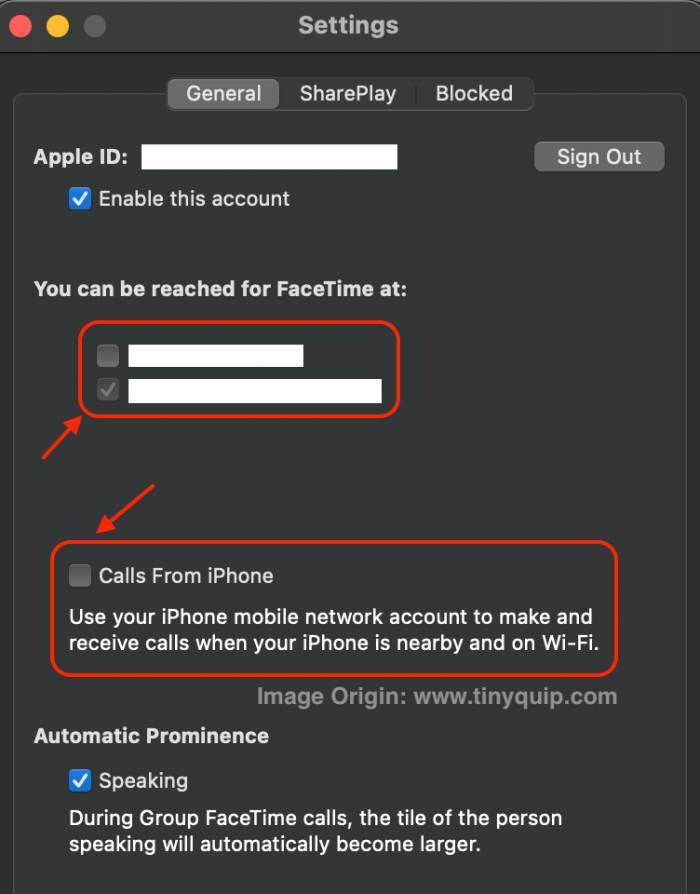
Once you uncheck the “Calls from iPhone” and “Mobile number” to disable calls from iPhone on your Mac.
Also read: How to Change iPhone Passcode and Why?
9. Disable Notes Sync between iPhone and Mac
Apps like Notes are pretty helpful when you want to keep quick pointers for important things in your life. However, some users wouldn’t want to see the same thing on their iPhones and Macs. And this is because the iCloud account is selected as the default option for creating Notes on your iPhone. If you haven’t changed this preference yet on your iPhone, let’s make this change.
Let’s disable Notes sync using your iPhone,
- Open the “Settings” app on your iPhone and look for the “Notes” app from the app list
- Scroll down and toggle on “On My iPhone” account
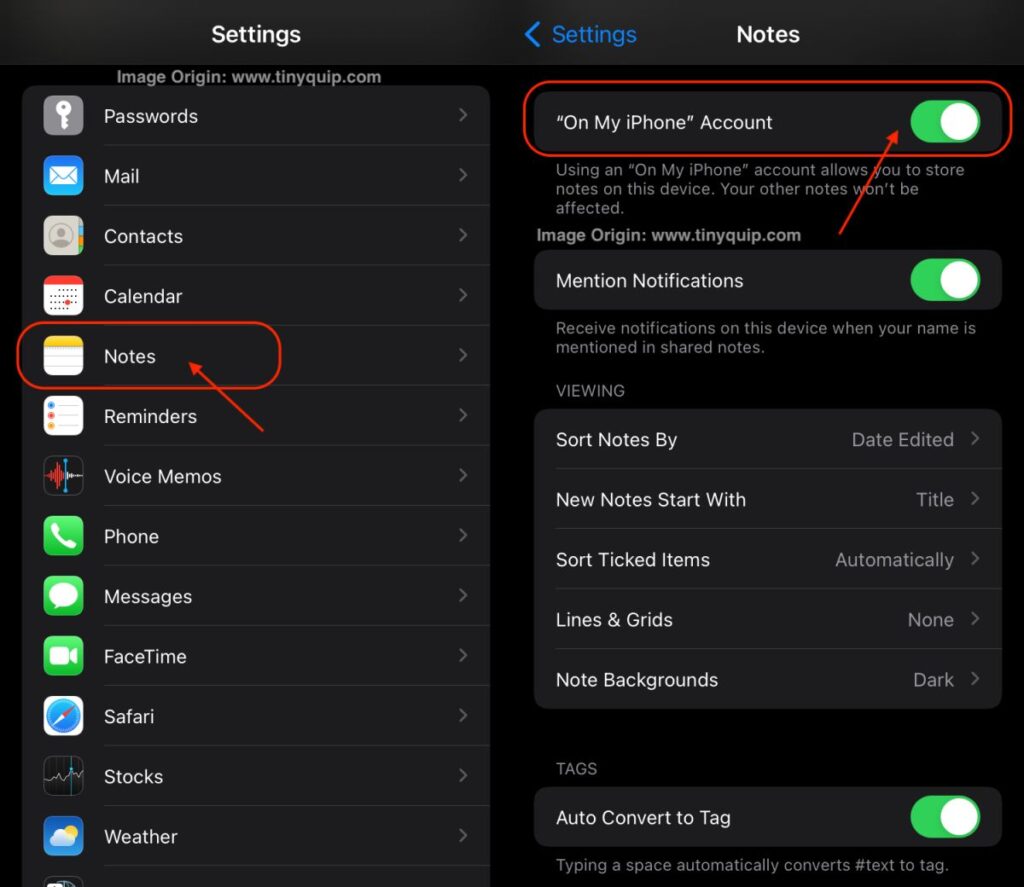
Once you toggle on your “On My iPhone” account, any notes that you create will be stored on the iPhone itself. However, the default account is not yet changed to your iPhone.
Let’s make this change by following the steps below,
- In the “Settings” app on your iPhone and look for the “Notes” app
- Scroll down and look for the “Default Account” option, by default it is set to “iCloud” account
- Change the preference to “On My iPhone”
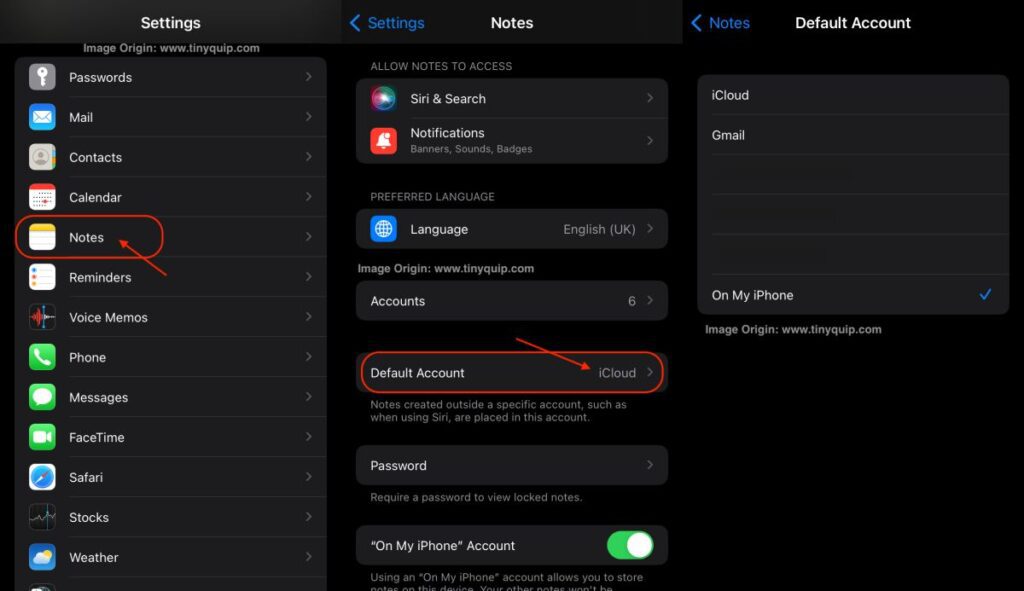
Once you change the preference, new notes that you will create will be stored on your iPhone itself.
Tip: To share individual notes between your iPhone and Mac, you can always create new notes or move the existing notes to your iCloud folder
You may also like to read,
10. Disconnect iPhone Safari Downloads from iCloud
With iOS 13 and above, users can easily download files from the internet on their iPhone using the “Safari” browser. This is a feature that iPhone users have been waiting for a pretty long time. But by default, these downloads are saved in the iCloud drive, and you can always find them clustered on all your Apple devices using the same iCloud ID.
To save some space, you can always choose to change the download location to your iPhone device. Here are some of the steps that you can follow,
- Open the “Settings” menu on your iPhone and look for the “Safari” app
- In the “Safari Settings,” scroll down and look for the “Downloads” option
- Now, change the default “Downloads” option to “On My iPhone” from the “iCloud Drive”
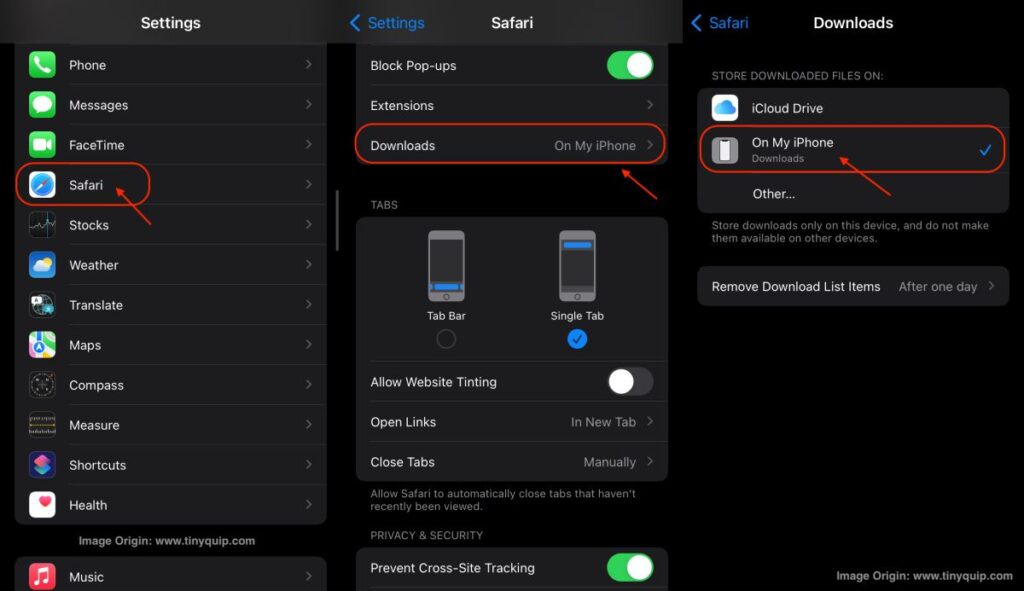
Once done, the downloads are stored on your iPhone rather than the iCloud drive. So, your iPhone is disconnected from your Mac for safari downloads.
Also read: 7 Best Third-Party App Store Alternatives | iOS
11. Remove an iPhone from Apple ID on Mac
When you have multiple Apple devices using the same Apple ID, it is likely the settings, purchases, iCloud, and media are synced. However, if you are changing your iPhone and now want to remove all your accounts from your older iPhone, you can do it using the iCloud account on your Mac.
Using iCloud on Mac, you can easily remove devices that are logged in with your Apple ID. Likewise, you can also remove a Mac device from iCloud using the iCloud account on your iPhone.
Here is how to remove an iPhone from Apple ID on your Mac,
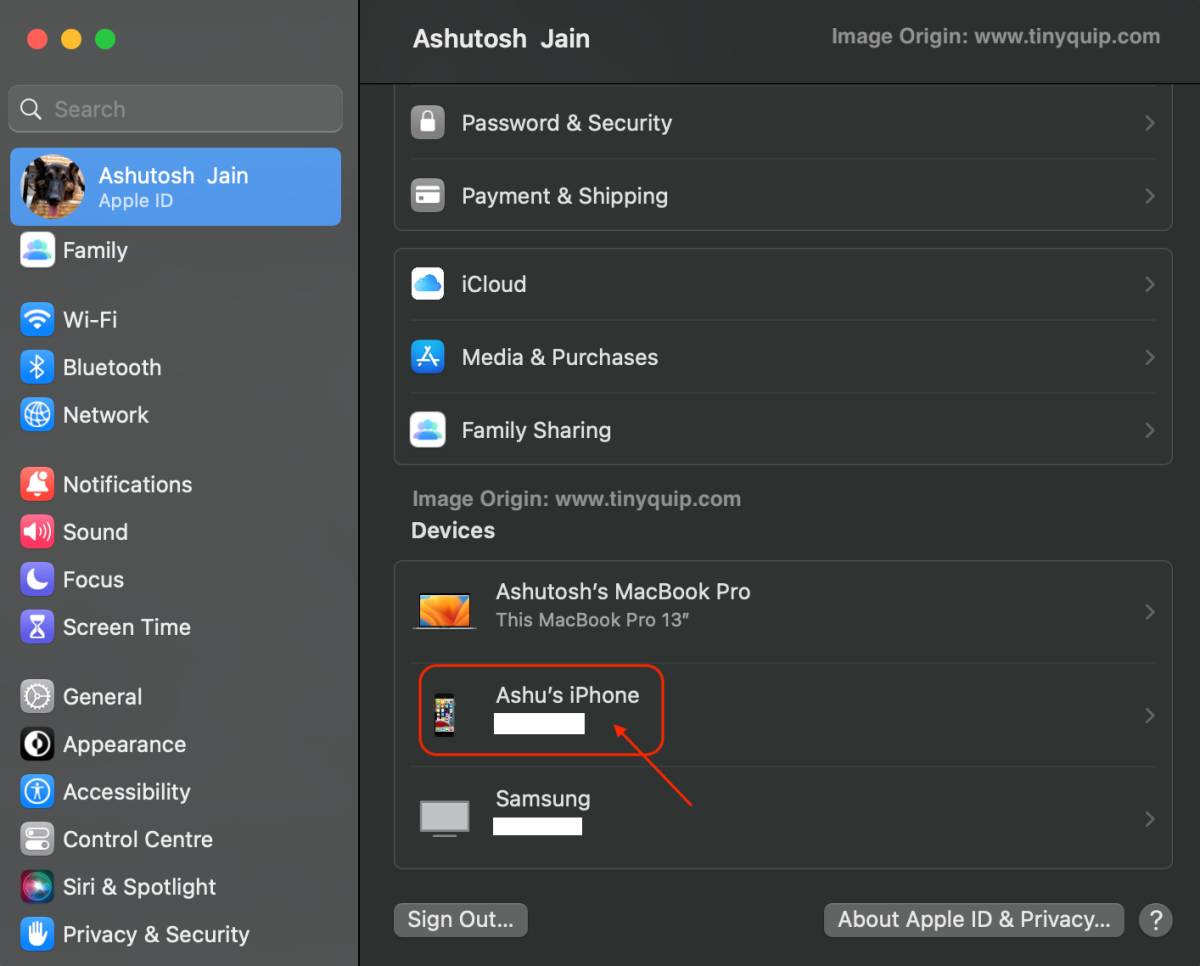
- Open the “Settings” app on your Mac and tap on your Apple account
- Scroll down, and you can find the list of devices that are using the signed in using your existing iCloud account
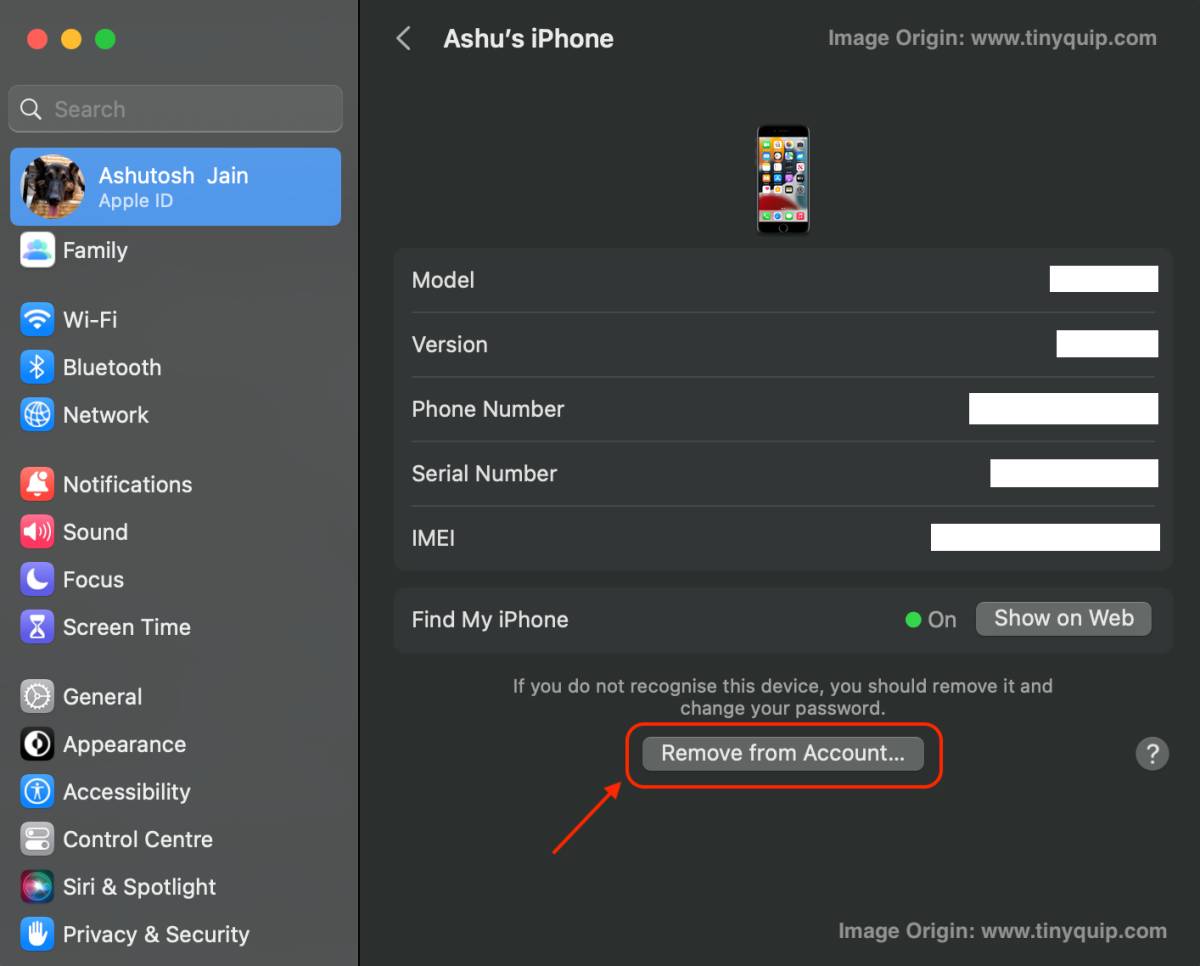
- Tap on the iPhone from the list, and you can find more detailed information about your device
- At the bottom, you can find the option to “Remove from Account,” tap on it, and your iPhone device will be removed from your iCloud account
Once done, this final step will completely disconnect your iPhone from your Mac. Now, none of the data or features are synced between your iPhone and Mac, and the devices are completely disconnected.
Also read: MagEZ Slider Review | The Best 4-in-1 Wireless Charger for Apple?
Frequently Asked Questions [FAQs]
Once you completely disconnect your iPhone from your Mac, you can reconnect both devices by logging in using the same Apple ID. Additionally, you can also sync both the devices, notes, calls, and messages by enabling iCloud sync.
By disabling the “Handoff” feature, you can disable the Safari sync between your iPhone and Mac devices.
The possible reason for this is a faulty USB cable and grime or blockage in the USB port, creating an unstable connection.
Navigate to the Apple ID on your Mac, and under the devices section, you can find all devices using your Apple ID.
Under the devices section of your Apple ID, select the device that you wish to remove, and tap on “Remove Device” to remove the account.
Before you leave
Get Our Prime Content Delivered to your Inbox for Free!! Join the Ever-Growing Community… Right Now.
Give this article a quick share,
Wrapping up: Disconnect iPhone from MacBook | 11 Things you Must Do
This is how simple it is to disconnect an iPhone from your Mac; however, I personally love using it in the Apple ecosystem. The seamless environment between Apple devices makes it easier to share files, notes, and photos, pick calls, attend messages, and do more with ease. Nonetheless, if you share your devices with someone, like from work or someone close to you, and want to maintain privacy, you can always disconnect your iPhone from the Mac using the above methods.
We hope to have helped you with a solid guide on how to disconnect an iPhone from a Mac with ease. Feel free to browse more helpful guides on iPhone and Mac and share them with your friends on social media (do tag us). Also, join our Telegram channel and subscribe to our newsletter to never miss a cracky update from us.