

Want to delete all your screenshots on Mac? Here is the simplest guide with all the secret hacks for you.
Screenshots are one of the quick ways to capture important notes such as customer-relationship chat, parts of documents, or even an error message on your screen. I am sure you have more reasons than these as to why you need to take screenshots on your Mac.
But what happens after? Especially about the unnecessary screenshots that no longer have any value. We delete them, and one of the major reasons for this is to keep our Mac clean and free up some storage space.
But did you know screenshots are not stored on your Mac if you use them right away by dragging and dropping them? Now, that’s pretty time and storage-saving but more about it in the later parts of this helpful guide.
Also read: How to Take a Scrolling Screenshot on iPhone?
How to Delete Screenshots on Mac | All the Tricks and Tips
When it comes to deleting screenshots on Mac, there is always more than one way to do it. You can select individual screenshots and then delete them or choose multiple screenshots and delete them together. And most importantly, on Mac, by default, the screenshots are stored on the desktop, and you can use the “stacks” feature to get all of them together in an organized manner and delete them altogether.
Let’s look at all the methods to delete screenshots from a Mac in a step-by-step guide.
1. Deleting a Screenshot from Mac | The Basic Way
The most basic way to delete a screenshot is to select it and, from the options, choose to delete it. The most thing here is to find the location of the screenshot, and by default, it is the desktop. However, when you use “cmd + shift + 5” to take a screenshot, you can choose the location where you wish to save the screenshot from the “Options” button.
Once you find the screenshot, here are the steps to delete it from your Mac,
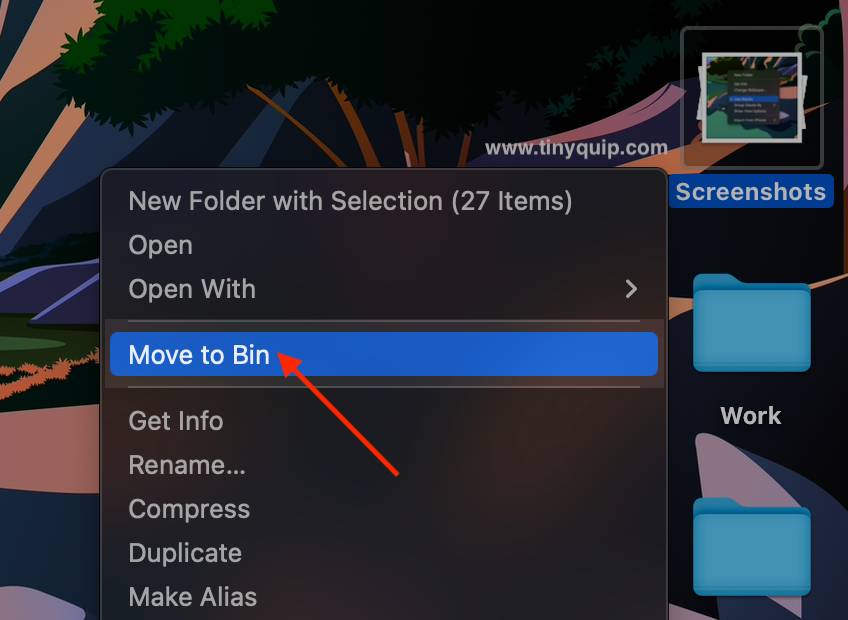
- Tap using two fingers on the screenshot that you wish to delete.
- You should now see a sub-menu for that particular screenshot; tap on the “Move to Bin” option.
- Alternatively, you can single-tap on the screenshot that you wish to delete and then tap the cmd and delete button on the keyboard.
One of the things you can add-on for this is to delete the screenshot from the “Recycle Bin” as well. For this, you can either open the recycle bin, look for the screenshot and then permanently delete it. Or, you can tap using two fingers on the “Recycle Bin” icon and then choose the “Empty Bin” option to permanently delete all the items from your Mac’s recycle bin.
Also read: How to Disconnect an iPhone from your Mac | 11 Things to Do
2. Deleting Multiple Screenshots using the Stacks Feature
If you have taken a lot of screenshots on your Mac but never deleted them, and now, all of those seem like a mess to find on your desktop, you can always use the stacks feature. This feature will group all the screenshots under one single icon, and you can then easily select all of them and delete them.
There are two things when it comes to deleting multiple screenshots; you either want to delete all of them, for which you can use the drag-to-select feature. Or, you can use the cmd button and click on all the screenshots that you wish to delete; these would make deleting multiple screenshots easier for you.
But first, enable the “Stacks” feature on your desktop.
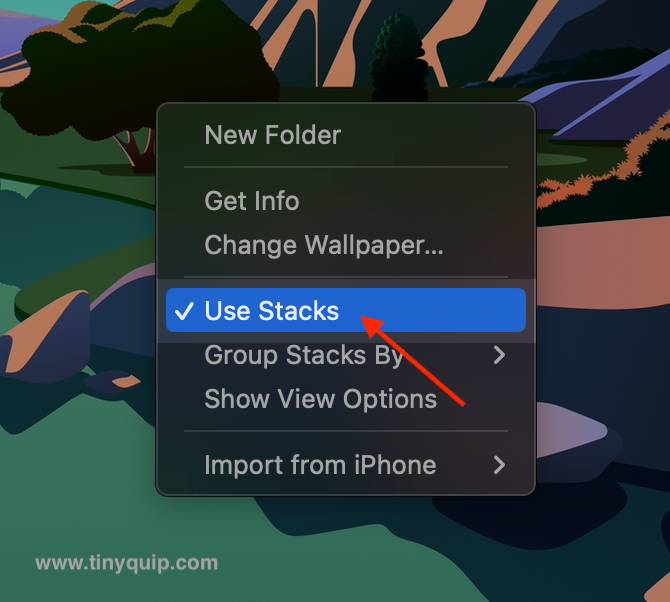
To enable stacks, tap with two fingers on your Mac desktop, and you can find the menu list. Now, enable the “Use Stacks” option, and all of your desktop items will be organized. This trick is pretty helpful in hiding your desktop items and making them look clean and decluttered too.
1. Deleting Multiple Screenshots on Mac with Drag-to-Select
- Once you have enabled the stacks feature, look for the screenshots stack on your desktop and tap on it.
- You will now see all the screenshots that are currently on your desktop, and you can use the mouse and drag to select all the screenshots and then delete them.
If you have a lot of items on your desktop, it is trickier to drag and select multiple screenshots as you might also select other screenshots and delete them. So, you will have to do it in multiple batches when you have a large number of screenshots to delete.
Also, you don’t necessarily use the move to bin or use the cmd+delete buttons to delete all the selected screenshots. You can drag the selection and place it over the recycle bin icon in the menu dock, and the selected items will be deleted.
2. Deleting Multiple Screenshots on Mac based on Selection
- After enabling the “Stacks” feature on your Mac desktop, tap on the icon that reads “screenshots” to view all the screenshots.
- Tap on each screenshot that you wish to delete while holding the cmd button. This will allow you to select multiple screenshots in random order.
- That’s it; you can now either drag the selection to the recycle bin icon on the dock, use the cmd+delete button, or use the “Move to Bin” option to delete your screenshots.
Also read: How to Install youtube-dl on Mac | MacPorts, Homebrew, & More
3. How to Delete Screenshots on Mac using Finder
When you use cmd+shift+5 to take a screenshot on your Mac, you get an option to choose the location where you wish to save your screenshots. This is handy when you don’t want everything on the desktop and rather want to save screenshots in documents or other folders.
But other folders on Mac don’t have the stacks feature like the desktop, so how do you delete screenshots by organizing them and doing it faster than the traditional method? The answer is simple, rearrange them using the filter options.
Let’s look at it more closely in steps,
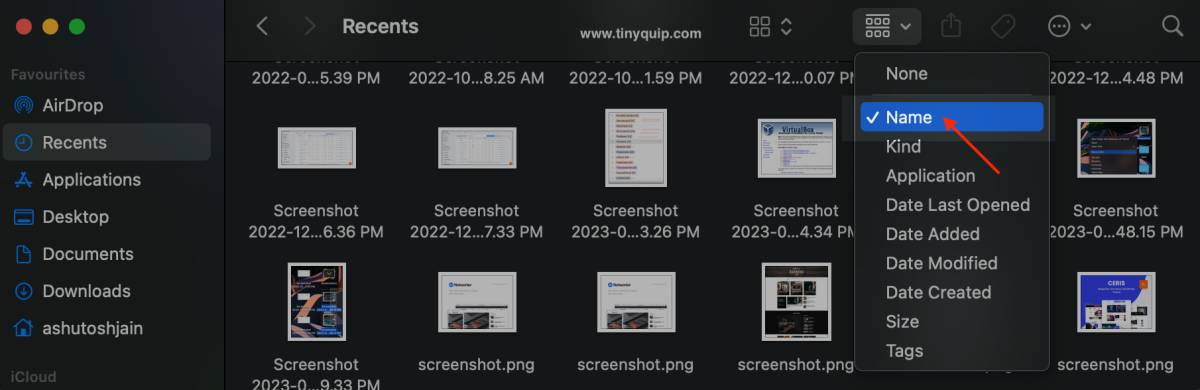
- Open the Finder app on your Mac and navigate to the location where your screenshots are saved. This location can also be the desktop if you wish to delete screenshots from your Mac desktop using the Finder app.
- From the right-top of your screen, you can rearrange all the files in the folder using a filter such as a Name, Kind, Application, Date Created, Modified, and more. In our case, we will choose the “Name” filter as all the screenshots are saved with the default name “Screenshot.”

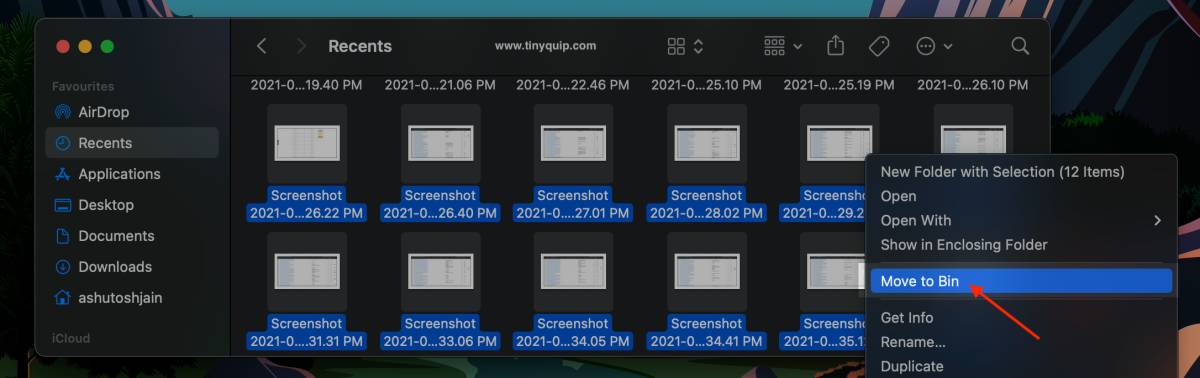
- Now, following the alphabetical order, we can now find all the screenshots in a single section from the entire folder. So, let’s select them by either drag-to-select or multiple selections using the cmd button.
- The last task is to delete these screenshots from your Mac; for this, after the selection, you can use the “Move to Bin” option or directly drag the selection over the Recycle bin on the dock. You can, alternatively, also use the cmd+delete to send items to recycle bin or cmd+option+delete to delete the screenshots permanently.
Also read: MacBook Battery is Not Charging? Try These Solutions
4. How to Find and Delete Lost Screenshots on Mac?
Most times, we accidentally save the screenshot to some random folder and then have no idea about it. In such a case, how will you delete the screenshot or use it at all?
This is where I get you the smart trick to find all the screenshots that are stored on your Mac.
- Open the “Finder app” on your Mac.
- Now, using the “cmd+f” button, open the search bar or just navigate your cursor to the “Finder search bar” in the top-right corner.
- In the search bar, type “kMDItemIsScreenCapture:1” without quotations and hit enter to search.
- Ensure your search location is set to “This Mac” in order to find all the screenshots on your Mac and not just one folder.
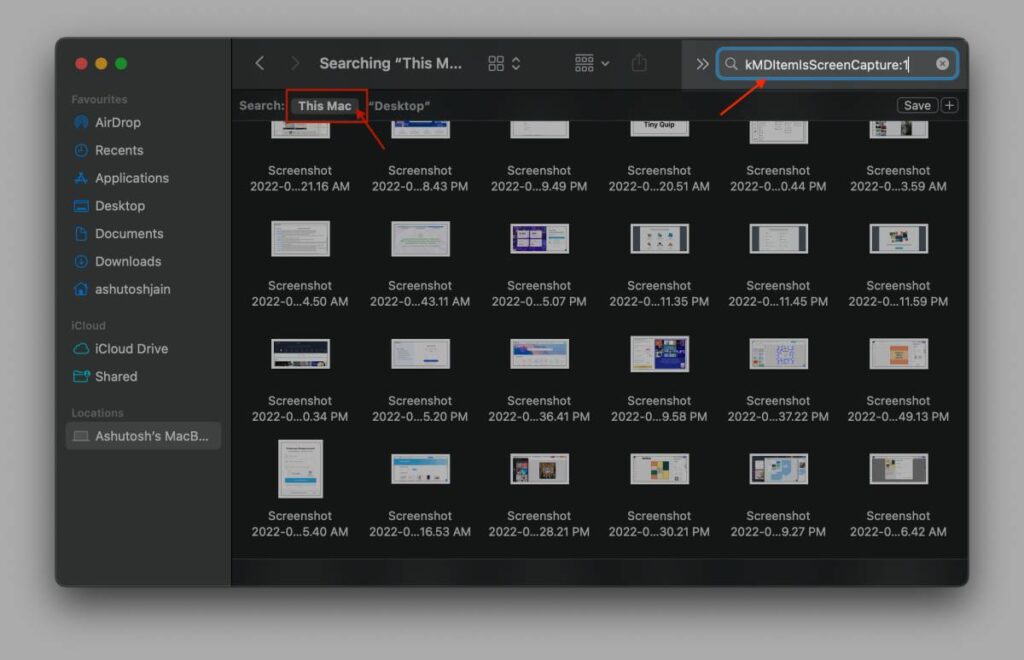
That’s it. There you have it. All the screenshots you have ever taken and stored on your Mac. You can now go through them and delete them if you want to.
Also read: How to Boot Your Mac in Safe Mode | Intel & Silicon
5. How to Take A Screenshot But Never Save It?
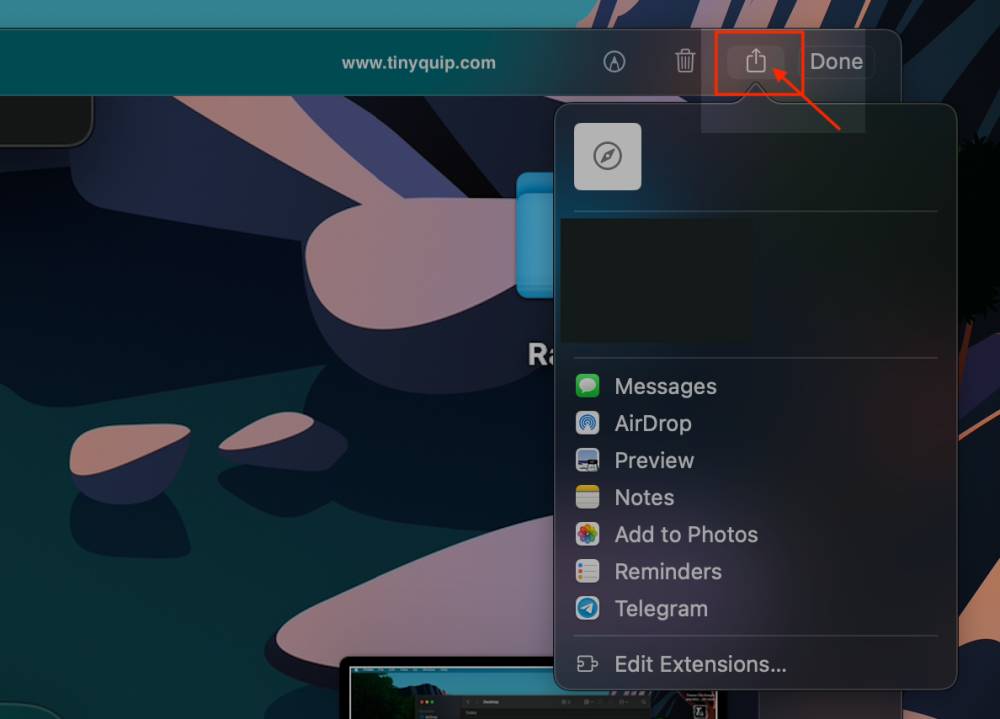
You must know one of those times when you accidentally take a screenshot or take a screenshot to send it to someone but don’t want to store it. You can always delete them on the spot, and Apple Mac allows you a few seconds to do that.
When you take a screenshot on your Mac, you can find a short preview of it at the right-bottom of your screen. When you tap on the small preview, the screenshot is enlarged, and you get access to all the editing tools. Here, you also find the option to share the screenshot in the form of the share button. Once you click it, you can choose various options such as iMessage, AirDrop, and more. Through there, you can share the screenshot instantly and then tap on the delete button to delete it without saving it.
Another way would be when you have an iMessage or WhatsApp conversation open on your Mac or some web application that accepts photos as input; you can drag the short preview from the right-bottom, and the screenshot will be given as a message or input but won’t be saved on your Mac. These come in handy when you want to save some time and work more efficiently.
Also read: MS Word Not Opening on Mac? Here is the Fix
Frequently Asked Questions [FAQs]
By default, all the screenshots on Mac are saved on the Desktop. You can use the “Stacks” feature on the Desktop to group them together and view all of them in one place.
When you use cmd+shift+5 to take a screenshot on Mac, you get an option to change the location to where the screenshot should be saved under the “Options.”
Open the “Finder” app and look for kMDItemIsScreenCapture:1 using the search bar. Select the search location as “This Mac,” and you will find all the screenshots stored on your Mac despite their folder location.
Before You Leave
Get Our Prime Content Delivered to your Inbox for Free!! Join the Ever-Growing Community… Right Now.
Give this article a quick share,
Also read: Fix: Unlock with Apple Watch Not Working on Mac
Wrapping up: How to Delete a Screenshot on Mac
To sum up, these are all the ways that you can use to delete a screenshot on Mac. One of the methods that I didn’t mention in the above guide is to find and delete a screenshot on Mac using the “Spotlight Search” method. This is a tricky method and only works when you know the correct name of the file. Rather, I would suggest you use the above methods, which are easier and time-saving when it comes to deleting a screenshot from your Mac or MacBook.
I hope to have helped you with how to delete a screenshot on Mac; if you have some more tricks to do it, let me know in the comment section below. If you like this article, do give this a quick share on your social media handles and do tag us. Also, join our Telegram channel, Facebook page, and Twitter to never miss a quick update.