A stable internet connection is essential for work, entertainment, and communication. But sometimes, even when your device shows that it is connected to WiFi, you may not be able to browse the internet. You will often see a message on your screen: “WiFi connected but no internet.” It can be frustrating, especially if you are in the middle of something important.
The problem could be caused by various factors. The issue may be with your router, modem, internet service provider (ISP), device settings, or DNS configuration. A simple restart may fix it in some cases, while other times, you may need to make changes in your device settings or network configuration.
In this guide, we will take a step-by-step approach to diagnose and fix the issue. So, stick with us till the end so we can help you solve this issue.
In this Guide,
- 1. Troubleshooting Router Problems
- 2. Checking Router Lights for Clues
- 3. Flushing DNS Cache on Windows, Mac, and Android
- 4. Setting up the DNS Server Properly
- 5. Check if the ISP is down
- 6. Removing Conflict Apps
- 7. Update the Wifi-Driver
- 8. Resetting Network Settings
- 9. Checking for MAC Address Filtering Issues
- 10. Assigning a Static IP Address
- 11. Restarting or Resetting the Router
- 12. Contacting Your ISP as a Last Resort
- Frequently Asked Questions [FAQs]
- Wrapping up: Your Internet is Now Connected
Also Read: The Best Budget WiFi Range Extenders & Signal Boosters
1. Troubleshooting Router Problems
The router is the main device that manages your internet connection. If it is not functioning properly, your device may show that it is connected to WiFi, but there will be no internet access. Router-related issues can be caused by hardware malfunctions, outdated firmware, cable damage, or incorrect network settings. Before assuming there is a problem with your ISP, checking the router should be your first step.
1. Restart the Router
A restart helps clear any temporary issues that may be causing the “WiFi connected but no internet” error.
- Turn off the router using the power button or unplug it from the power outlet.
- Wait for 30 seconds to 1 minute before turning it back on.
- Allow the router to fully reboot (this can take a few minutes).
- Once all the indicator lights are stable, try reconnecting to the internet.
2. Check Physical Connections
A loose cable connection can cause internet disruptions, even if the WiFi appears connected.
- Ensure the power cable is securely plugged into both the router and the power outlet.
- Check the Ethernet cable connecting the modem to the router. If it is loose or damaged, replace it.
- If you are using a wired connection, try using a different Ethernet port on the router.
3. Update Router Firmware
Firmware updates fix security vulnerabilities and performance issues. To check for updates:
- Log into your router’s admin panel by typing 192.168.1.1 or 192.168.0.1 in a web browser.
- Enter your admin username and password (usually found on a sticker on the router).
- Look for the Firmware Update or Software Update section.
- If an update is available, install it and restart the router.
4. Reduce Network Congestion
Too many connected devices can slow down your connection or cause instability.
- Disconnect devices that are not in use.
- If possible, switch to a 5GHz WiFi band instead of 2.4GHz for a more stable connection.
- Limit background downloads, streaming, and large file transfers.
5. Change Router Location
Poor router placement can weaken the WiFi signal and cause internet issues.
- Place the router in a central location, away from walls and obstructions.
- Avoid placing it near microwaves, cordless phones, or metal objects that can interfere with the signal.
6. Reset Router to Factory Settings (Only If Necessary)
- Locate the reset button on the back of the router.
- Press and hold it for 10–15 seconds using a pin or paper clip.
- Wait for the router to restart and restore factory settings.
- Set up the WiFi network again and check if the issue is resolved.
Note: This will erase all custom settings, including WiFi passwords.
Also Read: How to Find or See WiFi Password on Android
2. Checking Router Lights for Clues
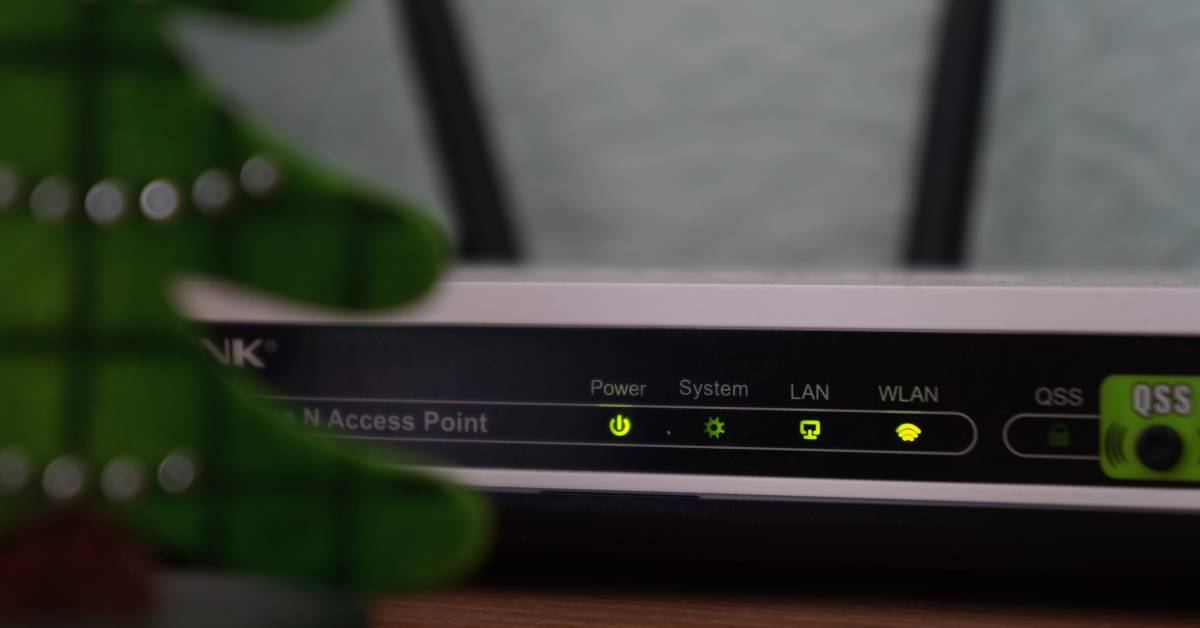
Router indicator lights provide valuable information about your internet connection. If your WiFi is connected but has no internet access, checking these lights can help you determine whether the issue is with your ISP, router, or device settings.
Most routers have at least three essential lights:
- Power Light – Shows if the router is turned on and working.
- WiFi Light – Indicates whether the WiFi signal is active.
- Internet Light – Displays the connection status to the internet.
Some routers also have lights for LAN ports, WPS, DSL, and signal strength, but the three main ones are enough for basic troubleshooting.
| Light Status | Meaning | Action |
|---|---|---|
| Power light is OFF | The router is not receiving power. | Check the power adapter and outlet. Try plugging the router into another socket. |
| WiFi light is OFF | The WiFi is turned off. | Restart the router or enable WiFi from the router settings. |
| Internet light is OFF | No internet connection from ISP. | Restart the router and check if your ISP is down. |
| Internet light is RED | ISP issue or authentication failure. | Contact your ISP for assistance. |
| Internet light is blinking continuously | The router is trying to connect to the internet. | Wait a few minutes. If it doesn’t stabilize, restart the router. |
1. The Power Light is Off
- Make sure the router is plugged into a working power outlet.
- Try using a different power adapter if available.
- If the router does not turn on, it may be faulty and needs replacement.
2. WiFi Light is Off or Blinking
- If the WiFi light is off, it means the wireless network is disabled.
- Log into the router settings using 192.168.1.1 or 192.168.0.1, and check if the WiFi is turned on.
- Restart the router and wait for the WiFi light to stabilize.
3. Internet Light is Off or Red
- If the internet light is off, the router is not receiving internet from your ISP.
- Restart both the router and modem.
- Check if the ISP is down (you can verify this by using mobile data).
- Confirm that your ISP subscription is active.
- If the internet light is red, it means a network authentication failure or an ISP issue.
- Try restarting the modem and router.
- If the problem persists, contact your ISP customer support.
If your router lights indicate a healthy connection, but you still have no internet, the issue might be with your device settings, DNS cache, or network configurations. The next step is to flush the DNS cache to clear potential network conflicts.
Also Read: How To Share WiFi Password on Apple devices without Third-Party Apps
3. Flushing DNS Cache on Windows, Mac, and Android
If your device is connected to WiFi but cannot access the internet, a corrupted DNS cache could be the cause. The DNS (Domain Name System) helps your device translate website names (like google.com) into IP addresses. When the DNS cache is outdated or corrupted, your device may struggle to load websites, even if the internet is working.
Flushing the DNS cache forces your device to request fresh network information from your ISP, fixing connection issues caused by incorrect DNS records.
When Should You Flush the DNS Cache?
- If some websites load while others don’t.
- If your device is connected to WiFi but shows “No Internet” errors.
- If you recently changed your DNS settings or ISP.
- If the internet works on other devices but not on a specific one.
Flush DNS Cache on Windows
- Open Command Prompt:
- Press Windows + R, type cmd, and press Enter.
- Run the flush command:
ipconfig /flushdns - Confirm the flush:
You should see a message: "Successfully flushed the DNS resolver cache." - Restart your computer and check if the internet is working.
How to Flush DNS Cache on macOS
- Open Terminal: Press Command (⌘) + Space, type Terminal, and hit Enter.
- Enter the appropriate command based on the macOS version:
macOS Ventura and later: sudo dscacheutil -flushcache; sudo killall -HUP mDNSRespondermacOS Big Sur, Catalina, Mojave, and High Sierra: sudo killall -HUP mDNSRespondermacOS Sierra and older: sudo dscacheutil -flushcache - Press Enter and enter your password (you won’t see it as you type).
- Restart your Mac and check if the internet is working.
How to Flush DNS Cache on Android
Unlike Windows and Mac, Android does not have a built-in command to flush the DNS cache. However, you can clear it by:
- Turning WiFi Off and On: Swipe down from the top of the screen and turn off the WiFi; wait for 10 seconds, then turn it back on.
- Clearing Browser Cache (Google Chrome Example):
- Restarting Your Device: Power off your Android device and Wait 10 seconds, then turn it back on.
This refreshes your network connection and clears the DNS cache.
Also Read: How to Fix DNS Server Not Responding on Windows & Mac OS
4. Setting up the DNS Server Properly
If your device is connected to WiFi but has no internet, the DNS server may be the issue. The Domain Name System (DNS) is responsible for converting website names like google.com into numerical IP addresses that computers understand.
If the DNS server is misconfigured, outdated, or down, your device will struggle to load websites even if the internet is working. Switching to a trusted DNS server, such as Google DNS or Cloudflare DNS, can often fix this issue.
Why Change the DNS Server?
- Your ISP’s DNS server might be down, preventing access to websites.
- Some ISP DNS servers are slow, causing slow browsing or disconnections.
- A misconfigured DNS setting can result in “WiFi connected but no internet” errors.
- Public DNS servers like Google DNS or Cloudflare DNS are often faster and more reliable.
Change DNS Server on Windows
- Open Run by pressing Windows + R, type ncpa.cpl, and press Enter.
- Right-click on WiFi and select Properties.
- Scroll down and select Internet Protocol Version 4 (TCP/IPv4).
- Click Properties.
- Select Use the following DNS server addresses.
- Enter the following values:
Preferred DNS Server: 8.8.8.8
Alternate DNS Server: 8.8.4.4 - Click OK to save the settings.
- Restart your computer and reconnect to WiFi.
How to Change DNS Server on macOS
- Click the Apple menu and select System Preferences.
- Go to Network and select your WiFi connection.
- Click Advanced and go to the DNS tab.
- Select any existing DNS servers and click the Minus (-) button to remove them.
- Click the Plus (+) button and enter:
8.8.8.8
8.8.4.4 - Click OK, then Apply to save the settings.
- Restart your Mac and reconnect to WiFi.
How to Change DNS Server on Android
- Open Settings and go to Network & Internet.
- Tap WiFi and select your connected WiFi network.
- Tap Modify Network.
- Go to Advanced options and change IP settings to Static.
- Enter:
DNS 1: 8.8.8.8
DNS 2: 8.8.4.4 - Tap Save and reconnect to WiFi.
Change DNS Server on iPhone/iPad
- Open Settings and go to WiFi.
- Tap the (i) icon next to your WiFi network.
- Tap Configure DNS and select Manual.
- Tap Add Server and enter:
8.8.8.8
8.8.4.4 - Tap Save, then disconnect and reconnect to WiFi.
5. Check if the ISP is down
If your WiFi is connected but there is no internet, the issue may not be with your router or device. Your Internet Service Provider (ISP) could be experiencing an outage, preventing access to the Internet even though the WiFi signal is active. This is one of the most common causes of sudden connectivity issues.
One way to determine if the ISP is down is by checking if the Internet works on mobile data but not on WiFi. If switching to mobile data allows websites and apps to load, the problem is likely with the ISP. Similarly, if the internet light on the router is red or off, it indicates that the router is unable to establish a connection with the ISP.
Online outage tracking services like Downdetector and Outage Report provide real-time updates about ISP failures. Searching for the ISP’s name on these platforms can confirm if other users in the area are experiencing the same issue. Many ISPs also post service updates on their official website, Twitter, or customer support pages, which can provide information on ongoing outages and estimated restoration times.
Running a speed test using websites like Fast can also help diagnose ISP-related issues. If the test does not start or shows extremely low speeds, the ISP might be having network disruptions.
If there are signs of an ISP outage, waiting is often the only solution. ISPs usually resolve network failures within a few hours, though severe issues like fiber cuts or maintenance may take longer. For immediate internet access, using a mobile hotspot from a phone can be a temporary solution.
If there is no reported ISP outage but the problem persists, contacting the ISP’s customer support can help identify whether there is a localized issue affecting the connection. In many cases, ISPs can refresh the network remotely or suggest additional troubleshooting steps.
If the ISP is working fine but the issue remains, it may be caused by conflicting apps, antivirus software, or firewalls blocking the internet connection. The next step is to check and disable any applications that could be interfering with network access.
6. Removing Conflict Apps
If your WiFi is connected but has no internet, certain applications may be interfering with network access. Antivirus software, VPNs, firewalls, and parental control apps can block or limit connections, causing browsing and app failures even when WiFi is working.
Common Applications That Can Block Internet Access
- Antivirus Software: Some security programs have web protection features that may block legitimate network activity.
- VPNs: Unstable or misconfigured VPNs can prevent devices from connecting to the internet.
- Firewalls: Strict firewall settings may block certain websites or apps from accessing the network.
- Parental Control Apps: Some apps restrict network usage based on time, content, or device settings.
How to Identify and Disable Conflict Apps
Turn Off the VPN
- If a VPN is active, disconnect it and check if the internet starts working.
- If the issue is resolved, switch to a more stable VPN or adjust settings to allow better connectivity.
Disable Antivirus Web Protection
- Open the antivirus program installed on the device.
- Look for Web Protection, Network Security, or Internet Shield settings.
- Temporarily turn off these features and check if the internet works.
Check Firewall Settings
- Go to Control Panel > Windows Defender Firewall (on Windows).
- Click Allow an app through Windows Firewall and check if the blocked application is listed.
- If the firewall is blocking the internet, temporarily disable it and test connectivity.
Disable Parental Control Restrictions
- If a parental control app is installed, open its settings and check if network restrictions are enabled.
- On routers, access the router admin panel and check for Parental Controls or Content Filtering settings.
- Disable any restrictions and try connecting again.
If the internet connection is restored after disabling one of these applications, the issue is confirmed. Adjusting the settings to allow unrestricted network access while keeping necessary security features enabled is recommended.
Also Read: The Best Parental Control Apps for Android
7. Update the Wifi-Driver
If your WiFi is connected but has no internet, an outdated or corrupted WiFi driver may be causing the issue. WiFi drivers ensure your device can communicate with the network adapter. If they are outdated or malfunctioning, your device may struggle to maintain a stable connection. Updating or reinstalling the driver can often fix this problem.
Steps to Update WiFi Drivers
- If updating or reinstalling the driver does not resolve the issue, the problem may be caused by network configuration errors. The next step is to reset network settings to restore default configurations and eliminate any misconfigurations.
- Open Device Manager on Windows by pressing Windows + R, typing devmgmt.msc, and press Enter. Locate the Network Adapters section and find the WiFi adapter. Right-click on it and select Update driver. Choose Search automatically for updated driver software, and if an update is available, install it. Restart your computer once the update is complete.
- If Windows does not find an update, download the latest WiFi driver from your laptop or network adapter manufacturer’s official website. Search for your device model, download the correct driver, install it, and restart your computer.
- If updating does not work, uninstall the driver. In Device Manager, right-click the WiFi adapter and select Uninstall device. Restart your computer, and Windows will attempt to reinstall the driver automatically. If the system does not reinstall it, manually install the downloaded driver.
- On macOS, WiFi drivers are updated automatically through system updates. Click the Apple menu, select System Preferences, and go to Software Update. If an update is available, install it and restart your Mac. This ensures your system is running the latest network drivers and patches.
Also Read: Best Ethernet Cable for High-Speed Internet Bandwidth
8. Resetting Network Settings
If your WiFi is connected but there is no internet, resetting network settings can resolve hidden misconfigurations. Over time, changes in system settings, failed updates, or conflicting software can interfere with your device’s ability to connect properly. A network reset restores default settings and removes any incorrect configurations that might be blocking internet access.
Steps to Reset Network Settings
- On Windows, open Settings, go to Network & Internet and select Status. Scroll down and click on Network reset, then press Reset now. This will remove and reinstall all network adapters. Restart your computer after the Reset is complete.
- On macOS, click the Apple menu, select System Preferences, and go to Network. Choose your WiFi connection, click Advanced, and select Remove (-). After removing the connection, restart your Mac, reconnect to the WiFi, and check if the issue is resolved.
- On Android, go to Settings, tap System, select Reset options, and choose Reset WiFi, mobile & Bluetooth. Confirm the Reset and restart your device.
- On iPhone or iPad, open Settings, go to General, select Transfer or Reset iPhone, and tap Reset Network Settings. Your device will restart, and you will need to reconnect to WiFi manually.
If resetting the network settings does not fix the issue, the problem might be caused by router-related restrictions or incorrect IP assignments. The next step is to check for MAC address filtering issues that could be blocking your connection.
Also Read: Is NordVPN Any Good? This Review is All You Need
9. Checking for MAC Address Filtering Issues
If your WiFi is connected but there is no internet, your router may be blocking your device due to MAC address filtering. MAC (Media Access Control) addresses are unique identifiers assigned to every network device. Some routers have MAC address filtering enabled, which can block specific devices from accessing the internet.
Steps to Check and Disable MAC Address Filtering
- Log into your router’s admin panel by opening a web browser and typing 192.168.1.1 or 192.168.0.1. Enter your router’s username and password (this information is usually on a sticker on the router).
- Locate the MAC Filtering or Access Control section in the router settings. If MAC filtering is enabled, check the list of blocked or allowed devices.
- If your device’s MAC address appears on the blocked list, remove it and save the changes. If your router is set to “Whitelist mode”, which allows only certain MAC addresses to connect, add your device’s MAC address to the list of allowed devices.
- To find your MAC address on Windows, open Command Prompt, type ipconfig /all, and look for the Physical Address under the WiFi adapter section. On macOS, go to System Preferences > Network > Advanced, and check the WiFi MAC address. On Android and iOS, go to Settings > WiFi > Tap on connected network to find the MAC address.
- After making the necessary changes, restart your router and device to apply the settings. Reconnect to WiFi and check if the internet is working.
If disabling MAC address filtering does not resolve the issue, the problem might be caused by incorrect IP configurations. The next step is to assign a static IP address to stabilize the connection.
Also Read: Turbo VPN Review: Legit, Safe & Trustworthy?
10. Assigning a Static IP Address
If your WiFi is connected but has no internet, your device might not be getting a proper IP address from the router. By default, most routers assign dynamic IP addresses through DHCP (Dynamic Host Configuration Protocol). However, sometimes DHCP fails, causing internet connectivity issues. Assigning a static IP address can resolve this problem by ensuring that your device always has a fixed network address.
Steps to Assign a Static IP Address
If assigning a static IP address does not fix the issue, the problem may be related to router settings or firmware issues. The next step is to restart or reset the router to restore connectivity.
- On Windows, open Settings, go to Network & Internet and click on WiFi. Select your connected network, scroll down to IP settings, and click Edit. Change the setting from Automatic (DHCP) to Manual and enable IPv4.
Enter the following values:IP Address: 192.168.1.150Subnet Mask: 255.255.255.0Default Gateway: 192.168.1.1Preferred DNS Server: 8.8.8.8Alternate DNS Server: 8.8.4.4 - On macOS, go to System Preferences > Network, select your WiFi network, and click Advanced. Navigate to the TCP/IP tab, and change Configure IPv4 from Using DHCP to Manually. Enter the same values as above and click Apply. Disconnect and reconnect to WiFi.
- On Android, open Settings, go to WiFi and tap on your connected network. Select IP settings and change it from DHCP to Static. Enter the same IP and DNS values, save the changes, and reconnect.
- On iPhone or iPad, open Settings, go to WiFi, tap on the (i) icon next to your network, and select Configure IP. Choose Manual, enter the static IP details, and save the changes. Disconnect and reconnect to WiFi.
Also Read: ExpressVPN Review | Why is this the Best VPN Service?
11. Restarting or Resetting the Router
If your WiFi is connected but has no internet, restarting or resetting the router can resolve many network issues. Routers can experience temporary glitches, firmware crashes, or incorrect configurations, leading to connectivity problems. Restarting the router refreshes the connection while resetting it and restores it to factory settings if needed.
Steps to Restart or Reset the Router
- To restart the router, turn it off using the power button or unplug it from the power source. Wait 30 seconds to 1 minute before turning it back on. This allows the device to clear its temporary memory and reconnect to the network properly.
- Check the router indicator lights after restarting. The power light should be solid, the WiFi light should be stable, and the internet light should be blinking or solid (depending on your ISP). If the internet light remains red or off, contact your ISP.
- If restarting does not fix the issue, a router reset may be necessary. Locate the reset button on the back of the router. Press and hold it for 10–15 seconds using a pin or paper clip until the router restarts. This will restore factory settings and remove any custom configurations, including WiFi passwords.
- After resetting, reconnect the router to the modem and configure the network settings again. Log into the router’s admin panel using 192.168.1.1 or 192.168.0.1 and follow the setup instructions.
If resetting the router does not restore internet access, the issue may be with external network problems or ISP restrictions.
Also Read: Anker 737 Power Bank Review | The Powerful Battery Pack?
12. Contacting Your ISP as a Last Resort
If you have tried all the troubleshooting steps and your WiFi is still connected but has no internet, the issue may be on your ISP’s end. Problems such as network outages, service maintenance, or account issues can disrupt your internet connection, even if your router and device settings are correct.
- Check if your internet service is active by logging into your ISP’s account portal. Sometimes, unpaid bills or expired subscriptions can result in a temporary disconnection.
- Call your ISP’s customer support number and explain the issue. Provide details such as when the problem started, which troubleshooting steps you have already tried, and whether other devices are affected.
- Ask if there are any network outages or maintenance updates in your area. ISPs often conduct system upgrades that may cause temporary disconnections.
- Request that your ISP run a remote network diagnostic on your connection. Many ISPs can detect problems from their end and refresh the network to restore service.
- If the issue persists, ask if a technician visit is necessary. In some cases, faulty ISP equipment, like a damaged modem or fiber line issues, may require professional inspection and replacement.
If your ISP is unable to provide a solution and frequent disconnections continue, consider switching to a more reliable provider if alternative ISPs are available in your area.
Also Read: Best AV Receivers For Music and Home Entertainment with Dolby Atmos
Frequently Asked Questions [FAQs]
This happens when your device successfully connects to the router, but the router itself is not getting an internet connection. It could be due to an ISP outage, misconfigured network settings, or a problem with the router or modem.
Yes, routers can fail to transmit internet due to outdated firmware, overheating, or incorrect configurations. Restarting the router usually helps, but if the problem persists, checking cables, updating firmware, or resetting the router may be necessary.
Resetting network settings erases saved WiFi passwords, VPN configurations, and custom DNS settings, restoring them to default. It does not affect personal files or installed apps, but you will need to reconnect to WiFi manually.
Check your ISP’s website, outage tracking platforms, or social media for service updates. Switching to mobile data and testing internet access can also confirm if the issue is on their end rather than your network.
Yes, security software can block network connections by mistakenly flagging them as threats. Temporarily disabling antivirus protection or adjusting firewall settings can help identify if they are causing the issue.
Public DNS services like Google DNS or Cloudflare DNS are often faster and more stable than ISP-assigned DNS servers. They can help bypass ISP restrictions, improve browsing speed, and reduce downtime caused by DNS failures.
A static IP prevents frequent address changes and can resolve connectivity issues in certain cases. However, for most home users, DHCP (automatic IP assignment) is easier to manage and works well for general internet use.
Before You Leave
Get Our Prime Content Delivered to your Inbox for Free!! Join the Ever-Growing Community… Right Now.
Give this article a quick share,
Wrapping up: Your Internet is Now Connected
A WiFi connection without internet can be frustrating, but in most cases, the issue can be resolved with a few troubleshooting steps. Restarting your router, checking for ISP outages, flushing the DNS cache, updating WiFi drivers, and resetting network settings often fix the problem. If none of these solutions work, checking for MAC address filtering, assigning a static IP, or even contacting your ISP may be necessary.
For most users, a simple router restart or DNS flush solves the issue quickly. However, if the problem persists across multiple devices, it’s likely an external issue that requires ISP intervention. Using public DNS servers, keeping your WiFi drivers updated, and avoiding interference from security apps can help prevent future connectivity problems.
If your internet frequently disconnects or remains unreliable despite troubleshooting, consider upgrading your router or switching to a more stable ISP. A WiFi range extender can also help eliminate dead zones in your home and improve connectivity.
If you like what you read, give us a quick share on your social media platform and give us all the love and support. You can also connect with us on our Telegram Channel, Facebook Page, Reddit Community, and X to never miss out on tech updates.