Renaming a file in Windows is the easiest task, but if you are a beginner, renaming files and directories in Linux may look a little tough. Tasks like changing file names are the most basic, and if you are getting started on Linux, here is the guide on how to rename files and folders.
Renaming files and directories may feel complicated if you have little or no knowledge about the bash commands. There are several command-based options such as using the “mv” command, “rename” command, and tools like pyRenamer and Metamorphose2. However, if you have used Linux earlier for operations like zipping or unzipping a folder or other basic tasks, you might have noticed that if you miss a command or miswrite it, the command will not be executed. This is why it is important to use the right command and syntax for bash commands.
To help you rename files and folders in Linux, here are 4 effective ways with a step-by-step process.
Also read: How to Install WSL 2 on Windows 10? | Windows Subsystem for Linux
4 Ways to Rename Files and Directories in Linux
In this tutorial, we will first learn to rename files in Linux using the bash or shell commands. To do this, we will use the “mv” command first and then use the “rename” command as an alternative option. In the later section of this article, we will also learn the GUI options to rename a file or directory in Linux operating system.
To use the bash commands effectively, it is better to be in the superuser mode or have root access. The reason for this is to effectively rename the files on Linux despite its location and access/permissions.
Also, it is important to note; if you are using Linux in superuser or root mode, there is a good chance of you deleting the important system files and directories. Ensure you are aware of the commands and using the correct location and filename.
1. Renaming a file in Linux using the “mv” command
The “mv” command is a shorthand for the move command, which signifies moving files and directories. Using the “mv” command, you can change a single file or multiple files from a source to a destination.
Though the “mv” command is used for moving files and directories, it can also rename files. There are a set of file operations you can use with the “mv” command on your Linux OS, and we will use it to change the filename or rename it.
The – – help command, when used with “mv”, will list out all the options that you can use with the mv command. You can use these commands for various operations alongside renaming the files and folders.
To know the list of options available with the “mv” command, type – – help and the list of options will be listed.
mv --helpThe general syntax of using the “mv” command is,
Syntax: mv [options] source destination To rename a file with the “mv” command, specify the file name to be renamed and the new file name. Here you need to be cautious as some Linux versions interchange the old name and new filename position. So, if you are using a Linux version such as Kali Linux, you might notice the new filename comes first and then the old filename.
Also read: How to Start, Stop and Restart Apache Ubuntu?
Example
If the basics are unclear to you, here is a quick example that illustrates the rename operation in Linux using the “mv” command. In this example, we are renaming the “old_file_name” with a “new_file_name” using the “mv” command in action. It is important to locate the directory and perform the operations in the same directory to execute this command successfully.
If you are not in the same directory where the file is located, you must first use the “cd” (change directory) command. Once the directory is changed, you can now use the “mv” command to rename the files and folders.
Here is the example to change/rename a file or directory name in Linux using the “mv” command,
mv old_file_name new_file_namemv [options] oldlife.pdf newlife.pdfNote: To rename a file in Linux, you need to be in the directory you want to rename a file.
However, it is not important to have root access or superuser access to rename files using the “mv” command. In certain cases, when you are renaming files, folders, and directories that are system files, those times you will need to have root or superuser access.
Using the above command, you can change the file name “old_file_name” to “new_file_name” using the terminal.
Also read: How to Delete Files and Directories in Linux – Simple Guide
2. How to Rename a File or Directory in Linux using the “rename” Command
The “rename” command is more advanced than the “mv” command to rename files and directories in Linux. This command requires you to have the basic knowledge of regular expressions; there are two versions of the “rename” command.
If you want to rename multiple files in Linux, you can use the “rename” command, which is the best fit. The rename command is not pre-installed on the Linux operating system. First, you will have to install the “rename” command on your Linux based operating system and then use it for renaming files, folders, and directories.
Here are the commands to install the “rename” command on your Linux and Ubuntu operating systems.
Install “rename” Command on Ubuntu and Debian System
Similar to the installation of basic commands and tools on Linux based operating systems, rename is also installed using apt. The apt command is used for various purposes such as installing, updating, removing, and managing Debian packages. Install on Linux is helpful if you are in a superuser or root mode to make the installation available to all the users and install it seamlessly. For this reason, we use “sudo” to indicate the kernel that we are installing the new tool in superuser mode.
To install the rename command, type the following code:
sudo apt install renameOnce you are done with the installation of the “rename” command, it should now be easy for you to rename the files and folders or directories in Linux based operating systems. Likewise to other bash commands, there are various options available with the “rename” command. One can use – – help alongside the “rename” command to view all the options that you can use with the “rename” command.
Also read: Things to do after installing Kali Linux – Most Important.
Rename a Single File or Directory in Linux using the “rename” Command.
Using the “rename” command, you can either rename a single file or directory or rename multiple files together in Linux. Renaming a single file or directory is easy, and if you wish to do so, here are the steps to rename a file or directory in Linux using the “rename” command.
To rename a file or directory using the “rename” command, we have the following syntax –
rename [options] perlexpr filesIt is simple to rename files using the “rename” command in Linux. The above command is also to rename a single file or directory in Linux. However, there are instances when you want to rename files in bulk; in such situations, you cannot use the “mv” command or the “rename” command without options to rename files. If you wish to rename the files in bulk, you can use the “rename” command and other options. But how to do so?
Rename Multiple Files and Directories in Bulk
Suppose you have downloaded a zip folder from your co-worker with all the randomly assigned filenames. In this situation, renaming individual files should be a time-consuming event, which could be tackled with the “rename” command. Using the rename command with options should allow you to rename files in bulk on your Linux operating system.
You can rename multiple files using the “rename” command. To rename multiple files in Linux using the rename command, use the following syntax,
rename 's/old/new/' filesLikewise to other bash commands, the “rename” command can also be used with several other options. But do you know how to know the available options with the “rename” command? Yes, using the “help” command. We will use the – – help command and the “rename” command to add more operations while renaming files in bulk.
There are multiple options available with the “rename” command; you can use the – – help to list all the options.
Once you get all the available options, you can use the “rename” command while renaming files in bulk on Linux. A generalised example for this can be given as,
rename [options] 's/old/new/' filesAlso read: How to use Clubhouse on Linux?
Example
Let us understand the “Linux rename command” using a simple example where we rename multiple files together. This is one of the easiest examples and should help you understand how to rename multiple files on Linux/Ubuntu in bulk.
Here is the example,
In the following command, we rename all the files with the “.pl” extension to the “.perl” format. For this command to work properly, ensure you are in the correct directory and have files with “.pl” extensions.
Also, it is important to note: If you are in superuser/root mode in one of the system directories and use rename command, you might make your Linux work no more. Ensure you are in the correct directory and if you are not, use the “cd /path” command to change the working directory.
rename 's/pl/perl/' *.plThe above command renames all the files with the .pl extension to the .perl extension.
If you are unsure of using the command based terminals for renaming files and directories in Linux or Ubuntu systems, you can also use GUI based tools.
Also Read: How to check the version of Linux? Check Linux Version
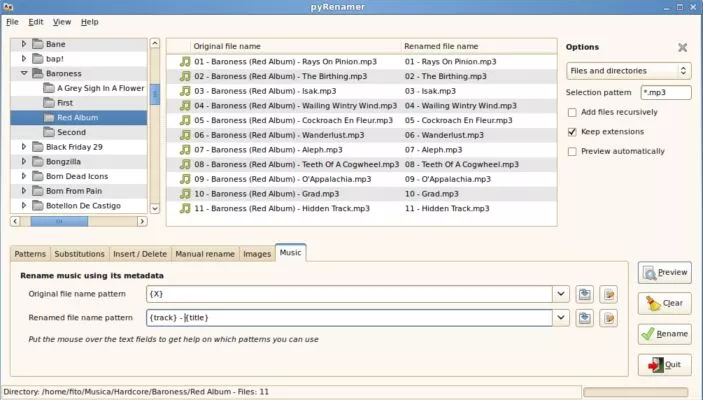
3. pyRenamer – Best Desktop Client to Rename Files in Linux
Renaming files in Linux is now super-simplified with the pyRenamer Linux client. If you don’t want to use the terminal or are imperfect with regular expressions to rename a file, you can use this GUI option. With the help of pyRenamer, you can rename multiple files in a batch and also rename individual files on Linux, Ubuntu, CentOs, ArchLinux, and almost any other Linux based operating system.
pyRenamer serves as one of the best Linux clients to rename files and directories in Linux. Most of the time, we incorrectly use the bash commands as there are several commands to remember, and if you are just a beginner to Linux or Ubuntu-based systems, this is the perfect choice for renaming files.
How to Download pyRenamer on Linux
Likewise to several other tools on Linux, pyRenamer can be downloaded from the Github repository and then cloned on your Linux based operating system. However, there are a few things to note before cloning pyRenamer on Linux; the first and foremost is to get the latest python version on your Linux because pyRenamer is a python tool. Secondly, you need to install the following tools,
- pygtk
- gconf
- python-hachoir-metadata (For renaming music files)
- python-eyed3 (For renaming other MP3 files)
Once you have cloned all the above tools on your Linux or Ubuntu-based system, the last step is to install pyRenamer. Similar to all the other Debian packages, pyRenamer uses apt and sudo permissions. Alternatively, you can also clone the pyRenamer using Github.
Here is the syntax to download and install pyRenamer,
sudo apt-get install pyrenamerAs mentioned, you can also clone pyRenamer using the Github repository,
You can clone the pyRenamer from this pyRenamer Github Repository.
It is also easy to use pyRenamer; here are some of the commands you may find helpful.
- Launch pyRenamer using “pyRenamer” command.
- pyrenamer path: Used to set the new active working directory (Replace path with the directory location).
- pyrenamer – – help: Used to view all the available options with the pyRenamer command.
The pyRenamer client is one of the simplest and easiest tools to rename files and folders or directories in bulk on Linux and Ubuntu-based systems. You can also find one of the alternative software, Metamorphose2, to rename files in bulk.
Also Read: Best Ethernet Cable for High-Speed Internet Bandwidth.
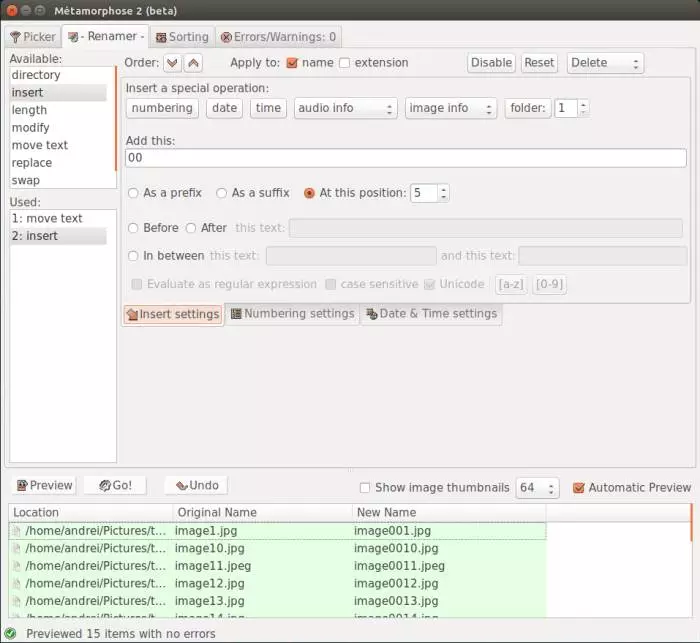
4. Metamorphose2 – Renaming files and Directories in Linux
Metamorphose2 is one of the best alternatives to pyRenamer for renaming files in bulk without using complicated bash commands. The tool comes in handy when there are multiples files you would like to rename and when you wish to rename them in order.
The requirements to install Metamorphose 2 tool on your Ubuntu or Linux based systems are,
- Python 2.6 or 2.7 (not compatible with 3.x).
- wxPython 2.8 (preferred) or 3.0
- Python Imaging Library (PIL) 1.1.6 or greater or Pillow 2.3.0 or greater
Now that you have all the requirements on your Linux, you can install the Metamorphose2 tool using the following clone command:
git clone https://github.com/metamorphose/metamorphose2.gitMetamorphose2 also has several submodules under it; the developer also encourages the users to update the submodules. To update the submodules, use the following command in the same working directory:
git submodule update --initSome of the operations you can do with the Metamorphose2 tool to rename files in bulk on Linux are,
- – – help: Show help screen and exit.
- – – timer: Show time taken to complete operations.
- – – debug: Show debugging information.
- – – path: Specify a directory to load.
- – – config: Specify a configuration file to load.
You can find more information on Metamorphose2 on the official Github repository.
Known Issues
Though Metamorphose2 is one of the best software to rename Linux files in bulk, the commits have some strange known issues.
- While renaming files in bulk or a batch, it takes longer to process the request.
- Program locks up when ‘walking’ a large number of files/folders.
- Unreadable picker items under Linux (possibly other GTK).
- Thumbnails fail.
Also Read: Can Private Browsing be Traced on iPhone – A Brutal Truth.
Frequently Asked Questions [FAQs]
Yes, Linux offers GUI-based tools like pyRenamer and Metamorphose2 that let you rename files without using terminal commands. These tools provide batch renaming options, making them useful for renaming multiple files at once.
The mv command is primarily used for moving files but can also rename them, making it a simple, built-in option. The rename command is more powerful and allows bulk renaming using patterns and regular expressions, but it requires installation on some Linux distributions.
For most user files, root access is not needed. However, if you are renaming system files or files in protected directories, you may need sudo permissions to execute the command successfully.
Yes, using the rename command or GUI-based tools like pyRenamer, you can rename multiple files simultaneously. The mv command does not support bulk renaming unless used in a script.
This usually happens when you try renaming a file in a restricted directory. Running the command with sudo or changing file permissions using chmod may resolve the issue.
If you renamed a file using mv, you can rename it back manually. However, if you used the rename command in bulk without testing, there is no direct undo option unless you restore from a backup.
Always double-check file paths before renaming system files. Using mv with absolute paths and running ls before executing the command helps prevent accidental renaming of critical system components.
Before You Leave
Get Our Prime Content Delivered to your Inbox for Free!! Join the Ever-Growing Community… Right Now.
Give this article a quick share,
Conclusion | Rename Files and Directories in Linux
These are the 4 best ways to rename files in Linux and Linux based operating systems. The most preferred option to rename files and directories in Linux is to use the “mv” command or the “rename” command. These are two of the most powerful commands that are built-in Linux OS. Alternatively, if you wish to rename files in directories in bulk, you can use GUI based tools such as pyRenamer and Metamorphose2. These are the best options to rename multiple files at once in Linux or Ubuntu. You can also read more Linux based articles.
Got a question or trouble on how to rename files and directories in Linux, both individual and bulk? Drop them in the comments, and we will get back to you soon.
If you like what you read, give us a quick share on your social media platform and give us all the love and support. You can also connect with us on our Telegram Channel, Facebook Page, Reddit Community, and X to never miss out on tech updates.